

Face It! Apple’s Vision Framework Makes Image Processing Simple

Apple’s Vision Framework is a powerful tool for computer vision that allows developers to integrate broad capabilities of computer vision into their apps, even with the use of custom machine learning models. It works on devices running iOS 11.0+ and offers real-time, on-device processing without requiring constant internet access, LiDAR sensors, or the latest high-performance chips.
The key features we will explore:
- Face Detection
- Face Landmark Recognition
- Text Recognition
- Hand Pose Detection
It’s worth noting that Vision is also capable of human body pose estimation through its built-in requests, making it suitable for many general-purpose motion and interaction scenarios on Apple platforms. However, when applications require more granular control over skeletal models, cross-platform consistency, or advanced tuning for dynamic movement analysis, dedicated pose estimation frameworks such as MediaPipe tend to offer greater flexibility and depth.
Getting Started with Vision
Apple’s Vision Framework provides powerful tools for computer vision tasks, leveraging advanced built-in machine learning models. These models automatically process images or video streams in real-time, performing tasks such as detecting faces, text, or other visual elements. This allows developers to integrate sophisticated functionalities into their apps without the need to develop custom algorithms from scratch.
The entire process in Vision is built on the concept of requests. Each task is encapsulated as a request (VNRequest), and specific requests, such as face detection or landmark recognition, inherit from this base class. This structure provides flexibility, allowing you to create various requests based on the task at hand. After creating a request, you configure it with the necessary parameters, pass an image or video stream for processing, and receive the results asynchronously.
This inheritance structure makes Vision highly modular and easy.
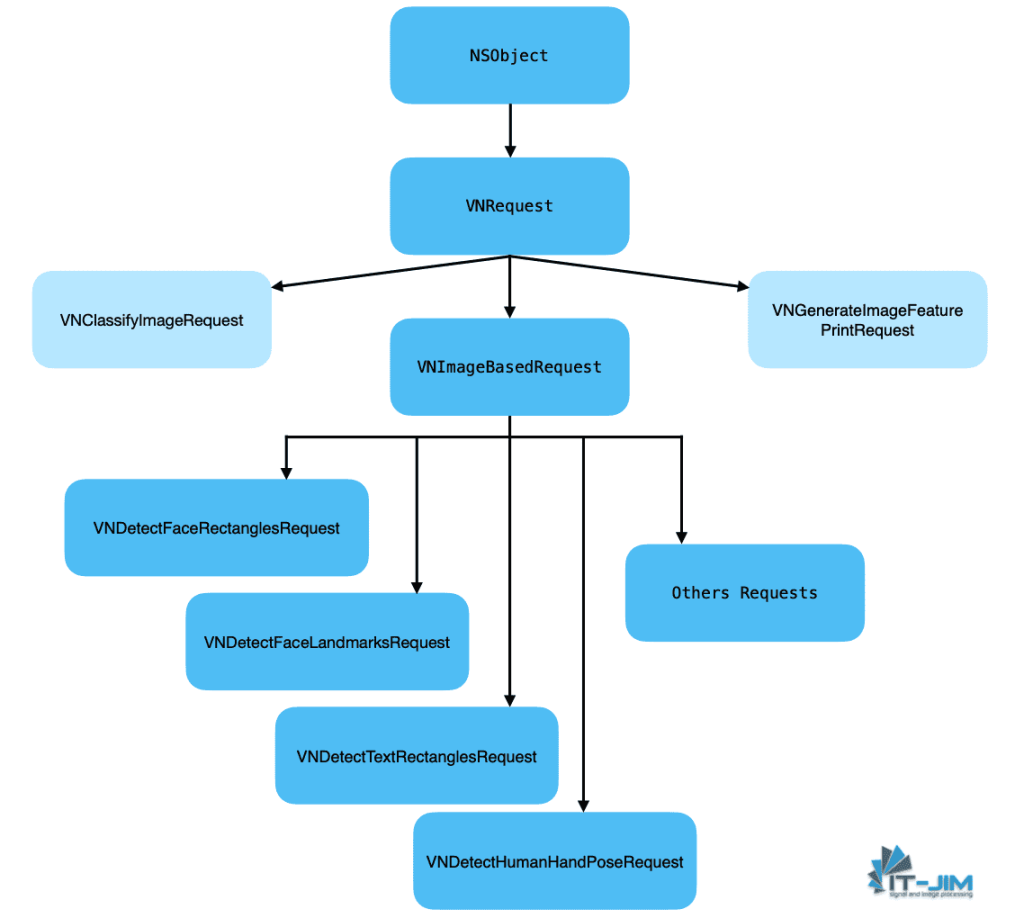
An essential part of working with Vision is the VNImageRequestHandler, which is responsible for handling images and frames passed to the Vision Framework. This class allows you to process both still images and real-time video feeds, managing the lifecycle of requests from input to output. The handler’s role is crucial because it simplifies the flow of processing multiple requests on the same image or frame, abstracting the complexity of the underlying machine learning models.
This structure is critical because it enables you to run multiple requests in sequence or in parallel, ensuring that your app remains responsive while the Vision Framework performs potentially resource-intensive tasks in the background.
Additionally, Vision Framework supports integration with custom machine learning models through CoreML, allowing you to extend its capabilities beyond the built-in functionality. This means you can perform more specialized tasks by training your own models and integrating them with Vision, creating highly customized solutions for your specific use cases.
How does it work?
At the core of Vision Framework’s functionality lies a carefully designed process that allows for seamless integration of computer vision tasks within your app. When working with images or video streams, Vision operates through a structured lifecycle: from capturing or loading an image, processing it with built-in machine learning models, and finally visualizing or using the results. This process ensures efficiency and flexibility in handling a variety of requests.

While the process may seem complex, it abstracts much of the complexity behind machine learning and image processing, allowing developers to focus on implementing the functionality rather than building the algorithms from scratch. By following this clear structure, Vision ensures that even resource-intensive tasks, such as real-time image recognition, can be handled smoothly and asynchronously, making it a robust and flexible tool for creating advanced computer vision applications.
Setup Structure
Now that we have a clear understanding of how Vision Framework operates, as shown in the earlier lifecycle diagram, we will structure our app around three key services to manage different aspects of the vision processing:
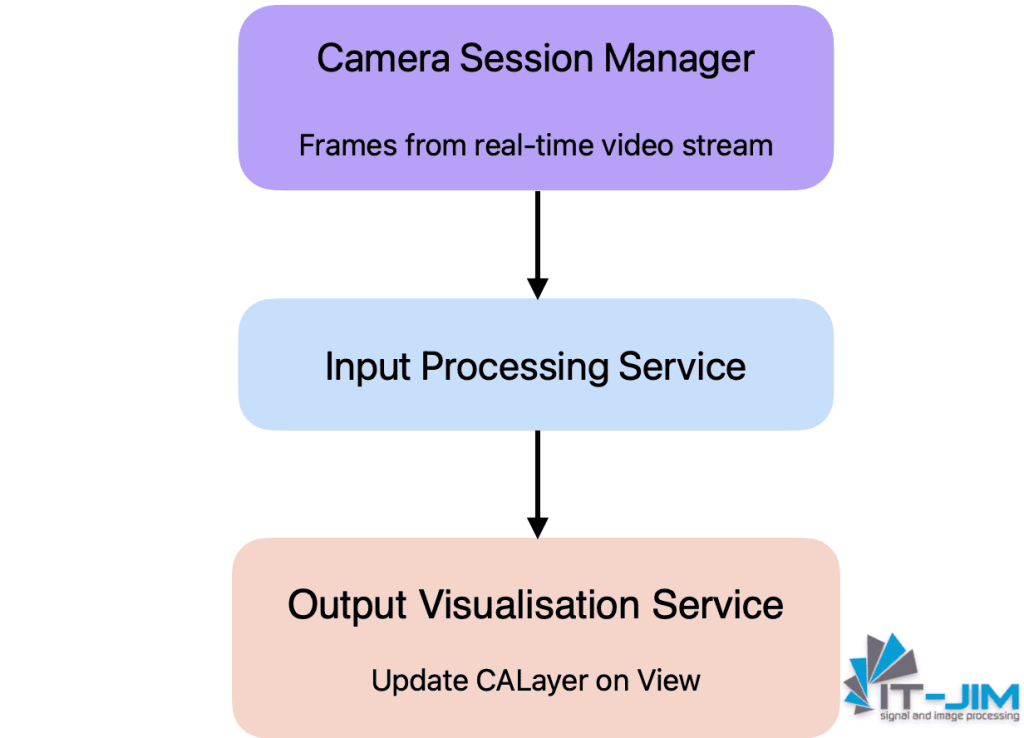
- Camera Session Manager — responsible for configuring the camera and providing a CALayer to display the camera feed.
- Input Processing Service — responsible for handling Vision requests and processing the visual data to provide results.
- Output Visualisation Service — responsible for visualizing the processed results and updating the UI.
By separating these concerns into distinct services, we ensure that each component of the Vision workflow is isolated, making the app easier to maintain and expand in the future.
Camera Session Manager
Let’s start by setting up the Camera Control Manager. This service will handle the camera configuration, enabling real-time video capture from the device’s camera. It will also provide the necessary CALayer for rendering the camera feed, which will later be used by the Vision Processing Service for analysis.
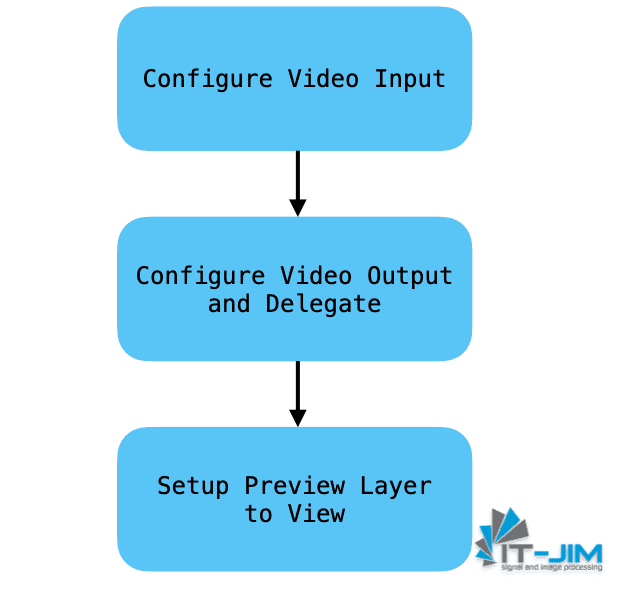
In the code below, we configure the camera to capture video streams in real-time. This configuration ensures that the Vision Framework receives a live feed from the device’s camera, which will be passed to the Vision Processing Service for further analysis.
protocol CameraSessionManager: AnyObject {
    // MARK: - Publisher
    var eventPublisher: AnyPublisher<CVPixelBuffer, Never> { get }

    // MARK: - Properties
    var previewLayer: AVCaptureVideoPreviewLayer! { get }

    // MARK: - Funcs
    func startSession()
    func pauseSession()
    func toggleCameraMode()
}
After implementing our protocol, we will create a CameraSessionManagerImpl – service class – an object that will allow us to work with the camera control and receive a video stream.
final class CameraSessionManagerImpl: NSObject, CameraSessionManager {
    // MARK: - Publishers
    private(set) lazy var eventPublisher = eventSubject.eraseToAnyPublisher()
    private let eventSubject = PassthroughSubject<CVPixelBuffer, Never>()

    // MARK: - Properties
    var previewLayer: AVCaptureVideoPreviewLayer!
    private let session = AVCaptureSession()
    private let cameraQueue = DispatchQueue(label: "camera-control-queue", qos: .userInitiated)
    private var isUsingFrontCamera = true

    // MARK: - Init
    override init() {
        super.init()
        cameraQueue.async {
            self.setupCaptureSession()
        }
    }

    // MARK: - Control
    func startSession() { … }

    func pauseSession() { … }

    func toggleCameraMode() { … }
We will implement all further functionality through extensions to separate functional blocks and improve visibility. Moreover, it has a very good impact on dispatching.
// MARK: - Private
private extension CameraSessionManagerImpl {
    func setupCaptureSession() {
        session.beginConfiguration()

        let videoInputConfigured = try? configureVideoInput()

        guard videoInputConfigured != nil else {
            session.commitConfiguration()
            return
        }

        let videoOutput = AVCaptureVideoDataOutput()
        videoOutput.setSampleBufferDelegate(self, queue: cameraQueue)
        if session.canAddOutput(videoOutput) {
            session.addOutput(videoOutput)
        }

        session.commitConfiguration()

        self.previewLayer = AVCaptureVideoPreviewLayer(session: self.session)
        self.previewLayer.videoGravity = .resizeAspectFill
    }

    func configureVideoInput() throws {
        guard let videoDevice = AVCaptureDevice.default(
            .builtInWideAngleCamera,
            for: .video,
            position: isUsingFrontCamera ? .front : .back
        ) else {
            throw CameraError.failedCameraDevice
        }

        do {
            let videoInput = try AVCaptureDeviceInput(device: videoDevice)

            if session.canAddInput(videoInput) {
                session.addInput(videoInput)
            } else {
                throw CameraError.failedVideoInput
            }
        } catch {
            throw CameraError.failedVideoInput
        }
    }
}
Once the session is configured, it can output video frames in various formats that can be further processed. In our case, we opted for a real-time video stream, which can be accessed using the AVCaptureVideoDataOutputSampleBufferDelegate.
This delegate provides CMSampleBuffer objects, which represent individual frames captured from the camera at a specific frame rate (FPS). These frames are then fed into the Vision Framework for further processing and analysis, making real-time visual data processing possible
The session can operate on both rare camera modules and the front-facing camera, but when using the front camera, it’s important to keep in mind the orientation attribute, as the video stream from the front camera is mirrored.
// MARK: - AVCaptureVideoDataOutputSampleBufferDelegate
extension CameraSessionManagerImpl: AVCaptureVideoDataOutputSampleBufferDelegate {
    func captureOutput(
        _ output: AVCaptureOutput,
        didOutput sampleBuffer: CMSampleBuffer,
        from connection: AVCaptureConnection
    ) {
        guard let pixelBuffer = CMSampleBufferGetImageBuffer(sampleBuffer) else {
            return
        }

        self.eventSubject.send(pixelBuffer)
    }
}
Camera Session Manager is ready; we now receive each frame from our selected module after the session starts, and we can move on to the next step: creating and integrating the Input Processing Service to start using the powerful capabilities of Vision computer vision for our needs.
Input Processing Service
This service is responsible for handling Vision requests and processing visual data in real-time. It acts as the middle layer between the camera feed and the final visual output by performing operations such as face detection, text recognition, and hand tracking, depending on the specific request.
The Input Processing Service operates by receiving frames from the camera and then applying the necessary Vision request based on the selected functionality. Each request is executed on a separate queue to ensure efficient handling of the data without impacting the user interface.
The service also makes use of VNImageRequestHandler to process images or video frames, and it handles the results asynchronously, ensuring smooth performance even with complex tasks.
protocol InputProcessingService: AnyObject {
    // MARK: - Publishers
    var eventPublisher: AnyPublisher<[VNObservation], Never> { get }

    // MARK: - Funcs
    func toggleCameraMode()
    func setupRequest(for type: VNImageBasedRequest.Type)
    func processImage(_ pixelBuffer: CVPixelBuffer)
}
The InputProcessingServiceImpl class is responsible for executing the Vision requests.
final class InputProcessingServiceImpl: InputProcessingService {
    // MARK: - Publishers
    private(set) lazy var eventPublisher = eventSubject.eraseToAnyPublisher()
    private let eventSubject = PassthroughSubject<[VNObservation], Never>()

    // MARK: - Properties
    private let visionQueue = DispatchQueue(label: "vision-processing-queue", qos: .userInitiated)
    private var visionRequests = [VNRequest]()
    private var isUsingFrontCamera: Bool = true

    // MARK: - Setup
    func setupRequest(for type: VNImageBasedRequest.Type) { … }

    // MARK: - Process
    func processImage(_ pixelBuffer: CVPixelBuffer) {
        visionQueue.async {
            let requestHandler = VNImageRequestHandler(
                cvPixelBuffer: pixelBuffer,
                orientation: self.isUsingFrontCamera ? .leftMirrored : .right,
                options: [:]
            )

            do {
                try requestHandler.perform(self.visionRequests)
            } catch {
                self.logger.log(.error(.failedToProcessImage))
            }
        }
    }

    // MARK: - Toggle Camera
    func toggleCameraMode() { … }
}
Each request, once processed, will send its results through the eventPublisher, which is observed by other components in the app, like the Output Visualization Service
With the Input Processing Service now fully operational, we can capture frames from the camera and process them through Vision Framework, using different types of requests depending on the task. Next, we will move on to integrating the Output Visualization Service, which will visualize these results in real-time.
Output Visualization Service
The Output Visualization Service is responsible for rendering the results of the Vision Framework’s analysis onto the app’s user interface. This service takes in the visual observations provided by the Input Processing Service, such as face landmarks, text regions, or hand poses, and overlays them on the video feed or image using a CALayer.
This service ensures that all UI updates occur on the main thread to avoid rendering issues and makes use of CAShapeLayer for drawing different visual elements such as facial features, recognized text bounding boxes, or hand poses.
protocol OutputVisualisationService: AnyObject {
    // MARK: - Properties
    var overlayLayer: CALayer { get }

    // MARK: - Funcs
    func setup(layer: CALayer)
    func visualize(_ results: [VNObservation])
}

final class OutputVisualisationServiceImpl: OutputVisualisationService {
    // MARK: - Properties
    var overlayLayer = CALayer()

    // MARK: - Setup
    func setup(layer: CALayer) {
        overlayLayer.frame = layer.bounds
        overlayLayer.sublayers?.removeAll()
    }

    // MARK: - Visualization
    func visualize(_ results: [VNObservation]) {
        /// Ensure UI updates are made on the main thread.
        DispatchQueue.main.async {
            self.overlayLayer.sublayers?.removeAll(where: { $0 is CAShapeLayer })
        }

        guard let firstResult = results.first else { return }

        switch firstResult { … }
    }
}
By isolating visualization logic into this service, we maintain clean separation of concerns, allowing for easy control to the UI while processing real-time video streams.
Face Detection and Face Landmarks
Vision Framework provides the ability to detect faces in images and video streams. It can recognize key facial features, enabling the creation of interactive features in apps, ranging from AR filters to simple face recognition systems for authentication.
Face and key point tracking works effectively even in low-light conditions, from different angles, or even from the side. Once the request results are received, you can customize the appearance as desired, for example, as shown below.

To work with face detection, it’s enough to create a corresponding request object VNDetectFaceRectanglesRequest and a function to process the results and visualisation:
// MARK: - Face Detection Request
extension InputProcessingServiceImpl {
    func setupFaceDetectionRequest() {
        let request = VNDetectFaceRectanglesRequest { [weak self] (request, error) in
            guard
                let results = request.results as? [VNFaceObservation],
                error == nil
            else {
                return
            }
            self?.eventSubject.send(results)
        }

        visionRequests = [request]
        logger.log(.info(.visionFaceDetectionRequestSetup))
    }
}
// MARK: - Face Detection Drawing
extension OutputVisualisationServiceImpl {
    func drawFaceObservations(_ observations: [VNFaceObservation]) {
        for faceObservation in observations {
            /// face.boundingBox provides coordinates in normalized units (0 to 1).
            let boundingBox = faceObservation.boundingBox

            /// convertedRect converts them into layer coordinates for proper display.
            let convertedRect = self.convertBoundingBox(boundingBox)

            self.addFaceLayer(convertedRect)
        }
    }

    func addFaceLayer(_ rect: CGRect) {
        let faceLayer = CAShapeLayer()
        faceLayer.frame = rect
        faceLayer.borderColor = UIColor.green.cgColor
        faceLayer.borderWidth = 2
        faceLayer.cornerRadius = 5

        DispatchQueue.main.async {
            self.overlayLayer.addSublayer(faceLayer)
        }
    }
}
In general, we have the ability to detect faces and recognize key facial features simultaneously, but it’s better to separate these tasks for better code clarity.
Facial landmark recognition can detect points such as the contour, eyes, eyebrows, nose, and lips (both inner and outer parts). When creating a request, we now use VNDetectFaceLandmarksRequest:
// MARK: - Face Landmarks Request
extension InputProcessingServiceImpl {
    func setupFaceLandmarksRequest() {
        let request = VNDetectFaceLandmarksRequest { [weak self] (request, error) in
            guard
                let results = request.results as? [VNFaceObservation],
                error == nil
            else {
                return
            }
            self?.eventSubject.send(results)
        }
        visionRequests = [request]
    }
}
// MARK: - Face Landmarks Drawing
extension OutputVisualisationServiceImpl {
    func drawFaceLandmarks(_ observations: [VNFaceObservation]) {
        for faceObservation in observations {
            /// Check if landmarks are available for the current face.
            guard let landmarks = faceObservation.landmarks else {
                continue
            }

            /// Convert the normalized bounding box to display coordinates for drawing.
            let faceRect = faceObservation.boundingBox
            let convertedRect = convertBoundingBox(faceRect)

            /// For each face, take the landmarks and draw each landmark
            /// element (e.g., eyes, nose, lips, etc.).
            drawLandmarks(landmarks, faceBoundingBox: convertedRect)
        }
    }

    func drawLandmarks(_ landmarks: VNFaceLandmarks2D, faceBoundingBox: CGRect) { … }
}
The face detection and landmark recognition features in Vision Framework are highly versatile, offering numerous applications across various fields.
These features enable interactive and engaging user experiences, while also supporting advanced security and health tracking functionalities, for example, use cases include:
- Face filters and other functions which can be used on the main camera, unlike ARKit face which can be detected only on the selfie camera.
- Security and analytics: Face recognition for access control and collecting data for quantitative analysis;
- Health: Monitoring facial expressions and shape for tracking emotions or health changes.
Text Recognition
Vision Framework allows to perform text recognition in images or videos, converting it into a digital format. It currently supports 18 languages (including Cyrillic and Arabic scripts), making it a great choice for applications that deal with documents, translation, or content analysis.
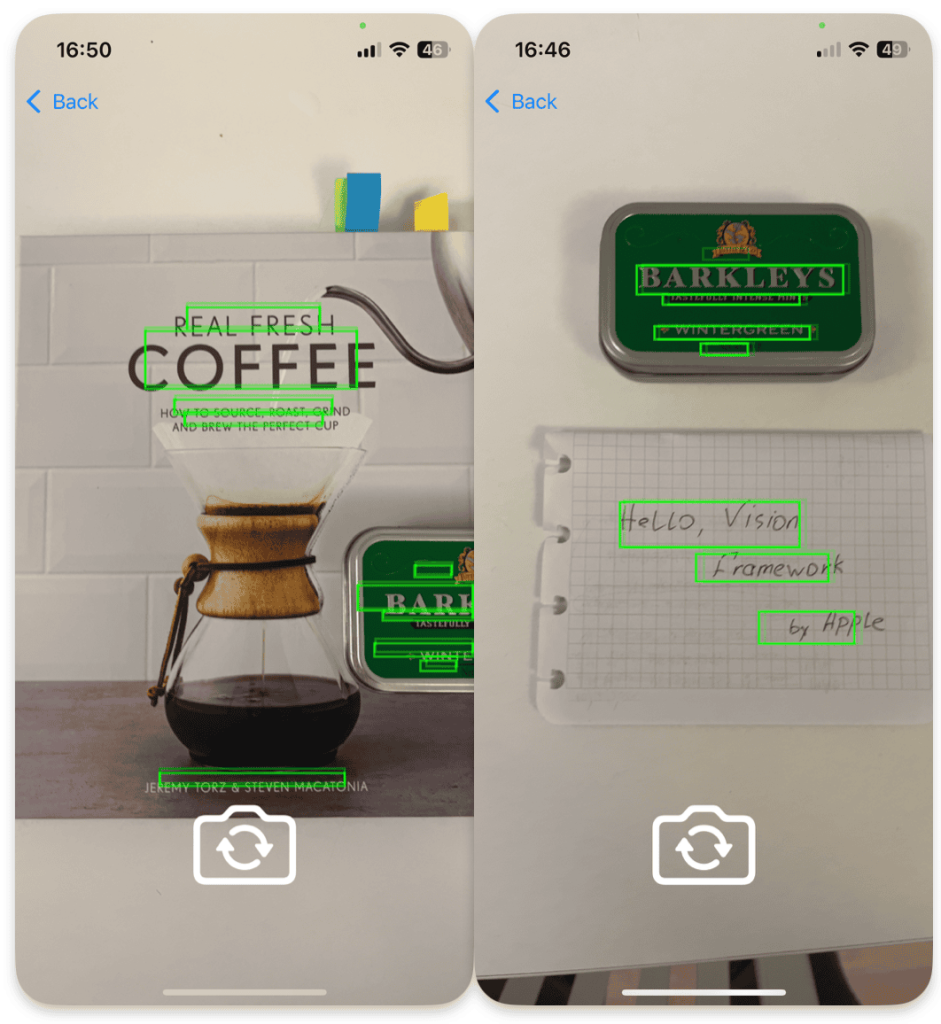
When using VNRecognizeTextRequest, we must specify the model that will process the frames or provided images through the recognitionLevel parameter.
Other parameters are optional but can help you better understand the capabilities of this request. Additionally, when receiving the request’s result, the bounding box is returned directly along the edges of the text characters, but for a better user experience, you might want to consider expanding it slightly.
// MARK: - Text detection Request
extension InputProcessingServiceImpl {
    func setupTextDetectionRequest() {
        let request = VNRecognizeTextRequest { [weak self] (request, error) in
            guard
                let results = request.results as? [VNRecognizedTextObservation],
                error == nil
            else {
                return
            }
            self?.eventSubject.send(results)
        }

        /// Availiable recognitionLevels is .fast and .accurate
        request.recognitionLevel = .fast

        request.usesLanguageCorrection = true
        request.automaticallyDetectsLanguage = true

        visionRequests = [request]
        logger.log(.info(.visionTextDetectionRequestSetup))
    }
}

// MARK: - Text Detection Drawing
extension OutputVisualisationServiceImpl {
    func drawTextObservations(_ observations: [VNRecognizedTextObservation]) {
        for textObservation in observations {
            let boundingBox = textObservation.boundingBox
            let convertedRect = convertBoundingBox(boundingBox)

            addTextLayer(convertedRect)
        }
    }

    func addTextLayer(_ rect: CGRect) {
        let textLayer = CAShapeLayer()
        textLayer.frame = rect
        textLayer.borderColor = UIColor.green.cgColor
        textLayer.borderWidth = 2
        textLayer.cornerRadius = 3

        DispatchQueue.main.async {
            self.overlayLayer.addSublayer(textLayer)
        }
    }
}
The text recognition features in Vision Framework are highly adaptable, providing solutions for a wide range of industries and user needs.
From logistics to accessibility, these features make it easier to capture, analyze, and interact with textual data in various contexts. For example, potential use cases include:
- Commerce and logistics: Scanning price tags or product compositions, working at logistics hubs, operations with long-distance services, sorting, and storing goods;
- Language: Real-time translation to overcome language barriers;
- Education: Digitization of materials from textbooks or blackboards;
- Accessibility: Translating or converting text to speech for people with visual impairments.
Hand Pose Detection
This feature enables real-time tracking of hand movements and poses, opening up new possibilities for interacting with virtual objects in augmented reality applications. This technology is especially relevant today with the rapid advancement of AR and VR headsets, where natural, controller-free interaction is becoming a key part of the user experience.
Hand tracking detects the palm’s contour and each finger individually (Thumb, Index, Middle, Ring, Little), as well as the joints’ positions. When configuring, you can specify the maximum number of hands to track. This represents a first step toward creating future interfaces, where interaction with the digital world will feel as natural as interacting with the physical one.
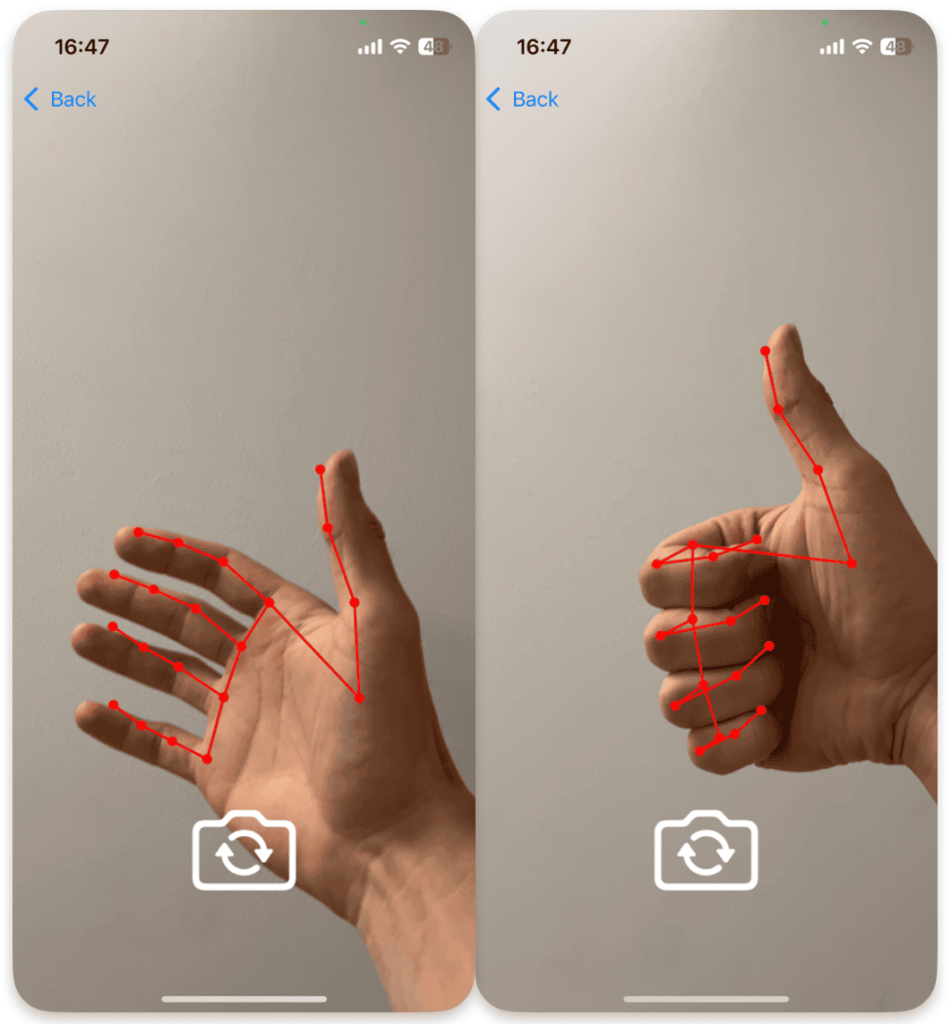
// MARK: - Hand Detection Request
extension InputProcessingServiceImpl {
    func setupHandDetectionRequest() {
        let request = VNDetectHumanHandPoseRequest { [weak self] (request, error) in
            guard
                let results = request.results as? [VNHumanHandPoseObservation],
                error == nil
            else {
                return
            }
            self?.eventSubject.send(results)
        }

        /// The default value for this property is 2
        /// The maximum value for VNDetectHumanHandPoseRequestRevision1 is 6.
        request.maximumHandCount = 2

        visionRequests = [request]
        logger.log(.info(.visionHandDetectionRequestSetup))
    }
}
// MARK: - Hand Detection Drawing
extension OutputVisualisationServiceImpl {
    func drawHandPoseObservations(_ observations: [VNHumanHandPoseObservation]) {
        for handObservation in observations {
            if let points = try? handObservation.recognizedPoints(.all) {
                /// Draw the hand skeleton using the recognized points for joints and connections
                drawHandSkeleton(points: points)
            }
        }
    }

    func drawHandSkeleton(points: [VNHumanHandPoseObservation.JointName: VNRecognizedPoint]) { … }
The hand and finger tracking capabilities in Vision Framework open up new possibilities for intuitive interaction with digital content, particularly in virtual and augmented reality applications.
These features provide a more natural, controller-free experience, which can greatly enhance workflows in a variety of professional fields. Examples include:
- Design and prototyping: Finger tracking allows designers to interact with 3D models, manipulate objects, and review prototypes without using physical controllers. This is especially useful in the automotive, aerospace, and manufacturing industries, where high levels of detail and realism are critical.
- Virtual reality training: In scenarios where employees use their hands (e.g., in maintenance or on production lines), hand tracking enables the simulation of real working conditions. This helps bridge the gap between training and actual tasks, providing more accurate preparation.
- Remote collaboration: Hand and finger tracking in VR helps professionals working in remote teams effectively communicate and manipulate 3D models simultaneously, improving communication and speeding up decision-making during product development or project reviews.
What’s coming next?
The use cases described here showcase the incredible power and versatility of Vision Framework, but they are just the beginning for creating innovative computer vision applications. Integrating with CoreML opens up new possibilities, allowing you to use custom machine learning models for more complex and specialized tasks. This significantly expands Vision’s functionality, adapting it to the unique needs of your projects, and improving both accuracy and flexibility.
How do you plan to leverage these capabilities in your future projects?
