

The European Conference on Computer Vision (ECCV) is one of the top computer vision conferences in the world. In 2018, it is to be held in Munich, Germany. There were 2439 paper submissions, of which 776 were accepted (59 orals, 717 posters).
Meet our CEO Ievgen Gorovyi at this conference!
Author: admin
“Introduction to ML for scientists” Workshop
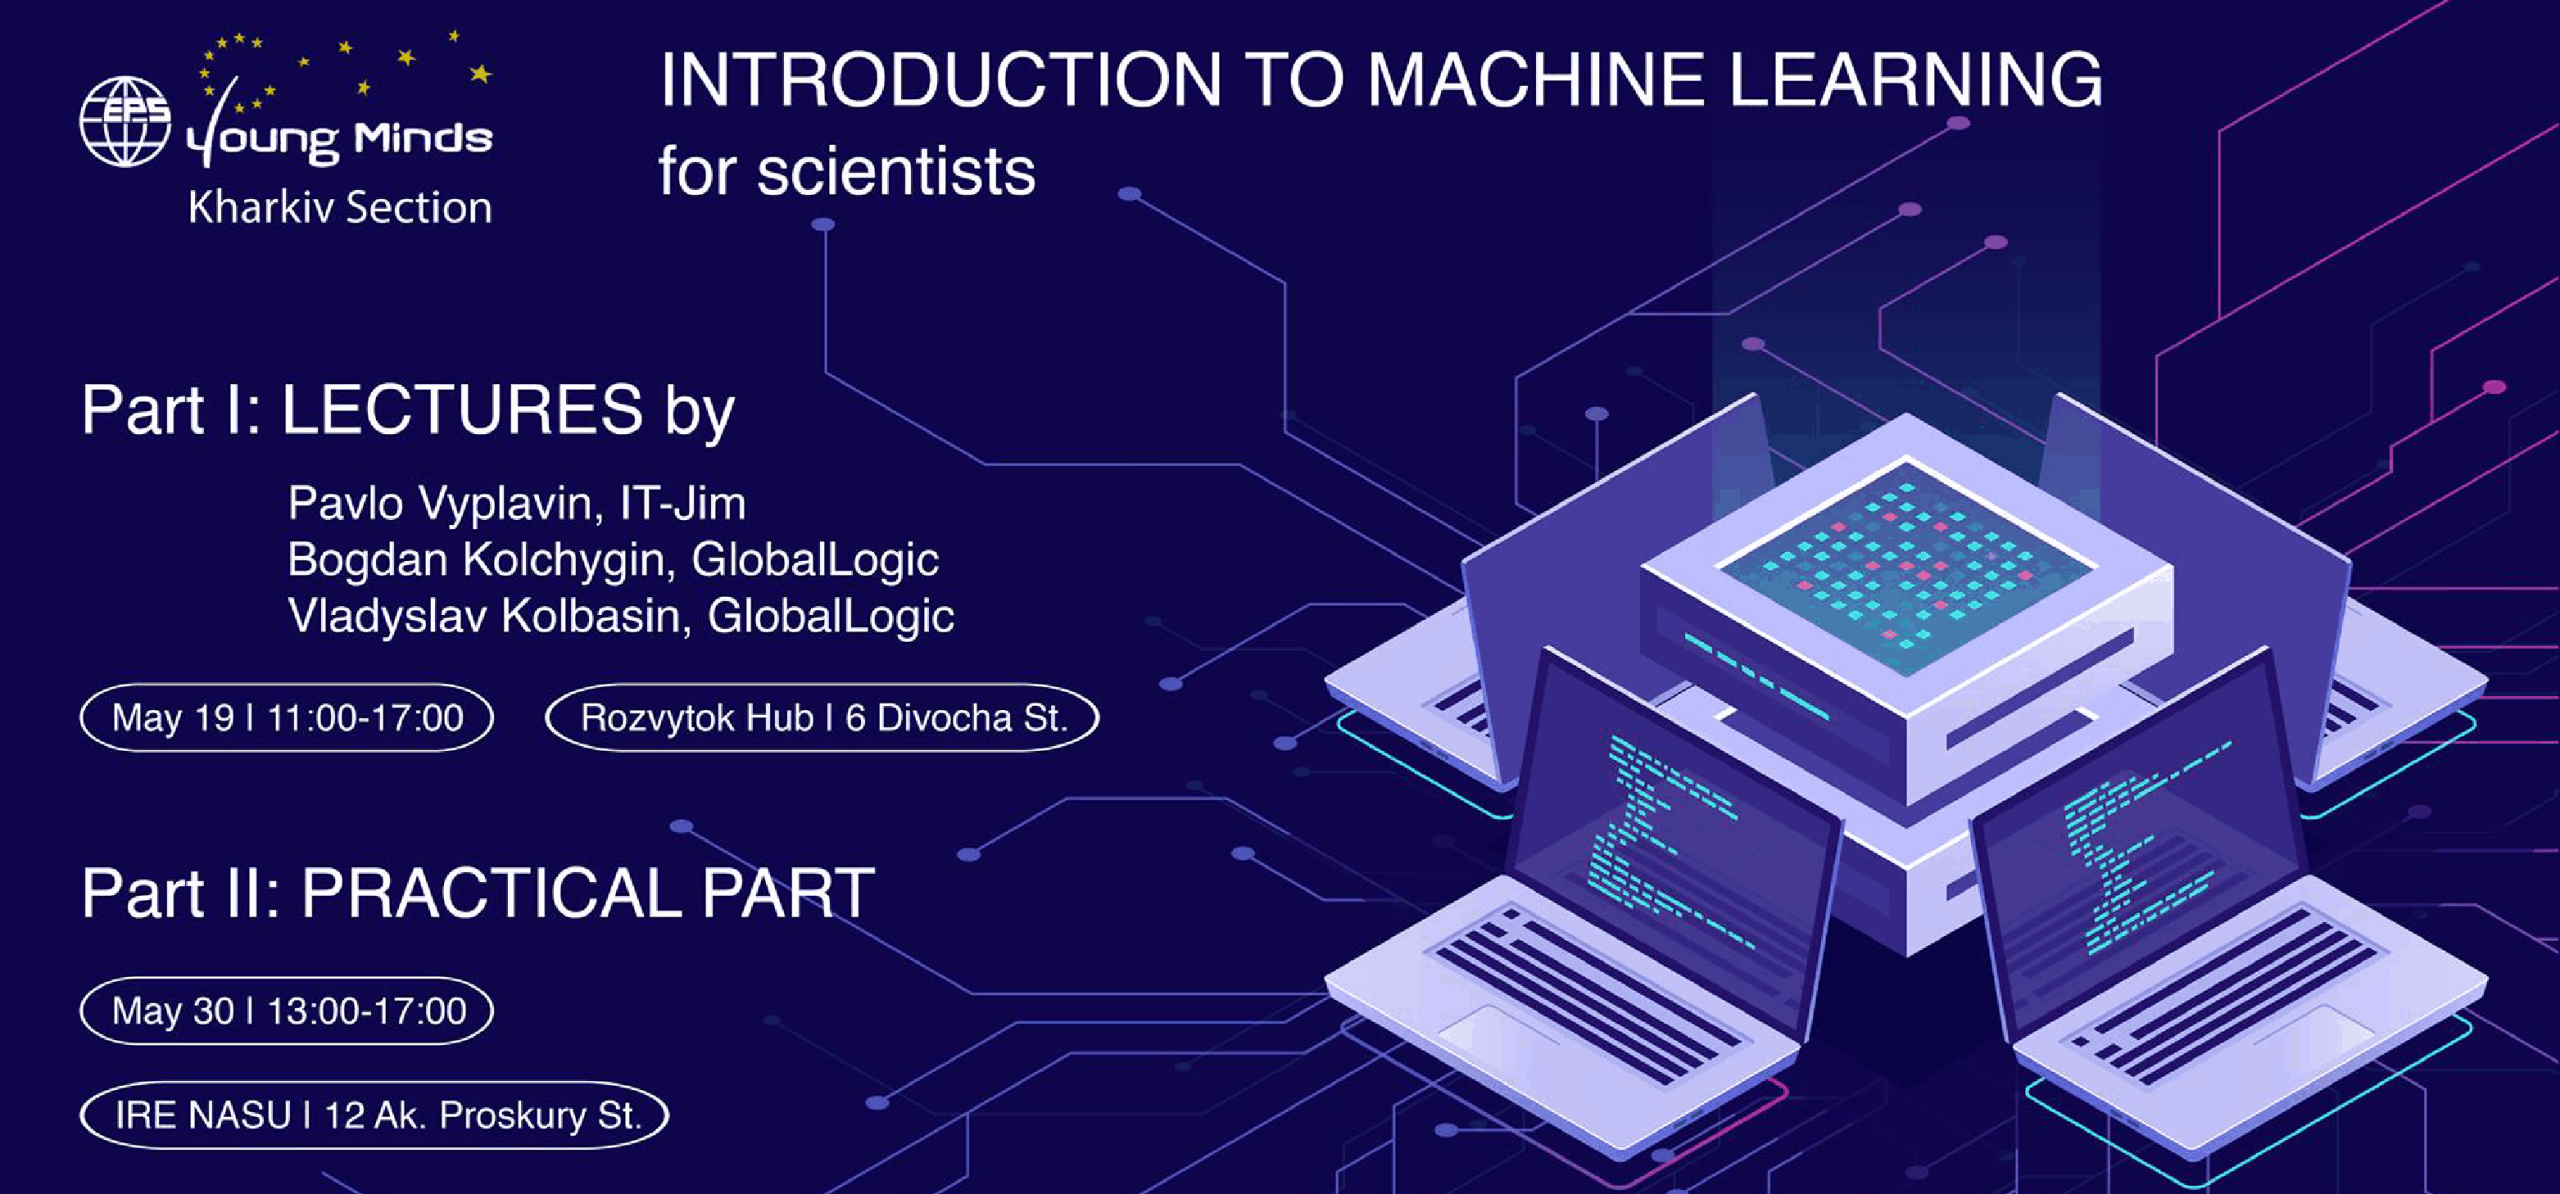
It-Jim’s CTO Pavlo Vyplavin will provide some insights on the tasks we solve at our company at the Introduction to Machine Learning (for scientists) workshop organized by EPS Kharkiv Young Minds Section and Young Scientists Council of O.Ya. Usikov Institute for Radiophysics and Electronics. The second day of the workshop will be devoted to practical implementation of the concepts from the theoretical lecture.
Augmented Reality in Web: Results and Challenges
The paper presents basic concepts of augmented reality applications and challenges in building them in the web. We describe the technical and algorithmic stack required to develop, implement and deploy the augmented reality application. Theoretical concepts behind marker detection and tracking are discussed. Two different pipelines are implemented: server-based with algorithms execution in the cloud and completely front-end solution that runs on a user device. We show advantages and disadvantages of each approach and analyze experimental results as well.
Embedded and Single-Board Computer Vision: Introduction

Computer vision (CV) and machine learning (ML) algorithms solve a tremendous amount of problems. However many businesses often do not understand what hardware to choose for running your favorite neural net or some advanced image and video processing pipelines. With this blog post, we start a series of articles about embedded vision and specific practical things you need to know before making your choice.
Embedded, USB stick, and single-board computers
An embedded computer (in a narrow sense) is a computer typically found inside your car, router or washing machine. For sure, SpaceX Dragon 2 or Boeing 777 have even more serious on-board computers. An embedded computer (Fig. 1) is typically a printed circuit board, or sometimes a single chip, which has rather specialized input-output connectors and typically does not have any of the more usual connectors like USB, Ethernet or HDMI. It cannot be easily used outside of the larger piece of hardware (you car, router, etc.), thus it is called “embedded”.

Fig. 1. Embedded computers.
Sometimes the word “embedded”, in a broader sense, is also applied somewhat wrongly to USB-stick and single-board computers. USB-stick computers (Fig. 2) include Google Coral Stick and Intel Neural Compute Stick 2 (previously known as “Movidius”), the two principal USB deep learning accelerators. There are many other USB-stick devices, but they are not very interesting for CV/ML.

Fig. 2. Google Coral Stick (left) and Intel Neural Computer Stick 2 (right), the two competing USB deep learning accelerators.
Finally, single-board computers (Fig. 3) include the Raspberry Pi series, Google Coral, Nvidia Jetson series, and many others. Such computers are typically a single printed circuit board (sometimes in a box), but unlike the embedded computers, the single-board ones have output ports like USB, HDMI, and Ethernet, and sometimes also Bluetooth and Wi-Fi units, so that you can use them as small desktop computers. Some of them (Nvidia Jetson Xavier) come in both embedded and single-board versions.

Fig. 3. Single-board computers: Raspberry Pi 4 (UL), Google Coral (UR), Nvidia Jetson Nano (LL), Nvidia Jetson Xavier (LR).
These three classes of devices can run various operating systems (OSes). In this blog, we mainly focus on devices running some sort of Unix/Linux, as opposed to Windows, Android, or non-Linux embedded OSes found in some hardcore embedded devices.
Computer Vision and Machine Learning on Embedded Computers
How to use single-board computers for computer vision and machine learning (other devices, i.e. embedded, have some differences we are not going into)? Or for that matter, how to use them for anything at all? Let’s start with the easier second question:
- If you have something like Raspberry Pi, just think of it as a small desktop computer. Connect the power, monitor, keyboard, mouse, and either ethernet or Wi-Fi. Then use your device as a Linux computer with a GUI desktop. You will have to have basic Linux skills, of course, and the Linux versions for single-board computers are somewhat different from what you are used to on PCs, for example, you will hardly ever see heavyweight desktops like Gnome 3 or KDE.
- Some more primitive devices are “strictly headless”, i.e. they cannot use the monitor and often have no GPU. Moreover, even devices like Raspberry Pi are often used in a headless mode (and with a headless Linux) in order to maximize performance and to use less disk space. You can still use a monitor if you want, but only with a text-mode Linux console and no GUI. Using headless devices typically requires some sort of connection (Internet, serial, or USB), so that you can log in to your headless device via SSH from your computer. Of course, you must be fluent in the Linux command line (typically bash).
- But wait, we did not install Linux yet! How do we do that? It depends. Raspberry Pi series (and the copycats such as Orange Pi) is the simplest: You use a standard micro-SD card (like the one in your smartphone or digital camera) as your one and only hard disk. What does it mean? You guessed right, to install Linux simply download the desired Linux image and burn it onto the SD card in your laptop. Make sure you buy the biggest and fastest SD card you can find! Other devices, however, have built-in SSD drives. It means you have to use some sort of USB connector to install the OS from the host computer, often with instructions like “push a hidden button with a pencil when powering on the device”.
- Things are more “interesting” for the Nvidia Jetson series. On one hand, Jetsons usually ship with pre-installed Linux. But if you have to reinstall, the real fun starts. You need to install something called “Nvidia SDK Manager” on your laptop or desktop PC (known as “host”), which is available only for “Ubuntu Linux x64 version 18.04 or 16.04”. Not only Windows, macOS, or non-Ubuntu Linux users are excluded, but who runs something as ancient as Ubuntu 18.04 nowadays? Moreover, you will typically be asked for Nvidia GPU with the latest drivers (which excludes host PCs without Nvidia GPU) and a very particular version of CUDA (which is never the same as the version you have on your PC). We are not sure though that the latter applies to all possible Nvidia SDK Manager versions. In the end, using Docker (on a Linux host) seems the only solution that works, and it is far from easy (you have to turn on GUI, GPU, and USB support in Docker).
- Compared to the PCs, single-board computers (especially the cheaper or older ones) tend to be painfully slow and with very limited resources. They also overheat easily.
OK, suppose we managed to get our device up and running, and installed some sort of Linux on it. What next? We are all programmers. We like to write code. How do you do that on single-board computers?
- C and C++ are typically supported (although the hardcore embedded devices might have C only). This includes the usual Linux C/C++ infrastructure of gcc, cmake, gdb, etc. Use the package manager of your OS (apt for the Ubuntu-Debian family) to install packages. Many common C/C++ libraries are also available via apt, although often in very outdated versions.
- If some library is missing (or the apt-provided version is too old), you will have to build it from the source, which can take many hours on a single-board device.
- As an alternative to building libraries and your own projects on-device, you can cross-compile for Raspberry PI or whatever on your PC, which requires setting up a toolchain with libraries and other things, which is not easy. You will only need cross-compiling skills if you are a professional embedded developer. Beginners should build on-device instead if possible.
- Our small devices are typically too weak to run any Integrated Developer Environments (IDE) efficiently, so use the default notepad of your OS to edit the C++ code, cmake to build it, and text-mode gdb if you really need debugging. If you really want an IDE, try code::blocks or kdevelop. It is a good idea to develop a code on your PC first before porting it to a device.
- The architecture of single-board devices is almost always ARM, which means having Neon SIMD instructions instead of Intel SIMD (SSD, MMX), which makes low-level optimization strategies quite different. ARM devices are often mutually compatible.
- Python 3.x is available on most devices. However, some packages in pip3 repositories are missing, or the versions are very old. Installing python packages often involves building C/C++ code, and on single-board devices, it can take forever or sometimes fails with C++ compile errors. Do not expect to necessarily be able to use all your favorite Python libraries on a Raspberry Pi or Jetson Nano.
- Other languages, like Java, might be also available, but as they are seldom used for CV/ML, we will not focus on those.
Finally, how to do CV/ML on single-board devices?
- As explained above, C++ and Python are available, so if you can do CV/ML on a Linux PC, you can also do it on a device! Although speed can be an issue.
- In particular, the popular computer vision library OpenCV is available. If you have to build OpenCV from the source, it can take many hours (especially with contrib), and a lot of disk space.
- Some single-board devices have unique hardware, such as: CSI cameras, hardware video encoders/decoders, deep learning accelerators, etc. These issues will be addressed below.
Computer Vision with a Raspberry Pi
While nowadays Raspberry Pi 4 is available, here we will talk about Raspberry Pi 3 as we have experience mostly with this edition of the single-board computer. So when we say that something is “very slow”, expect that the things are now slightly better on the newer model. As explained above, Raspberry Pi 3 is basically a tiny Linux PC that uses a micro-SD card as a hard disk. It has 4 USB ports, HDMI, ethernet, and also Wi-Fi and Bluetooth (the latter two are not very reliable). For Linux, we strongly suggest Raspberry Pi OS a.k.a. Raspbian, as it is guaranteed to support all Raspberry-specific hardware. Currently, Raspbian 10 is available. C++ and Python are supported reasonably well. Raspberry Pi (RPi) is an ideal gadget for toy CV projects. It has no hardware-accelerated deep learning though.
When you hear “Raspberry Pi”, for many people the first reaction is “Camera !”. Indeed, Raspberries are most often used with some sort of camera (Fig. 4).

Fig. 4. Raspberry Pi cameras: CSI, USB and Spy CSI.
On PCs, USB (Fig. 4 center) web cameras are most commonly used, but Raspberries have another interface called Camera Serial Interface (CSI, Fig 4. left, right). All real RPi geeks use CSI cameras! In particular a “spy camera” (ultra-small CSI camera), Fig. 4. right, is a very popular toy.
But how do we use these cameras? If you google, you will find info on command-line tools like raspivid, raspistill, but we are programmers, we do not want that junk, how to use cameras in a C++ or python code? On Linux, there is a standard camera interface called Video4Linux2 (V4L2). OpenCV and many other libraries use V4L2 under the hood. USB cameras work out of the box with V4L2, while for CSI cameras you will need a special driver bcm2835-v4l2 (update: apparently, with the latest Raspberry Pi OS 10 it is no longer needed). There are many ways to use a CSI camera in your code:
- V4L2 (including OpenCV VideoCapture)
- Raspicam C++ library
- Multi-Media Abstraction Layer (MMAL) specification
- OpenMAX specification
The last 3 options are unique to RPi. Why would you possibly need other options when you have V4L2? Because they might be more efficient or allow a more efficient pipeline. And now we come to the next question often asked:
Can I get a 90 fps video stream with a Raspberry Pi camera?
Many CSI cameras advertise 90 fps. Does it really work? We did a lot of testing a while ago with RPi 3. The short answer: not really. Maybe the camera itself can do it (at 640×480 resolution and with a weird bluish tint). But RPi 3 is too slow to correctly process the video. First, it is not entirely trivial to set the camera to the 90fps mode, but can be done with both OpenCV VideoCapture and Raspicam. When only grabbing the frames in the C++ code without any processing, we got about 80 fps at most. When streaming it over the local network via UDP in the H264 codec, we could get about 50 fps at most. On a slow computer like RPi 3 any image processing operations can easily become a fatal bottleneck: conversions between RGB, BGR and YUV420, encoding to video codecs, saving frame or video to disk, displaying video on screen with cv::imshow(), streaming etc.
RPi also has a video accelerator that can encode/decode H264 and some other codecs (but not H265). It is not trivial to use it. The most “native” way is to use the OpenMAX specification. It can use both video accelerator and CSI cameras and allows building efficient pipelines in a way similar to gStreamer. However, OpenMAX is not easy to use, involves tons of boilerplate code, and most importantly, it is typically unavailable on devices other than RPi (like PCs), so your RPi code will run on RPi only. Common media libraries ffmpeg and GStreamer can use the RPi video accelerator, but ffmpeg requires building from the source, which takes many hours on Raspberry Pi 3. To compare: PCs do not always have video accelerators unless they have a good Nvidia GPU. Video accelerators do not always accelerate encoding/decoding much, but at least they avoid the heavy CPU load of doing these operations on the CPU, and leave the CPU available for other things.
Summary
We covered just the first batch of practical insights about embedded vision. There are plenty of things we want to discuss: for example, how to run deep learning algorithms on single-board/ embedded devices, including TensorRT and DL accelerators. We will talk about it in our next article, so stay tuned!
Drop us a line!
Light-Weight Tracker for Sports Applications
In the paper, we describe the technical details of a multi-player sports tracker system. We demonstrate that proper in-depth analysis of video frames sequence may provide a lot of useful information required for sports analytics. Object detection and tracking steps are analyzed. Novel ideas for efficient filtering of false detections and irrelevant tracks are proposed. Also, we show an example of how the object tracking information used for the regions of interest location allows streaming sports events without human operators. At last, important practical implementation details, as well as initial experimental results, are discussed.
Outdoor Mapping Framework: from Images to 3D Model
3D mapping techniques have a large variety of applications from entertainment to military and medical fields. However, obtaining a well-refined 3D model from a set of images without the usage of depth sensors is a big challenge. In the paper, we analyze the main components of the 3D reconstruction pipeline allowing us to get detailed models of outdoor objects from drones. In particular, we experiment with algorithms required for structure from motion and point cloud densification. We demonstrate that proper local feature extraction, matching and verification directly affect a final model quality. Analysis of two existing 3D reconstruction frameworks (MVE and COLMAP) is conducted. Initial experimental results are shown.
Mobile Indoor Navigation: From Research to Production
Indoor positioning systems in GPS-denied environments are rapidly becoming popular. Various options are commonly available (BLE, Wi-Fi, ultra-wideband, ultrasonic, etc.). The key challenge is to provide accurate, and stable real-time user location at a low cost. In this paper, we present the research and production details of the developed hybrid indoor localization and navigation system (HILN). The proposed technical solutions are based on cheap Bluetooth beacons and mobile sensors. In particular, we describe two separate positioning pipelines for open spaces and narrow environments. The scheme of efficient fusion of inertial navigation system (INS) and BLE navigation system is proposed. All the developed solutions are integrated into the mobile indoor software development kit (SDK). Its main components are briefly mentioned. Our mobile positioning system provides 1-2m accuracy and works on Android and iOS devices on a real-time basis.
SDK for Augmented Reality Applications

SDK for Augmented Reality Applications
Project Overview
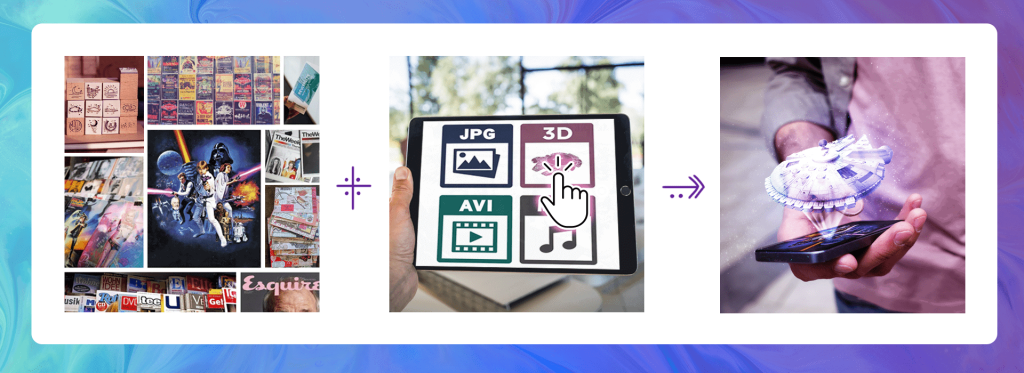
Our client’s goal was to enhance various printed media (magazines, posters, banners, etc.) with interactive experience using augmented reality. With AR, certain areas on the reading materials can be overlayed with digital information of a different kind: from videos, images, and 3D models to weather information and buttons that bring additional functionality, etc. Imagine, for example, a cooking video popping up when you hover your phone over its recipe in a journal or an instant 3D view on a model’s outfit you liked in the catalog along with the information where to buy it. This AR experience makes printed products more fun, exciting, emotional, and interactive, and ultimately requires robust computer vision algorithms. That is why the client was looking for a partner with solid experience in computer vision to create mobile AR SDK.
AR SDK: Key Components
The developed AR SDK provides a complete list of tools for the creation of augmented reality experience. This makes it very simple and ready to use. The components built are presented in Fig. 1:
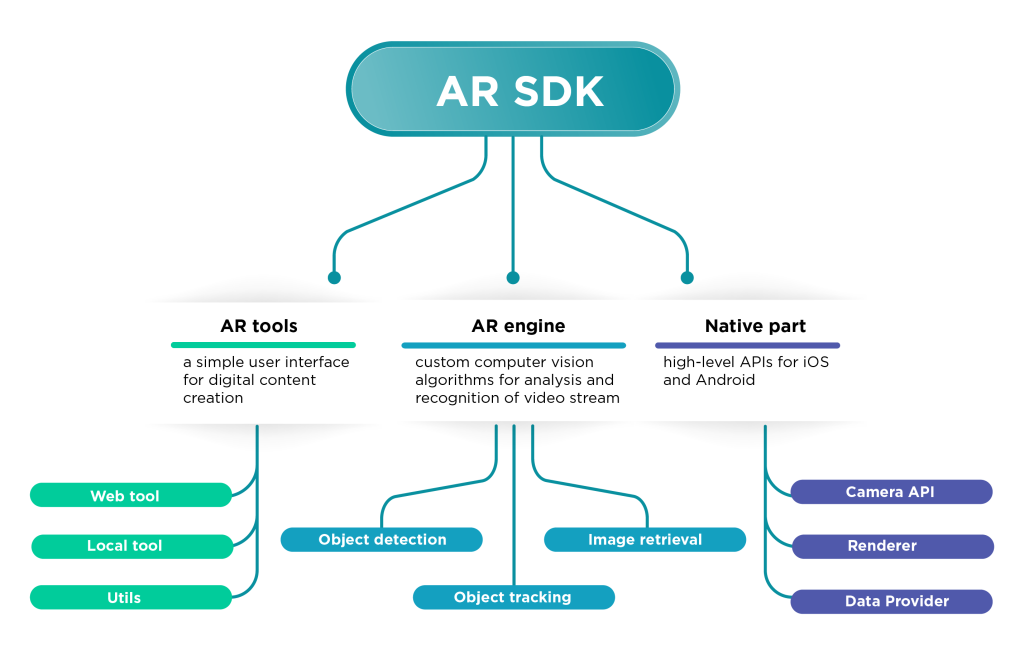 Fig. 1. Key components of the developed AR SDK.
They include:
- AR tools (Web and desktop versions)
- AR engine including object detection, tracking and image retrieval modules
- Native part including high-level APIs for iOS and Android
AR tools are used to provide a simple user interface for digital content creation. In particular, the user can upload the target images (magazine pages, banners, restaurant menu, photos, etc.). Built-in image analysis algorithms automatically determine the image quality, estimate the level of its suitability, and enhance its content for better AR experience. Another important role of AR tools is to provide an easy way to manage the digital layers, i.e. change the layout and geometrical properties of AR models (videos, images, 3D models). As a result, users can see how exactly the AR content will look like on mobile devices.
AR engine is a core of the system. It contains a set of custom computer vision algorithms and solutions for analysis and recognition of video stream from the mobile camera. The AR engine comprises three major modules:
- Marker detection and tracking modules provide robust real-time image recognition. The stability of this part is a key to the smooth augmentation of the digital AR layer.
- An additional visual search module allows adding AR experience to large image collections.
AR engine is written in C++, which is additionally optimized for real-time performance directly on mobile devices. This means that all algorithms work on the edge without an internet connection.
The data flow within AR SDK is illustrated in Fig. 2.
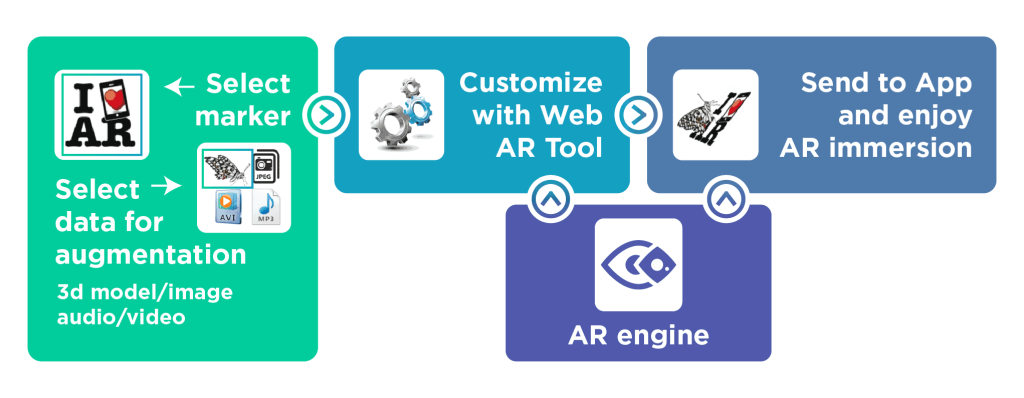
Fig. 2. AR SDK data flow.
Firstly, the user selects the image targets which will be used as triggers in the mobile AR application. Secondly, the digital layer is uploaded and easily managed using the Web AR tool. All auxiliary data is automatically generated and stored in the cloud infrastructure. Finally, once the mobile application is installed, all necessary data are downloaded from the server and we are ready to enjoy the AR immersion directly on the device.
Here is an example of AR SDK usage on different markers:
If you are looking for more technical details, check our blog post on marker-based augmented reality or the research paper on an advanced planar tracking approach for augmented reality applications.
Value delivered
Developed AR SDK opened a number of possibilities to apply advanced computer vision algorithms in a seamless manner. Created AR tools can be used without any additional expertise in AR and computer vision making the process of adding digital layers to the product really simple.
Do you have a plan on how augmented reality could bring new functionality to your app or software? Use the form below to get in touch with us and discuss your idea.
Let's get in touch
