Barcode Safari: Exploring the iOS Scan Frontier

Recently, we encountered a task in one of our projects involving the development of a product management system for a large warehouse. The system needed accurate and efficient barcode detection to streamline inventory tracking, reduce human errors, and optimize workflows.

We have different options to tackle this problem. Should we use a dedicated barcode detection technology, or integrate barcode detection within an Optical Character Recognition (OCR) framework? Let’s try both and find out!

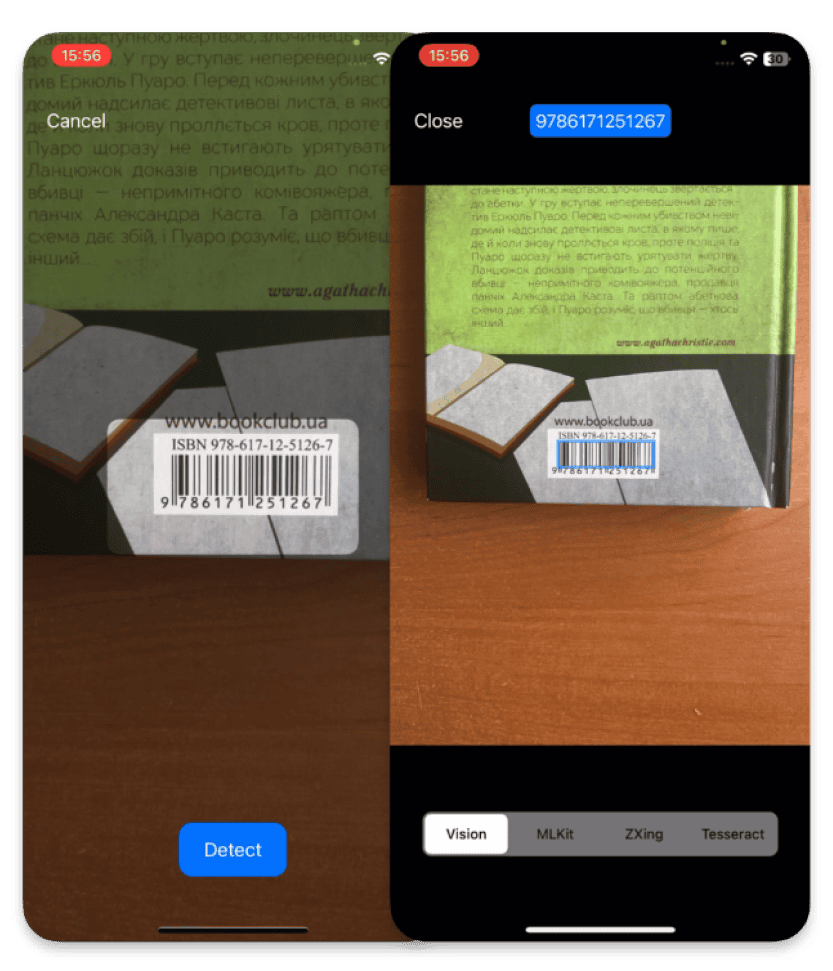
After thorough investigation, we selected four libraries for detailed research: Vision, MLKit, ZXingObjC, and SwiftyTesseract.  The main challenge was ensuring that the system could scan and identify multiple types of barcodes quickly and with high accuracy. Given the scale of the warehouse operations, performance and reliability were critical factors.

During our investigation, we faced several challenges, including:

  • Accurately identifying different types of barcodes
  • Determining the position of barcodes in photos
  • Handling scenarios where multiple barcodes appear in the same frame
  • Achieving high performance with minimal lag during scanning
  • Ensuring that the selected solution is well-supported and actively maintained for compatibility with future Swift and iOS updates
  • Considering cross-platform compatibility for potential future Android implementation

Picking the right barcode detection solution is key. Every project has its own needs, and by understanding them, we can decide on the best technology for barcode detection in iOS.

Vision

The Vision framework, provided by Apple, offers built-in support for barcode detection, allowing easy implementation with minimal code and no additional dependencies. It integrates seamlessly with AVCaptureSession, making it straightforward to add barcode scanning capabilities to iOS apps.

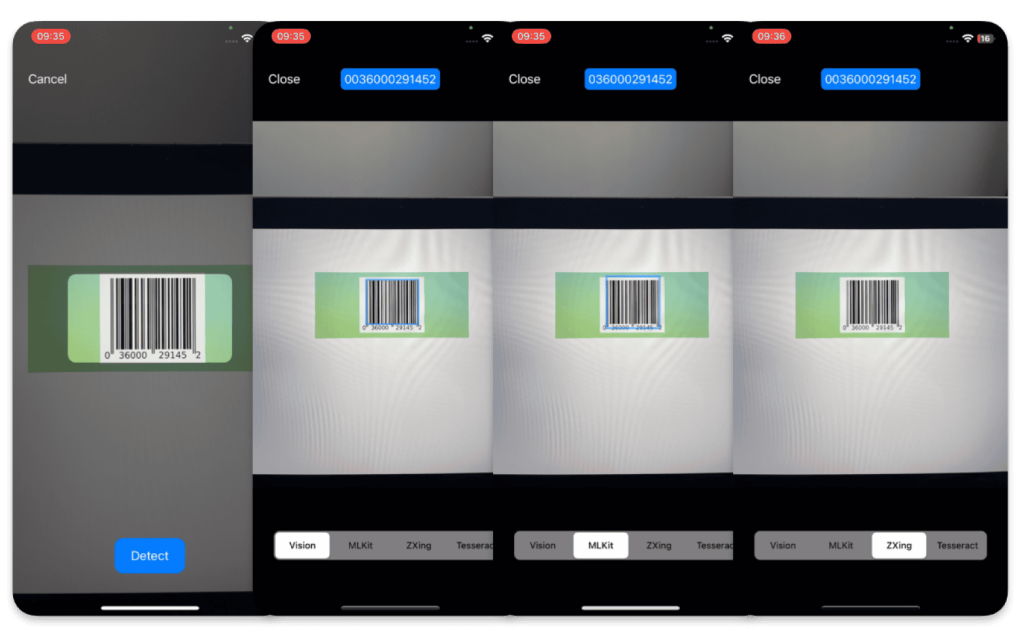
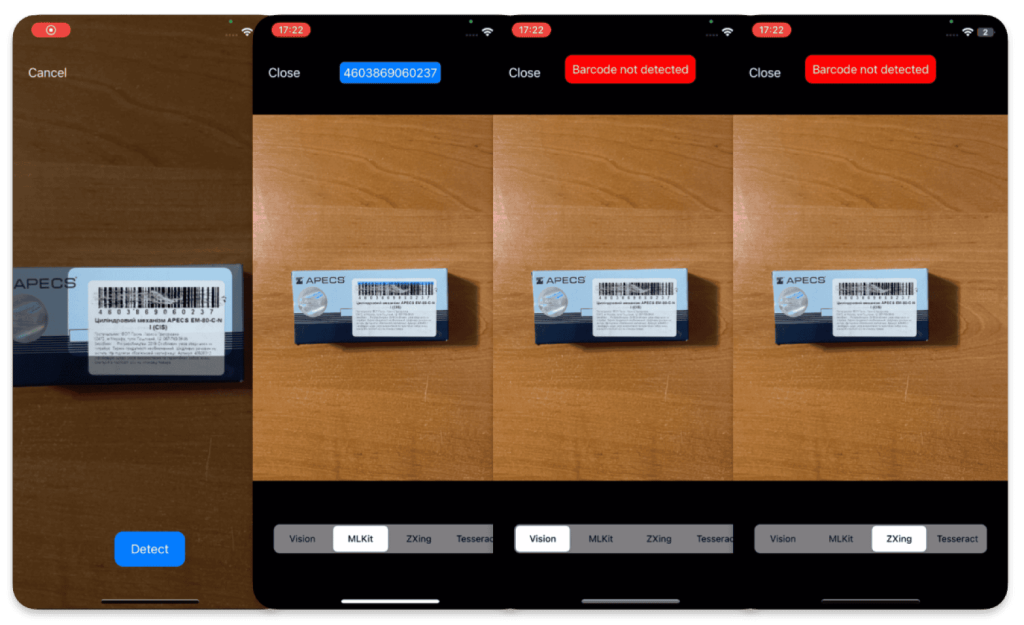
One of the major advantages of Vision is its seamless integration with the Apple ecosystem, ensuring that you don’t need to rely on external libraries or frameworks. It also provides high performance, with an average barcode detection processing time of just 0.07 seconds, which makes it highly efficient. Additionally, it generally offers high accuracy in barcode detection. However, in some cases, Vision may add a leading zero to barcodes, especially when the barcode starts with zero, so it becomes two zeros. This behavior could require additional handling to account for such scenarios.

Such a barcode, for example, will be detected as 0036000291452 in the picture below.

Barcode example

For the demo app, we created a minimalist UI with a choice of recognition modes and a display of results or errors on the tether for instant feedback.

The framework supports a wide variety of barcode formats, including both linear and 2D barcodes, and provides useful extra details, such as the bounding box and symbology of detected barcodes.

Another benefit is that Vision allows the detection of multiple barcodes within the same frame, which can be crucial for scanning large volumes of barcodes. Furthermore, Vision gives you the ability to specify a region of interest for barcode detection, which removes the need to crop the image beforehand.

You can also customize the barcode detection to focus on specific barcode symbologies or image orientation, which helps reduce unnecessary processing and false positives. With abundant resources like tutorials and official documentation available, integration and troubleshooting are made easier.

Barcodes Recognition with Apple Vision Framework

However, Vision does come with some limitations. It is exclusive to iOS, so if you’re aiming for cross-platform compatibility, it may not be the best fit. Additionally, handling edge cases, such as damaged barcodes, can be challenging. Also the issue of handling leading zeros in certain barcodes might require extra coding effort to ensure accuracy in all cases.

To use barcode detection in your app, you only need to import Vision framework and add the code for barcode detection.

Here’s a simple example that demonstrates how to implement barcode detection with Vision.


func detectWithVision(
        photo: URL,
        completion: @escaping ((String, CGRect)?) -> ()
    ) {
        guard
            let image = UIImage(contentsOfFile: photo.path),
            let cgImage = image.cgImage
        else {
            completion(nil)
            return
        }
        
        let request = VNDetectBarcodesRequest { (request, error) in
            guard
                let results = request.results as? [VNBarcodeObservation],
                error == nil
            else {
                completion(nil)
                return
            }
            
            let detectedBarcodes: [(String, CGRect)] = results.compactMap {
                guard let payloadStringValue = $0.payloadStringValue else {
                    return nil
                }
                return (payloadStringValue, $0.boundingBox)
            }
            
            completion(detectedBarcodes.first)
        }
        
        let handler = VNImageRequestHandler(
            cgImage: cgImage,
            orientation: image.cgImagePropertyOrientation
        )
        try? handler.perform([request])
    }

MLKit

MLKit, developed by Google, provides robust barcode detection for both iOS and Android, offering a cross-platform solution that supports multiple barcode formats.

One of its standout features is the ability to handle multiple barcodes in a single frame, making it ideal for scanning several items at once.

In addition to detecting barcodes, MLKit also provides detailed information for each result, including the barcode’s frame, format, and any specific data it contains – such as URLs, phone numbers, emails, or Wi-Fi credentials. It supports a wide range of barcode formats, covering both linear and 2D types.

The framework provides solid performance with an average processing time of around 0.16 seconds, which is still relatively fast. It has high accuracy and, unlike Vision, does not add extra leading zeros to barcodes. Additionally, it performs well in detecting damaged barcodes, making it a versatile choice for real-world scenarios. MLKit also offers comprehensive documentation and is regularly updated by Google. You can also specify the specific barcode formats you’re interested in, helping optimize performance and reduce unnecessary processing.

For example, with damaged barcodes like those shown below, MLKit still works reliably, whereas other solutions might struggle.

Damaged Barcode Detection with MLKit by Apple

However, MLKit does come with some drawbacks. For iOS, integration requires using Cocoapods, as it is not available through Swift Package Manager (SPM), which can make the initial setup more complicated.

Additionally, while it supports multiple barcode detections, if you need to specify a region of interest, you will either have to crop the image beforehand to focus on that area or implement additional filtering logic after detection. This extra step can increase the complexity of the handling process.

To integrate MLKit into your iOS project follow official documentation. Once MLKit is integrated into your project, you can implement barcode detection using the following code example.

func detectWithMLKit(
        photo: URL,
        completion: @escaping ((String, CGRect)?) -> ()
    ) {
        guard let image = UIImage(contentsOfFile: photo.path) else {
            completion(nil)
            return
        }
        
        let visionImage = VisionImage(image: image)
        visionImage.orientation = imageOrientation
        
        let barcodeScanner = BarcodeScanner.barcodeScanner()
        
        barcodeScanner.process(visionImage) { (barcodes, error) in
            guard let barcodes = barcodes, error == nil else {
                completion(nil)
                return
            }
            
            var detectedBarcodes: [(String, CGRect)] = []
            detectedBarcodes = barcodes.compactMap {
                guard let value = $0.displayValue else {
                    return nil
                }
                return (value, $0.frame)
            }
            
            completion(detectedBarcodes.first)
        }
    }

ZXingObjC

ZXingObjC is an open-source library for barcode scanning on iOS, and it’s part of the broader ZXing (Zebra Crossing) project. It supports a wide range of barcode formats – including some not covered by Vision or MLKit – such as RSS14 and Maxicode, making it a good fit for projects that need specialized or legacy barcode support.

To integrate ZXingObjC, you can use CocoaPods or Carthage. For barcode-focused apps, the ZXCapture class offers a straightforward way to implement real-time scanning without setting up your own AVCapture session.

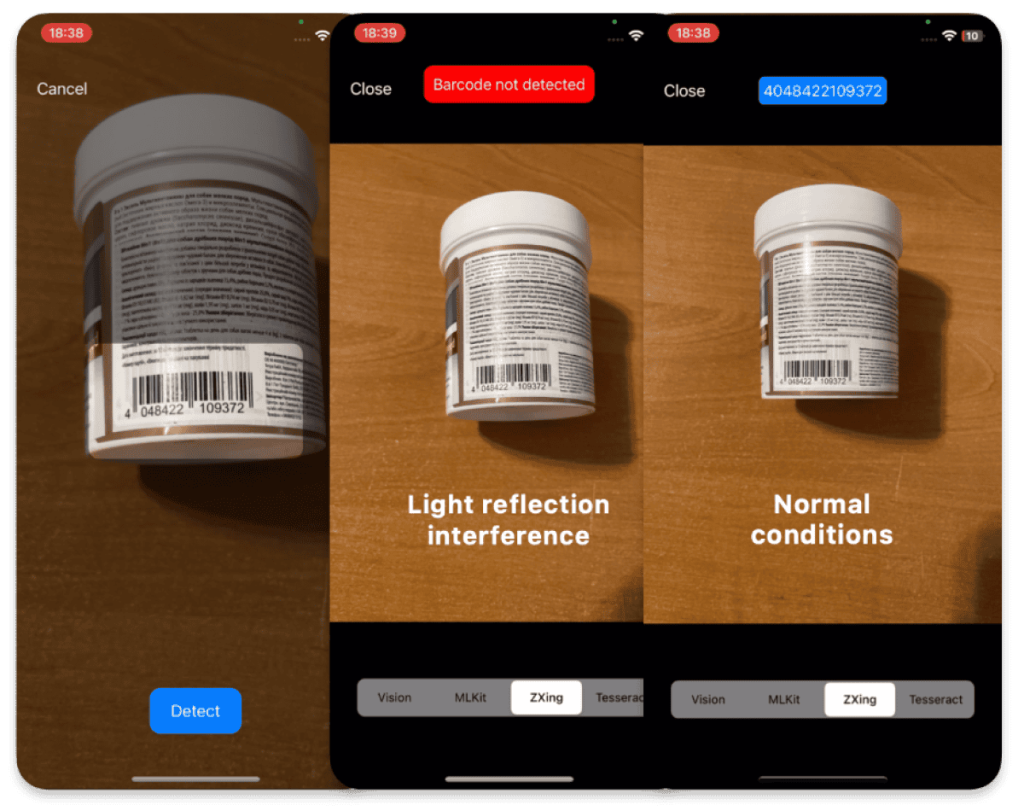
However, the integration process is more complex compared to other solutions. ZXingObjC can also add leading zeros to barcodes and struggles with detecting damaged barcodes. Its performance is slower than Vision and MLKit, with an average processing time of 0.3 seconds. Additionally, the accuracy of barcode detection can be inconsistent, especially when the barcode is at a non-optimal angle. This can make scanning barcodes challenging, as it may require the user to adjust the angle for detection. ZXingObjC does not support multiple barcode detection simultaneously, and it lacks the ability to specify image rotation. Furthermore, while it can provide the coordinates of a detected barcode, it only returns two points, meaning you don’t get the full bounding box or frame of the barcode. Another downside is that ZXingObjC is no longer actively maintained, and there have been no updates for some time, which raises concerns about its long-term reliability.

Another concern is that ZXingObjC is no longer actively maintained, raising questions about future compatibility. As shown in the example below, the detection results can vary depending on the angle, lighting, and visibility of smaller elements.

Barcodes scanning on iOS with ZXingObjC Open-Source Library

To add ZXingObjC to your project the instructions in the GitHub repository. Once you have ZXingObjC integrated into your project, you can use the following code example to implement barcode detection.

func detectWithZXing(
        photo: URL,
        completion: @escaping ((String, CGRect)?) -> ()
    ) {
        guard
            let image = UIImage(contentsOfFile: photo.path),
            let cgImage = image.cgImage else {
            completion(nil)
            return
        }
        
        DispatchQueue.global().async {
            let source = ZXCGImageLuminanceSource(cgImage: cgImage)
            let binarizer = ZXHybridBinarizer(source: source)
            let bitmap = ZXBinaryBitmap(binarizer: binarizer)
            let reader = ZXMultiFormatReader()
            
            let hints = ZXDecodeHints()
            hints.tryHarder = true
            hints.addPossibleFormat(kBarcodeFormatEan13)
            
            reader.hints = hints
            
            do {
                let result = try reader.decode(bitmap, hints: hints)
                if let value = result?.text {
                    completion((value, .null))
                } else {
                    completion(nil)
                }
            } catch {
                log.error(error: error)
                completion(nil)
            }
        }
    }

SwiftyTesseract

SwiftyTesseract, built on Google’s Tesseract OCR, is primarily designed for optical character recognition (OCR), but it can be adapted for extracting barcode numbers when that is the main goal. It integrates easily with Swift Package Manager (SPM), but it requires additional setup, such as downloading the appropriate language training files and adding them to your project. Since SwiftyTesseract is not specifically tailored for barcode detection, its capabilities are quite limited in this context. To achieve optimal results, the image must first be cropped to the region containing the barcode, and it should be free of additional text. Furthermore, the image quality must be high otherwise, the results may be inconsistent or inaccurate.

However, even when the image is cropped properly and of good quality, it may still miss some numbers or produce completely inaccurate results. Its performance is also a major concern, with an average processing time of around 2 seconds for a cropped image and approximately 12 seconds for the original image, making it unsuitable for real-time or high-performance barcode detection.

Additionally, it cannot be used for non-text-based barcodes. The library is quite old and is no longer actively maintained, further limiting its reliability and support.

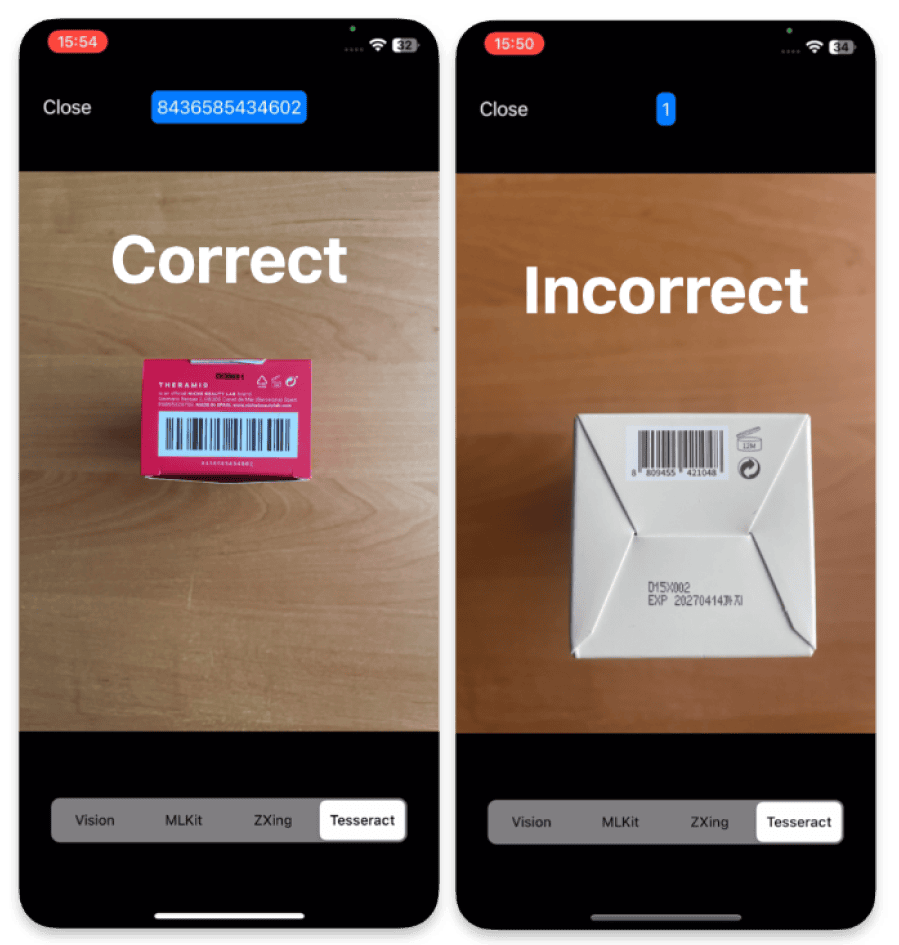
In the example below, it sometimes reads a text-based barcode correctly, but other times it produces an entirely incorrect result.

Barcodes Recognition on iOS with SwiftyTesseract

To integrate this library into your project follow the steps outlined in GitHub repository. Be sure to pay attention to the “Additional configuration” section,  as you will need to add language training files to your project.

After completing the setup, you can use the following code example to implement barcode detection.

func detectWithTesseract(
        photo: URL,
        rectOfInterest: CGRect,
        completion: @escaping ((String, CGRect)?) -> ()
    ) {
        guard
            let image = UIImage(contentsOfFile: photo.path),
            let croppedImage = image.cropping(to: rectOfInterest)
        else {
            completion(nil)
            return
        }

        let tesseract = Tesseract(
            language: .english,
            dataSource: Bundle.main
        )
        tesseract.allowList = "0123456789"

        DispatchQueue.global().async {
            let result = tesseract.performOCR(on: croppedImage)
            switch result {
            case .success(let text):
                completion((text, .null))
            case .failure(let error):
                log.error(error: error)
                completion(nil)
            }
        }
    }


Final Comparison

Based on the challenges we faced and the requirements for our barcode detection system, we developed a list of criteria to compare each technology.

After researching and testing the selected technologies, we are able to conduct a comparative analysis of their performance.

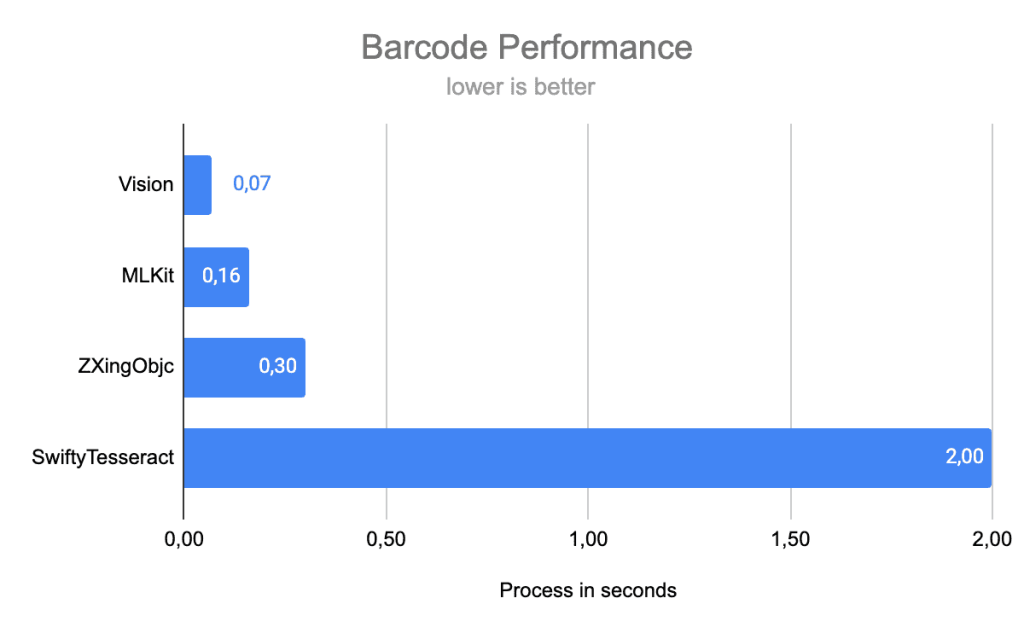
Let’s do this in the form of a bar chart, with the horizontal axis showing the time taken to process the image, and the vertical axis showing the selected technologies and their results:

Solutions Comparison for Barcode Recognition on iOS

The difference between the results is significant and, in some cases, critical.

If we project these results to the user experience, we can accurately indicate that Vision and MLKit show high performance and can definitely be offered for inclusion in a project. Instead, ZXingObjC offers processing in 300 ms, which is significantly longer than its predecessors, but can still provide a comfortable user experience when working in real time.

SwiftyTesseract shows the worst performance in terms of frame processing time, so it definitely cannot be used in real-time processing applications, but it can be used with photos or for background tasks if available. This is also due to the peculiarities of the general OCR approach to recognize all characters and then process the ones we have selected.

Below is a detailed comparison of Vision, MLKit, ZXingObjC, and SwiftyTesseract based on key factors:

Criteria Vision MLKit ZXingObjc SwiftyTesseract
Ease of integration High Medium Medium Medium
Supported formats Codabar 

Code 39 

Code 93 

Code 128

EAN-8

EAN-13 

ITF
UPC-A

UPC-E

Aztec 

Data Matrix 

PDF417 

QR-code

Codabar 

Code 39 

Code 93 

Code 128

EAN-8

EAN-13 

ITF
UPC-A

UPC-E

Aztec 

Data Matrix 

PDF417 

QR-code

Maxicode

RSS-14


Only text-based
Performance 0.07 sec 0.16 sec 0.3 sec 2 sec
Accuracy High High Medium Low
Cross-platform No Yes Yes Yes
Additional info
Barcode format

+ frame

Barcode format 

+ frame

Only 

barcode format

None
Multiple detection
Yes Yes No No
Tutorials / docs
High High Low Medium
Library support and updates Yes Yes No No

Barcodes Recognition on iOS: Conclusion

Each barcode detection library for iOS has its advantages and disadvantages, making the choice dependent on specific project requirements.

Vision: Ideal for projects that prioritize ease of integration, high performance, and simplicity over cross-platform support and ultra-high accuracy. It offers a seamless experience with good results, making it the best choice for applications that don’t require support for multiple platforms and where barcode detection is essential but not necessarily perfect.

MLKit: The go-to solution for cross-platform applications, especially when accuracy is critical and the ability to detect even damaged barcodes is required. It is highly supported with comprehensive documentation and frequent updates, making it an excellent choice for applications that need reliable performance across both iOS and Android.

ZXingObjC: A solid option for projects needing support for barcode formats not available in Vision or MLKit, such as Maxicode and RSS-14. However, the integration is more complex, and the lack of ongoing support could lead to issues in the future. It is a good option for projects with specific barcode format requirements but less ideal for projects requiring long-term stability and maintenance.

SwiftyTesseract: Not recommended for traditional barcode detection. It’s more suitable for projects where OCR is the primary focus, with barcode detection as a secondary task. It can handle only text-based barcodes and has slower performance, making it unsuitable for high-performance barcode scanning.

Ultimately, the choice depends on your project’s goals and constraints. Will you opt for the simplicity and speed of Vision, the cross-platform power of MLKit, the extended format support of ZXingObjC, or the OCR focus of SwiftyTesseract? The decision is yours.

This exploration has been a real challenge, showing us that a seemingly simple question can lead to complex answers. Which solution would you choose?

Apple’s ARKit vs. Eye Fatigue

In today’s world, digital devices dominate our daily lives, with significant time spent in front of screens – computers, smartphones, tablets, etc. While this lifestyle is an inevitable part of modern life, it also places substantial strain on our eyes. For many, eye fatigue has become a routine part of life, and if ignored, it can result in serious health issues. Key symptoms of the problem are: poor sleep, light sensitivity, reduced productivity

Obviously when having respective symptoms one should, first and foremost, reduce the screentime. However this is not always possible. Another way is to do Eye Exercises. An application which guides a person through a set of exercises would be beneficial. And that’s what we’re going to create today.

Eyes tracking

Key feature of an eye training app would be eye tracking. Eye movement tracking helps accurately assess exercise completion and ensures appropriate feedback for the user.

To implement the eye tracking function, we compared several potential solutions:

Tracking Type Vision MLKit ARKit
Process Time* ±7.3 ms ±14.25 ms ±8.6 ms
Output Data Type 2D 2D 3D
Individual Pupil Tracking +
Setup Code Small Many Small
Guides and Tutorials Many A little Many
Multiplatform +

* – 1080p 60 fps iPhone 14 Pro, Front Camera, median

  • Vision Framework: Provides extensive capabilities for 2D face tracking and keypoint detection, such as eye tracking. However, its accuracy and functionality when working with pupils are limited compared to ARKit.
  • Google ML Kit: A cross-platform solution with basic face and eye area tracking capabilities. The main drawbacks include slower frame processing on iOS compared to native tools and challenges in working with pupil tracking.
  • ARKit (ARFaceTracking): An Apple platform offering powerful tools for eye tracking in a 3D space. ARKit delivers precise data through the use of the TrueDepth camera and provides the best native implementation for pupil tracking.

Currently, there is no requirement for cross-platform implementation, as our focus is solely on iOS, where frame processing speed is critical. Additionally, ARKit’s output in a 3D format offers a more advanced implementation, providing deeper visualization options, better customization, and a more comprehensive picture of user actions.

Based on the above considerations, we have chosen ARKit (ARFaceTracking) to implement the eye tracking service.

First, we will define the ARSessionManager protocol and data models for processing results.

We will create the EyeTrackingData model to store data about the position of each eye in all expected states, enabling us to process the results from ARFaceAnchor and retain them:

final class EyeTrackingData {
    // MARK: - Properties
    var eyeLookInLeft: Float
    var eyeLookOutLeft: Float
    var eyeLookInRight: Float
    var eyeLookOutRight: Float
    var eyeLookUpLeft: Float
    var eyeLookDownLeft: Float
    var eyeLookUpRight: Float
    var eyeLookDownRight: Float
    var eyeBlinkLeft: Float
    var eyeBlinkRight: Float
    var eyeWideLeft: Float
    var eyeWideRight: Float
    
    // MARK: - Init
    init(...) { ... }
}

Now let’s describe the ARSessionManager protocol and the ARSessionManagerDelegate delegate, which will return the results for further use:

protocol ARSessionManager: AnyObject {
    // MARK: - Funcs
    func setDelegate(_ delegate: ARSessionManagerDelegate)
    func setupSession() -> ARSCNView
    func startSession()
    func pauseSession()
}

protocol ARSessionManagerDelegate: AnyObject {
    func didUpdateEyeTrackingData(_ data: EyeTrackingData)
}

When implementing ARSessionManager, it is important to consider the following configurations:

  • Using arSessionQueue to isolate the service’s operation queue from the UI, preventing interface blocking;
  • Using ARFaceTrackingConfiguration to explicitly specify the type of tracking.

final class ARSessionManagerImpl: NSObject, ARSessionManager {
    // MARK: - Delegate
    private var delegate: ARSessionManagerDelegate?
    
    // MARK: - Properties
    private var configurations: ARConfiguration?
    private let arSessionQueue = DispatchQueue(
        label: "ar-session-queue",
        qos: .userInitiated,
        attributes: [],
        autoreleaseFrequency: .workItem
    )
    
    // MARK: - ARSceneView
    private var sceneARView = ARSCNView()
    
    // MARK: - Set
    func setDelegate(_ delegate: ARSessionManagerDelegate) {
        self.delegate = delegate
    }
    
    func setupSession() -> ARSCNView {
        configurations = ARFaceTrackingConfiguration()
        sceneARView.delegate = self
        return sceneARView
    }
}

The methods startSession() and pauseSession() are provided for session management:

// MARK: - Controls
extension ARSessionManagerImpl {
    func startSession() {
        arSessionQueue.async {
            guard let config = self.configurations else { return }
            self.sceneARView.session.run(config, options: [
                .resetTracking, .removeExistingAnchors
            ])
        }
    }
    
    func pauseSession() {
        arSessionQueue.async {
            self.sceneARView.session.pause()
        }
    }
}

To accomplish the primary function – tracking the user’s eye state and transmitting the relevant data – it is necessary to utilize the appropriate method from ARSCNViewDelegate. This method enables the retrieval of ARFaceAnchor and the associated data set, ensuring accurate and efficient processing of the required information.

One of the key components returned by ARFaceAnchor is blendShapes. These are a set of parameters that describe specific facial positions and states, such as blinking, eye movements, or changes in mouth shape. Each of these positions is represented as a numeric value ranging from 0.0 to 1.0, indicating the intensity of a particular action or position.

BlendShapes are crucial for accurately determining the user’s eye state. For instance, the parameters eyeBlinkLeft and eyeBlinkRight indicate the blinking level of the left and right eyes, while eyeLookUpLeft or eyeLookOutRight show the gaze direction. Apple provides visualizations and documentation for these parameters, which greatly simplifies their integration into application development.

Eye Blinking

// MARK: - ARSCNViewDelegate
extension ARSessionManagerImpl: ARSCNViewDelegate {
    func renderer(
        _ renderer: SCNSceneRenderer,
        didUpdate node: SCNNode,
        for anchor: ARAnchor
    ) {
        guard let faceAnchor = anchor as? ARFaceAnchor else { return }
        let blendShapes = faceAnchor.blendShapes
        
        let eyeTrackingData = EyeTrackingData(
            eyeLookInLeft: blendShapes[.eyeLookInLeft]?.floatValue,
            eyeLookOutLeft: blendShapes[.eyeLookOutLeft]?.floatValue,
            eyeLookInRight: blendShapes[.eyeLookInRight]?.floatValue,
            eyeLookOutRight: blendShapes[.eyeLookOutRight]?.floatValue,
            eyeLookUpLeft: blendShapes[.eyeLookUpLeft]?.floatValue,
            eyeLookDownLeft: blendShapes[.eyeLookDownLeft]?.floatValue,
            eyeLookUpRight: blendShapes[.eyeLookUpRight]?.floatValue,
            eyeLookDownRight: blendShapes[.eyeLookDownRight]?.floatValue,
            eyeBlinkLeft: blendShapes[.eyeBlinkLeft]?.floatValue,
            eyeBlinkRight: blendShapes[.eyeBlinkRight]?.floatValue,
            eyeWideLeft: blendShapes[.eyeWideLeft]?.floatValue,
            eyeWideRight: blendShapes[.eyeWideRight]?.floatValue
        )
        
        delegate?.didUpdateEyeTrackingData(eyeTrackingData)
    }
}

We have created the EyeTrackingData model and defined the complete logic for ARSessionManager, which works with ARFaceTrackingConfiguration and provides the expected data. Now, we will focus on implementing the service that will process the results and determine whether the selected exercises have been completed.

To begin, it is necessary to create appropriate working models to describe the exercises and the criteria for their completion, such as eye positions. In our case, exercises will define the direction of the gaze relative to the center, meaning that the exercise name and the eye position can match:

enum EyeExercise: CaseIterable {
    case right
    case left
    case up
    case down
    case topLeft
    case topRight
    case bottomLeft
    case bottomRight
    case blink
}

Next, we need to define the criteria for the ExerciseService, i.e., its protocol. In our case, it will have combined functionality, meaning it will both create the training sequence and verify whether the current exercise is completed, then switch to the next one.


protocol ExerciseService {
    func regenerateExercises(type: TrainingSetType)
    func isCurrentExerciseCompleted(
        inputData: EyeTrackingData,
        user: UserData?
    ) -> Bool
}

The implementation of the isCurrentExerciseCompleted() method is critical to the functionality of our app, as this method determines whether the current exercise has been successfully completed:

func isCurrentExerciseCompleted(
    inputData: EyeTrackingData,
    user: UserData?
) -> Bool {
    /// We’ll check the input data value of each eye separately and determine
    /// its position to make sure that the exercise is being completed.
    /// For blinks, we will check whether the eyes were closed
    /// (i.e., no pupils are visible)
}


In our specific case, we employ the MVP architectural pattern, where data from ARSessionManager is returned via a delegate to the Presenter. In the Presenter, the data is processed using the ExerciseService class, which is responsible for structuring the training sequence and verifying the completion of the current exercise. These results are then processed to provide the user with appropriate feedback.

Calibration: A Crucial Step

Before a user begins using the app regularly, it is critical to perform a calibration process. Each individual is unique, with different eye positions, varying limits on rotation and movement, varying eye depth in the skull, and other physiological differences.

To ensure the comprehensive and high-quality functionality of our app, we must include a dedicated calibration feature. This involves creating a specific training sequence — a set of exercises that accounts for a maximum number of positions and states.

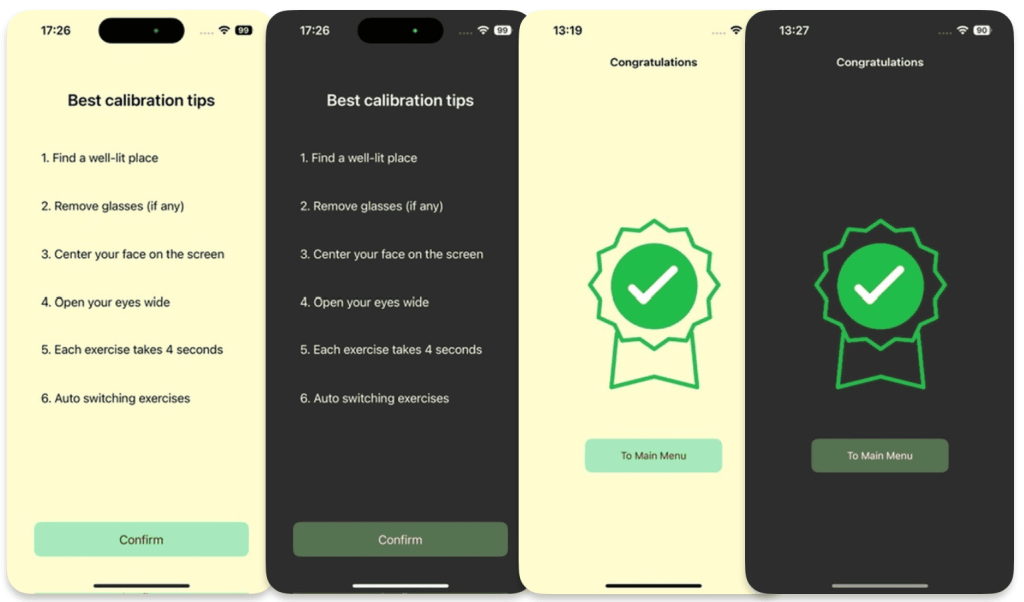
Additionally, an informational Best Practices screen should be implemented to educate and guide the user effectively.

At the end of the calibration (as with every workout), it’s worth adding a rewards screen to highlight the end of the workout and give the user a sense of accomplishment.

Best Calibration Tips

To achieve this, we will proceed with the following steps:

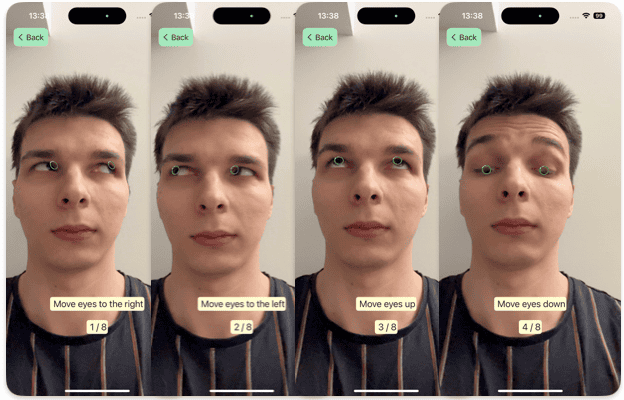
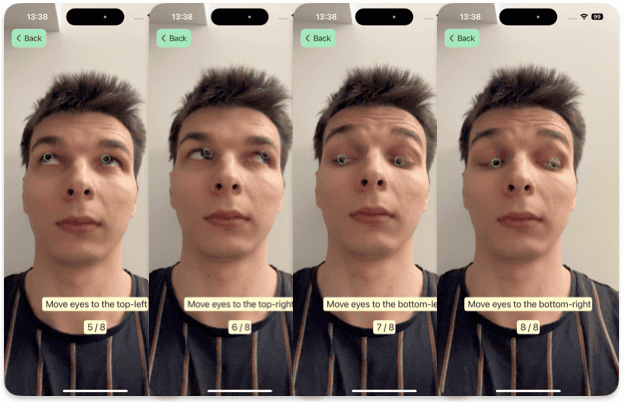
  1. Perform two cycles of EyeExercise with a pause of 5-10 seconds between each exercise. This will allow us to determine typical eye deviations and their positions for each exercise.
  2. Save these results in the corresponding values of UserData with a coefficient of 0.8. This adjustment will account for the natural imperfections in human movements and the variability of results.

Eye Tracking 1

Eye Tracking 2

And after this user is guided to do a set of various exercises where they have to move their eyes in all directions.

More about application

Data Input Form and Its Purpose

For personalized user interaction and efficient data storage and management, we utilize Apple’s CoreData framework. This allows for seamless operation with a local database and offers flexibility in handling data.

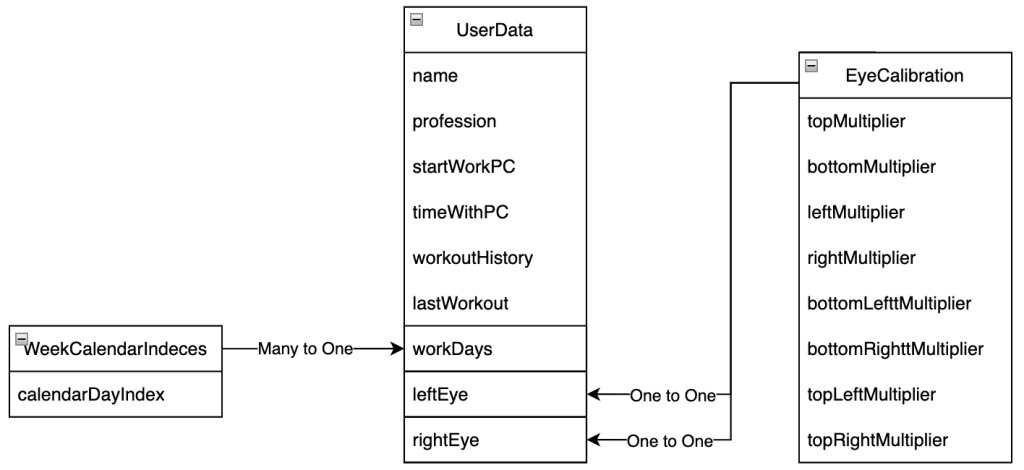
We create a UserData models to store essential user information and its child entities to manage and track exercises (look at relationship diagram bellow):

Data Input Schemes

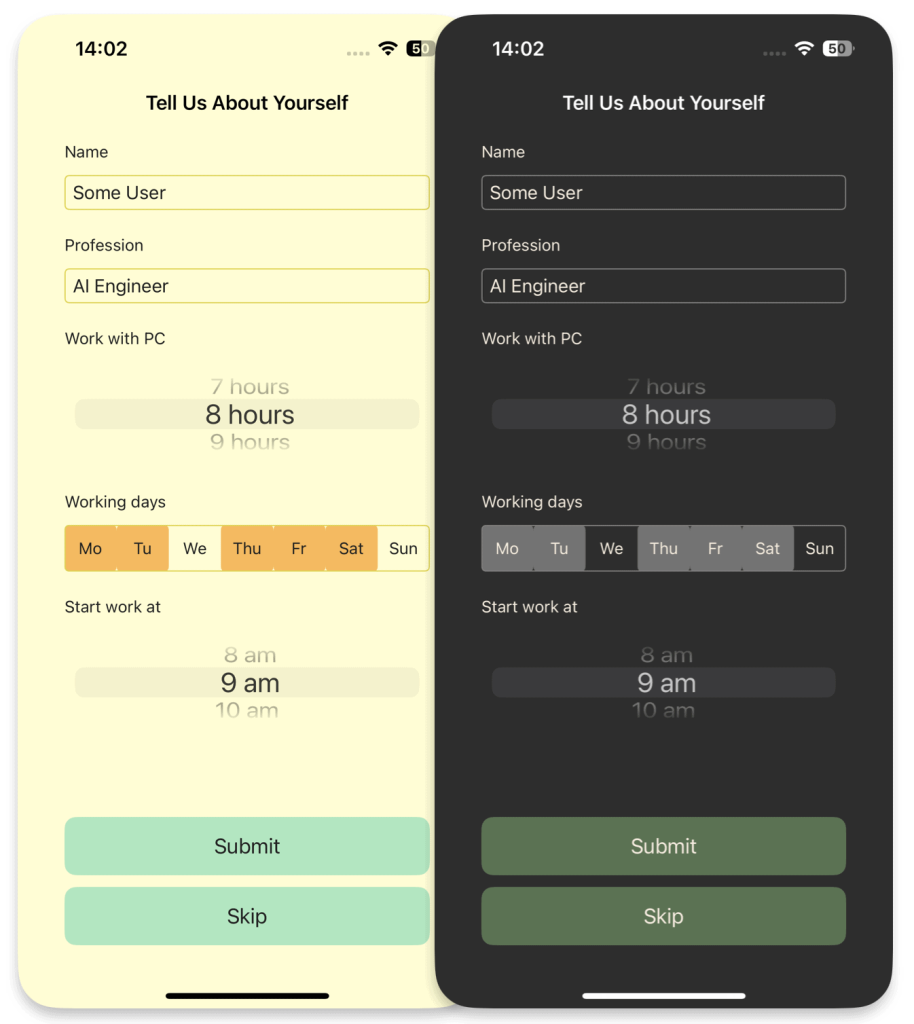
During the initial setup (onboarding), the user is prompted to enter the following information:

  • Working hours: Start time and duration of the workday spent at the computer;
  • Working days: The days of the week when the user is actively working.


Application Onboarding Setup

This data is essential for personalizing notifications to align with the user’s work schedule and ensure they are not intrusive during non-working hours.

Notifications

Regularity of breaks and exercises is really important. So a simple function like scheduled reminders throughout the day is a must.

To handle notification creation and management, we first define a protocol NotificationService, where we outline the required functionality:

protocol NotificationService: AnyObject {
    func scheduleNotifications(user: UserData, timeReminder: Int)
    func rescheduleNotifications(user: UserData)
}


Next, we will implement the methods scheduleNotifications() and rescheduleNotifications(), which will handle creating notifications based on the user’s onboarding questionnaire and updating them if the user completes eye exercises between reminders.

func scheduleNotifications(
    user: UserData,
    timeReminder: Int   /// numbers of hours between notifications
) { 
    let workingHours = Int(user.workingTime)
    let startHour = Calendar.current.component(.hour, from: lastWorkout)
    UNUserNotificationCenter.current().removeAllPendingNotificationRequests()
    
    for day in workDays {
        for hour in stride(
            from: startHour + timeReminder,
            to: startHour + workingHours,
            by: timeReminder
        ) {
            addNotification(day: day, hour: hour, lastWorkout: lastWorkout)
        }
    }
}

A private method addNotification() has been added to create a request. This method provides the context and trigger for the notification and adds it to the general notification pool.

private func addNotification(day: Int, hour: Int, lastWorkout: Date) {
    var dateComponents = DateComponents()
    dateComponents.weekday = day
    dateComponents.hour = hour
    
    if let notificationDate = Calendar.current.nextDate(
        after: lastWorkout,
        matching: dateComponents,
        matchingPolicy: .nextTime
    ) {
        /// Set notification content
        let content = UNMutableNotificationContent()
        content.title = Strings.NotificationService.title
        content.body = Strings.NotificationService.body
        
        /// Set notification trigger
        let trigger = UNCalendarNotificationTrigger(
            dateMatching: Calendar.current.dateComponents(
                [.year, .month, .day, .hour, .minute, .second],
                from: notificationDate
            ),
            repeats: false
        )
        
        let request = UNNotificationRequest(
            identifier: UUID().uuidString,
            content: content,
            trigger: trigger
        )
        
        UNUserNotificationCenter.current().add(request) { (error) in
            if let error = error {
                /// handling the error
            }
        }
    }
}

The implementation of rescheduleNotifications() remains similar, with the consideration that current notifications will be recreated for the remainder of the workday.

For example, if a user works from 9:00 AM to 5:00 PM with a reminder interval of every 2 hours, notifications will be sent at 11:00 AM, 1:00 PM, and 3:00 PM. Notifications will not be sent during non-working hours or days, ensuring they are non-intrusive and aligned with the user’s personal schedule.

Colors

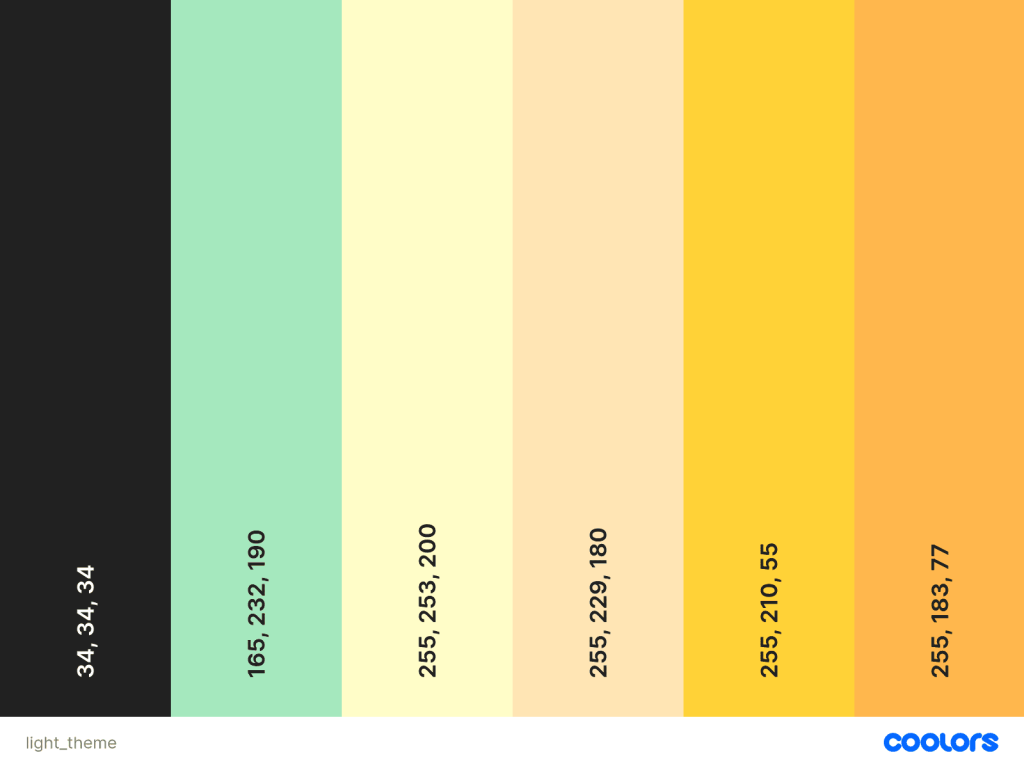
Last but not the least is the UI color scheme. User interface design and user experience are critical for eye health applications, as the right color scheme can reduce eye strain and enhance user perception (DevTo). UI colors for the app were chosen based on the principles of color psychology and their impact on users (MockFlow, HappyDesign).

Eye Tracking App Colors

Conclusion

In today’s world, digital devices dominate our lives, yet we often overlook the long-term impact of prolonged screen time on our eyes. Symptoms like migraines, disrupted sleep, light sensitivity, and reduced productivity may begin subtly but can escalate into significant health issues. Apps like ours aim to address these challenges proactively, promoting better eye health and well-being.Eye Tracking Meme

Building an app to combat eye fatigue requires more than technical expertise; it demands thoughtful design. Eye-tracking technology must balance performance, accuracy, and platform compatibility for seamless integration. Equally vital is the user experience – interfaces should reduce eye strain with adaptive color schemes and feel intuitive to use. Notifications play a key role in encouraging regular breaks, fostering healthier habits.

Challenges remain, such as hardware limitations (e.g., TrueDepth camera availability) and the need for robust onboarding and calibration processes to personalize the experience. User education is also critical, ensuring awareness of the importance of eye care and exercises.

Our app leverages ARKit with ARFaceTracking for precise, efficient three-dimensional eye tracking. The ARSessionManager isolates session handling, ensuring smooth data flow to the Presenter, where exercises are monitored. Adaptive color schemes reduce strain, while smart notifications remind users to take breaks, tailored to their schedules.

This demonstrates how technology can address real-world health issues. However, opportunities abound – whether through integrating third-party platforms or enhancing functionality with machine learning for greater precision and personalization.

How would you implement eye tracking in your app? 

Perhaps it’s time to explore the possibilities that machine learning could bring to the table. After all, the future of eye tracking is only limited by the scope of our imagination.

Face It! Apple’s Vision Framework Makes Image Processing Simple

Apple’s Vision Framework is a powerful tool for computer vision that allows developers to integrate broad capabilities of computer vision into their apps, even with the use of custom machine learning models. It works on devices running iOS 11.0+ and offers real-time, on-device processing without requiring constant internet access, LiDAR sensors, or the latest high-performance chips.

The key features we will explore:

  • Face Detection
  • Face Landmark Recognition
  • Text Recognition
  • Hand Pose Detection

It’s worth noting that Vision is also capable of human body pose estimation through its built-in requests, making it suitable for many general-purpose motion and interaction scenarios on Apple platforms. However, when applications require more granular control over skeletal models, cross-platform consistency, or advanced tuning for dynamic movement analysis, dedicated pose estimation frameworks such as MediaPipe tend to offer greater flexibility and depth.

Getting Started with Vision

Apple’s Vision Framework provides powerful tools for computer vision tasks, leveraging advanced built-in machine learning models. These models automatically process images or video streams in real-time, performing tasks such as detecting faces, text, or other visual elements. This allows developers to integrate sophisticated functionalities into their apps without the need to develop custom algorithms from scratch.

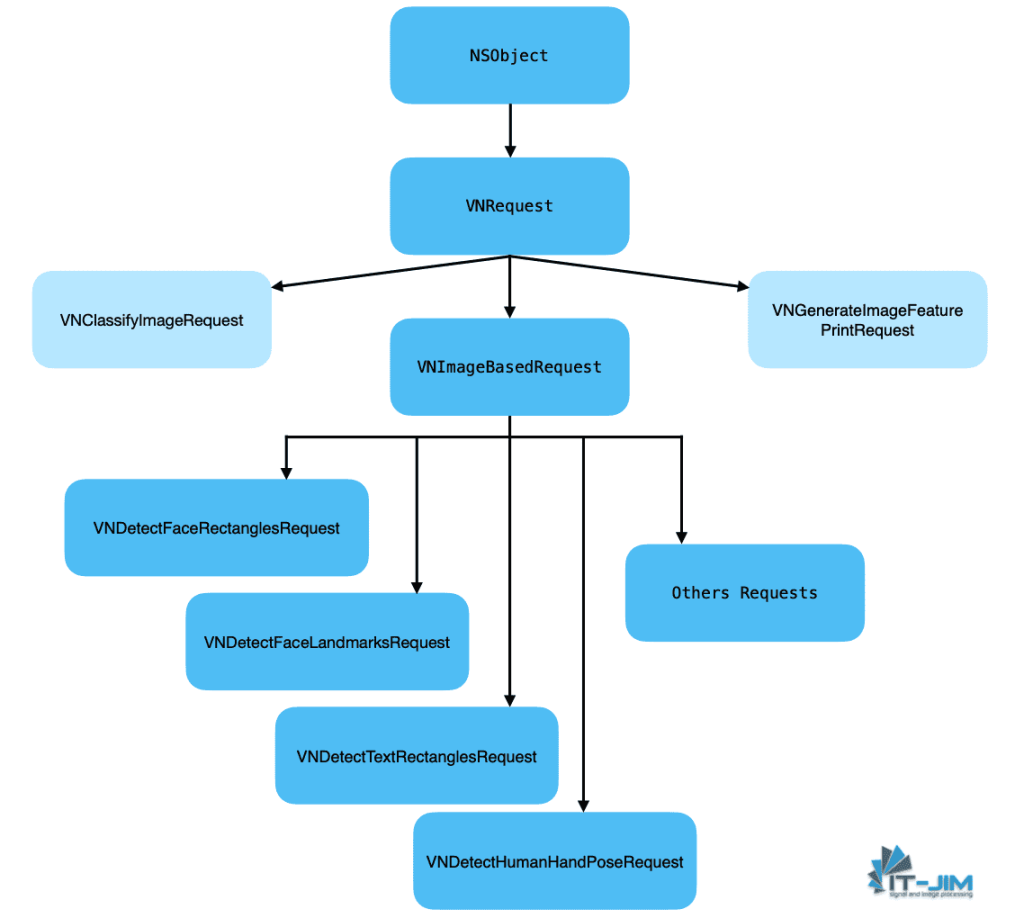
The entire process in Vision is built on the concept of requests. Each task is encapsulated as a request (VNRequest), and specific requests, such as face detection or landmark recognition, inherit from this base class. This structure provides flexibility, allowing you to create various requests based on the task at hand. After creating a request, you configure it with the necessary parameters, pass an image or video stream for processing, and receive the results asynchronously.

This inheritance structure makes Vision highly modular and easy.

Apple Vision-Framework Architecture


An essential part of working with Vision is the VNImageRequestHandler, which is responsible for handling images and frames passed to the Vision Framework. This class allows you to process both still images and real-time video feeds, managing the lifecycle of requests from input to output. The handler’s role is crucial because it simplifies the flow of processing multiple requests on the same image or frame, abstracting the complexity of the underlying machine learning models.

This structure is critical because it enables you to run multiple requests in sequence or in parallel, ensuring that your app remains responsive while the Vision Framework performs potentially resource-intensive tasks in the background.

Additionally, Vision Framework supports integration with custom machine learning models through CoreML, allowing you to extend its capabilities beyond the built-in functionality. This means you can perform more specialized tasks by training your own models and integrating them with Vision, creating highly customized solutions for your specific use cases.

How does it work?

At the core of Vision Framework’s functionality lies a carefully designed process that allows for seamless integration of computer vision tasks within your app. When working with images or video streams, Vision operates through a structured lifecycle: from capturing or loading an image, processing it with built-in machine learning models, and finally visualizing or using the results. This process ensures efficiency and flexibility in handling a variety of requests.

Apple-Vision-Framework-Architecture

While the process may seem complex, it abstracts much of the complexity behind machine learning and image processing, allowing developers to focus on implementing the functionality rather than building the algorithms from scratch. By following this clear structure, Vision ensures that even resource-intensive tasks, such as real-time image recognition, can be handled smoothly and asynchronously, making it a robust and flexible tool for creating advanced computer vision applications.

Setup Structure

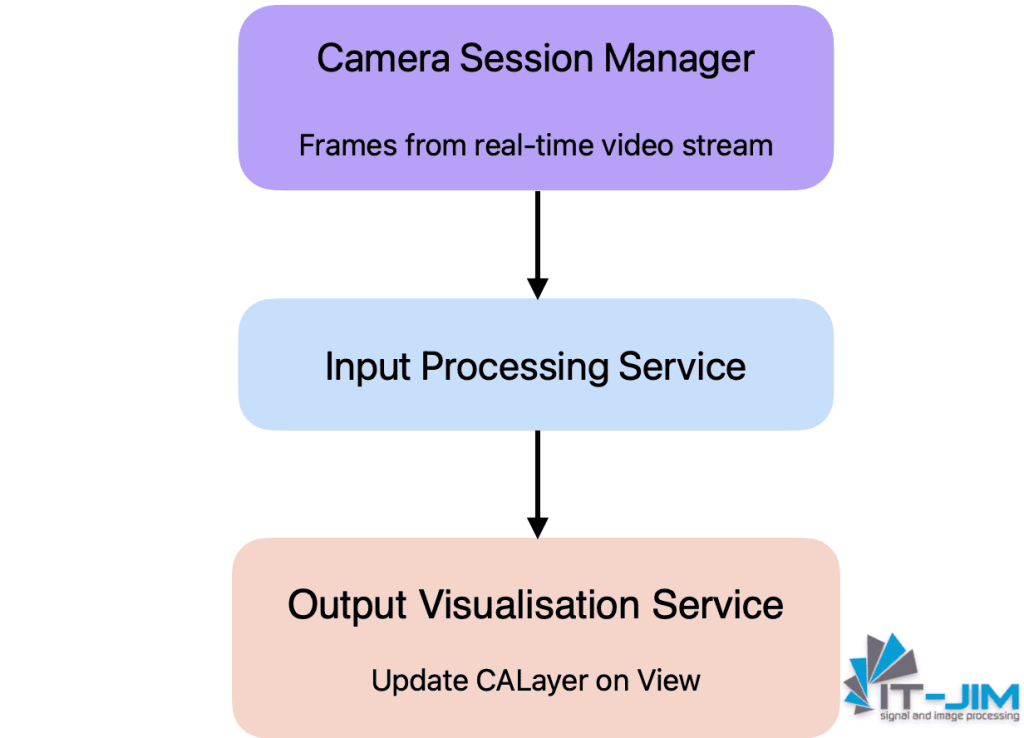
Now that we have a clear understanding of how Vision Framework operates, as shown in the earlier lifecycle diagram, we will structure our app around three key services to manage different aspects of the vision processing:

Apple Vision Framework Setup Structure


  1. Camera Session Manager — responsible for configuring the camera and providing a CALayer to display the camera feed.
  2. Input Processing Service — responsible for handling Vision requests and processing the visual data to provide results.
  3. Output Visualisation Service — responsible for visualizing the processed results and updating the UI.

By separating these concerns into distinct services, we ensure that each component of the Vision workflow is isolated, making the app easier to maintain and expand in the future.

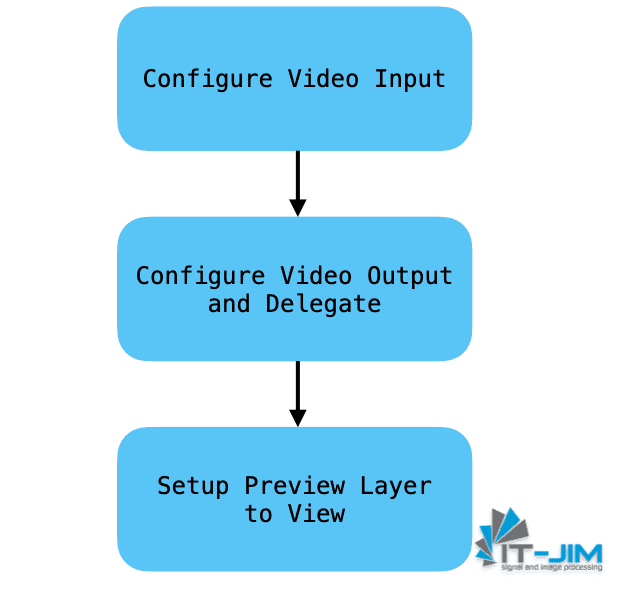
Camera Session Manager

Let’s start by setting up the Camera Control Manager. This service will handle the camera configuration, enabling real-time video capture from the device’s camera. It will also provide the necessary CALayer for rendering the camera feed, which will later be used by the Vision Processing Service for analysis.

Apple Vision Framework Camera Session Manager

In the code below, we configure the camera to capture video streams in real-time. This configuration ensures that the Vision Framework receives a live feed from the device’s camera, which will be passed to the Vision Processing Service for further analysis.

protocol CameraSessionManager: AnyObject {
    // MARK: - Publisher
    var eventPublisher: AnyPublisher<CVPixelBuffer, Never> { get }
    
    // MARK: - Properties
    var previewLayer: AVCaptureVideoPreviewLayer! { get }
    
    // MARK: - Funcs
    func startSession()
    func pauseSession()
    func toggleCameraMode()
}

After implementing our protocol, we will create a CameraSessionManagerImpl – service class – an object that will allow us to work with the camera control and receive a video stream.

final class CameraSessionManagerImpl: NSObject, CameraSessionManager {
    // MARK: - Publishers
    private(set) lazy var eventPublisher = eventSubject.eraseToAnyPublisher()
    private let eventSubject = PassthroughSubject<CVPixelBuffer, Never>()
    
    // MARK: - Properties
    var previewLayer: AVCaptureVideoPreviewLayer!
    private let session = AVCaptureSession()
    private let cameraQueue = DispatchQueue(label: "camera-control-queue", qos: .userInitiated)
    private var isUsingFrontCamera = true
    
    // MARK: - Init
    override init() {
        super.init()
        cameraQueue.async {
            self.setupCaptureSession()
        }
    }
    
    // MARK: - Control
    func startSession() { … }
    
    func pauseSession() { … }
    
    func toggleCameraMode() { … }

We will implement all further functionality through extensions to separate functional blocks and improve visibility. Moreover, it has a very good impact on dispatching.

// MARK: - Private
private extension CameraSessionManagerImpl {
    func setupCaptureSession() {
        session.beginConfiguration()
        
        let videoInputConfigured = try? configureVideoInput()
        
        guard videoInputConfigured != nil else {
            session.commitConfiguration()
            return
        }
        
        let videoOutput = AVCaptureVideoDataOutput()
        videoOutput.setSampleBufferDelegate(self, queue: cameraQueue)
        if session.canAddOutput(videoOutput) {
            session.addOutput(videoOutput)
        }
        
        session.commitConfiguration()
        
        self.previewLayer = AVCaptureVideoPreviewLayer(session: self.session)
        self.previewLayer.videoGravity = .resizeAspectFill
    }
    
    func configureVideoInput() throws {
        guard let videoDevice = AVCaptureDevice.default(
            .builtInWideAngleCamera,
            for: .video,
            position: isUsingFrontCamera ? .front : .back
        ) else {
            throw CameraError.failedCameraDevice
        }
        
        do {
            let videoInput = try AVCaptureDeviceInput(device: videoDevice)
            
            if session.canAddInput(videoInput) {
                session.addInput(videoInput)
            } else {
                throw CameraError.failedVideoInput
            }
        } catch {
            throw CameraError.failedVideoInput
        }
    }
}

Once the session is configured, it can output video frames in various formats that can be further processed. In our case, we opted for a real-time video stream, which can be accessed using the AVCaptureVideoDataOutputSampleBufferDelegate.

This delegate provides CMSampleBuffer objects, which represent individual frames captured from the camera at a specific frame rate (FPS). These frames are then fed into the Vision Framework for further processing and analysis, making real-time visual data processing possible

The session can operate on both rare camera modules and the front-facing camera, but when using the front camera, it’s important to keep in mind the orientation attribute, as the video stream from the front camera is mirrored.

// MARK: - AVCaptureVideoDataOutputSampleBufferDelegate
extension CameraSessionManagerImpl: AVCaptureVideoDataOutputSampleBufferDelegate {
    func captureOutput(
        _ output: AVCaptureOutput,
        didOutput sampleBuffer: CMSampleBuffer,
        from connection: AVCaptureConnection
    ) {
        guard let pixelBuffer = CMSampleBufferGetImageBuffer(sampleBuffer) else {
            return
        }
        
        self.eventSubject.send(pixelBuffer)
    }
}

Camera Session Manager is ready; we now receive each frame from our selected module after the session starts, and we can move on to the next step: creating and integrating the Input Processing Service to start using the powerful capabilities of Vision computer vision for our needs.

Input Processing Service

This service is responsible for handling Vision requests and processing visual data in real-time. It acts as the middle layer between the camera feed and the final visual output by performing operations such as face detection, text recognition, and hand tracking, depending on the specific request.

The Input Processing Service operates by receiving frames from the camera and then applying the necessary Vision request based on the selected functionality. Each request is executed on a separate queue to ensure efficient handling of the data without impacting the user interface.

The service also makes use of VNImageRequestHandler to process images or video frames, and it handles the results asynchronously, ensuring smooth performance even with complex tasks.

protocol InputProcessingService: AnyObject {
    // MARK: - Publishers
    var eventPublisher: AnyPublisher<[VNObservation], Never> { get }
    
    // MARK: - Funcs
    func toggleCameraMode()
    func setupRequest(for type: VNImageBasedRequest.Type)
    func processImage(_ pixelBuffer: CVPixelBuffer)
}

The InputProcessingServiceImpl class is responsible for executing the Vision requests.

final class InputProcessingServiceImpl: InputProcessingService {
    // MARK: - Publishers
    private(set) lazy var eventPublisher = eventSubject.eraseToAnyPublisher()
    private let eventSubject = PassthroughSubject<[VNObservation], Never>()
    
    // MARK: - Properties
    private let visionQueue = DispatchQueue(label: "vision-processing-queue", qos: .userInitiated)
    private var visionRequests = [VNRequest]()
    private var isUsingFrontCamera: Bool = true
    
    // MARK: - Setup
    func setupRequest(for type: VNImageBasedRequest.Type) { … }
    
    // MARK: - Process
    func processImage(_ pixelBuffer: CVPixelBuffer) {
        visionQueue.async {
            let requestHandler = VNImageRequestHandler(
                cvPixelBuffer: pixelBuffer,
                orientation: self.isUsingFrontCamera ? .leftMirrored : .right,
                options: [:]
            )
            
            do {
                try requestHandler.perform(self.visionRequests)
            } catch {
                self.logger.log(.error(.failedToProcessImage))
            }
        }
    }
    
    // MARK: - Toggle Camera
    func toggleCameraMode() { … }
}

Each request, once processed, will send its results through the eventPublisher, which is observed by other components in the app, like the Output Visualization Service

With the Input Processing Service now fully operational, we can capture frames from the camera and process them through Vision Framework, using different types of requests depending on the task. Next, we will move on to integrating the Output Visualization Service, which will visualize these results in real-time.

Output Visualization Service

The Output Visualization Service is responsible for rendering the results of the Vision Framework’s analysis onto the app’s user interface. This service takes in the visual observations provided by the Input Processing Service, such as face landmarks, text regions, or hand poses, and overlays them on the video feed or image using a CALayer.

This service ensures that all UI updates occur on the main thread to avoid rendering issues and makes use of CAShapeLayer for drawing different visual elements such as facial features, recognized text bounding boxes, or hand poses.

protocol OutputVisualisationService: AnyObject {
    // MARK: - Properties
    var overlayLayer: CALayer { get }
    
    // MARK: - Funcs
    func setup(layer: CALayer)
    func visualize(_ results: [VNObservation])
}

final class OutputVisualisationServiceImpl: OutputVisualisationService {
    // MARK: - Properties
    var overlayLayer = CALayer()

    // MARK: - Setup
    func setup(layer: CALayer) {
        overlayLayer.frame = layer.bounds
        overlayLayer.sublayers?.removeAll()
    }
    
    // MARK: - Visualization
    func visualize(_ results: [VNObservation]) {
        /// Ensure UI updates are made on the main thread.
        DispatchQueue.main.async {
            self.overlayLayer.sublayers?.removeAll(where: { $0 is CAShapeLayer })
        }
        
        guard let firstResult = results.first else { return }
        
        switch firstResult { … }
    }
}

By isolating visualization logic into this service, we maintain clean separation of concerns, allowing for easy control to the UI while processing real-time video streams.

Face Detection and Face Landmarks

Vision Framework provides the ability to detect faces in images and video streams. It can recognize key facial features, enabling the creation of interactive features in apps, ranging from AR filters to simple face recognition systems for authentication.

Face and key point tracking works effectively even in low-light conditions, from different angles, or even from the side. Once the request results are received, you can customize the appearance as desired, for example, as shown below.

Face Detection and Face Landmarks in Apple Vision Framework

To work with face detection, it’s enough to create a corresponding request object VNDetectFaceRectanglesRequest and a function to process the results and visualisation:

// MARK: - Face Detection Request
extension InputProcessingServiceImpl {
    func setupFaceDetectionRequest() {
        let request = VNDetectFaceRectanglesRequest { [weak self] (request, error) in
            guard
                let results = request.results as? [VNFaceObservation],
                error == nil
            else {
                return
            }
            self?.eventSubject.send(results)
        }
        
        visionRequests = [request]
        logger.log(.info(.visionFaceDetectionRequestSetup))
    }
}
// MARK: - Face Detection Drawing
extension OutputVisualisationServiceImpl {
    func drawFaceObservations(_ observations: [VNFaceObservation]) {
        for faceObservation in observations {
            /// face.boundingBox provides coordinates in normalized units (0 to 1).
            let boundingBox = faceObservation.boundingBox
            
            /// convertedRect converts them into layer coordinates for proper display.
            let convertedRect = self.convertBoundingBox(boundingBox)
            
            self.addFaceLayer(convertedRect)
        }
    }
    
    func addFaceLayer(_ rect: CGRect) {
        let faceLayer = CAShapeLayer()
        faceLayer.frame = rect
        faceLayer.borderColor = UIColor.green.cgColor
        faceLayer.borderWidth = 2
        faceLayer.cornerRadius = 5
        
        DispatchQueue.main.async {
            self.overlayLayer.addSublayer(faceLayer)
        }
    }
}

In general, we have the ability to detect faces and recognize key facial features simultaneously, but it’s better to separate these tasks for better code clarity.

Facial landmark recognition can detect points such as the contour, eyes, eyebrows, nose, and lips (both inner and outer parts). When creating a request, we now use VNDetectFaceLandmarksRequest:

// MARK: - Face Landmarks Request
extension InputProcessingServiceImpl {
    func setupFaceLandmarksRequest() {
        let request = VNDetectFaceLandmarksRequest { [weak self] (request, error) in
            guard
                let results = request.results as? [VNFaceObservation],
                error == nil
            else {
                return
            }
            self?.eventSubject.send(results)
        }
        visionRequests = [request]
    }
}
// MARK: - Face Landmarks Drawing
extension OutputVisualisationServiceImpl {
    func drawFaceLandmarks(_ observations: [VNFaceObservation]) {
        for faceObservation in observations {
            /// Check if landmarks are available for the current face.
            guard let landmarks = faceObservation.landmarks else {
                continue
            }
            
            /// Convert the normalized bounding box to display coordinates for drawing.
            let faceRect = faceObservation.boundingBox
            let convertedRect = convertBoundingBox(faceRect)
            
            /// For each face, take the landmarks and draw each landmark
            /// element (e.g., eyes, nose, lips, etc.).
            drawLandmarks(landmarks, faceBoundingBox: convertedRect)
        }
    }
    
    func drawLandmarks(_ landmarks: VNFaceLandmarks2D, faceBoundingBox: CGRect) { … }
}

The face detection and landmark recognition features in Vision Framework are highly versatile, offering numerous applications across various fields.

These features enable interactive and engaging user experiences, while also supporting advanced security and health tracking functionalities, for example, use cases include:

  • Face filters and other functions which can be used on the main camera, unlike ARKit face which can be detected only on the selfie camera.
  • Security and analytics: Face recognition for access control and collecting data for quantitative analysis;
  • Health: Monitoring facial expressions and shape for tracking emotions or health changes.

Text Recognition

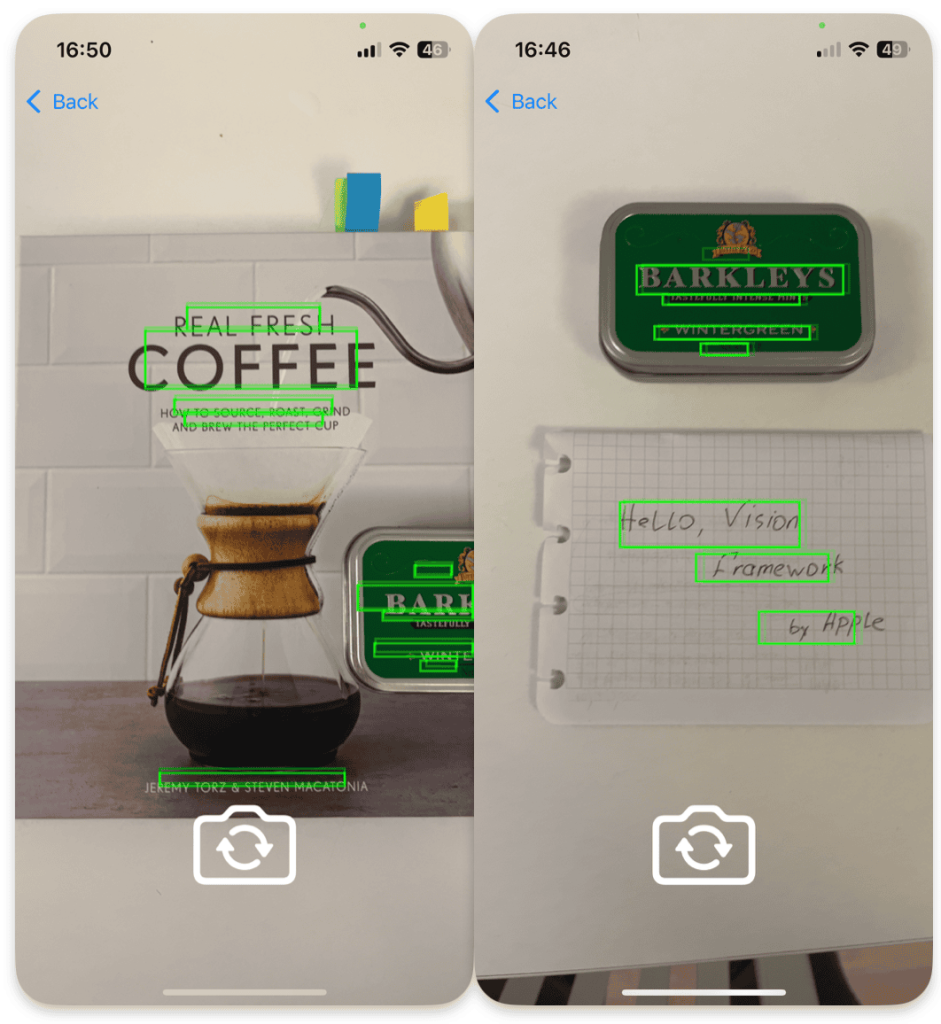
Vision Framework allows to perform text recognition in images or videos, converting it into a digital format. It currently supports 18 languages (including Cyrillic and Arabic scripts), making it a great choice for applications that deal with documents, translation, or content analysis.

Apple Vision Framework Text Recognition

When using VNRecognizeTextRequest, we must specify the model that will process the frames or provided images through the recognitionLevel parameter.

Other parameters are optional but can help you better understand the capabilities of this request. Additionally, when receiving the request’s result, the bounding box is returned directly along the edges of the text characters, but for a better user experience, you might want to consider expanding it slightly.

// MARK: - Text detection Request
extension InputProcessingServiceImpl {
    func setupTextDetectionRequest() {
        let request = VNRecognizeTextRequest { [weak self] (request, error) in
            guard
                let results = request.results as? [VNRecognizedTextObservation],
                error == nil
            else {
                return
            }
            self?.eventSubject.send(results)
        }
        
        /// Availiable recognitionLevels is .fast and .accurate
        request.recognitionLevel = .fast
        
        request.usesLanguageCorrection = true
        request.automaticallyDetectsLanguage = true
        
        visionRequests = [request]
        logger.log(.info(.visionTextDetectionRequestSetup))
    }
}

// MARK: - Text Detection Drawing
extension OutputVisualisationServiceImpl {
    func drawTextObservations(_ observations: [VNRecognizedTextObservation]) {
        for textObservation in observations {
            let boundingBox = textObservation.boundingBox
            let convertedRect = convertBoundingBox(boundingBox)
            
            addTextLayer(convertedRect)
        }
    }
    
    func addTextLayer(_ rect: CGRect) {
        let textLayer = CAShapeLayer()
        textLayer.frame = rect
        textLayer.borderColor = UIColor.green.cgColor
        textLayer.borderWidth = 2
        textLayer.cornerRadius = 3
        
        DispatchQueue.main.async {
            self.overlayLayer.addSublayer(textLayer)
        }
    }
}

The text recognition features in Vision Framework are highly adaptable, providing solutions for a wide range of industries and user needs.

From logistics to accessibility, these features make it easier to capture, analyze, and interact with textual data in various contexts. For example, potential use cases include:

  • Commerce and logistics: Scanning price tags or product compositions, working at logistics hubs, operations with long-distance services, sorting, and storing goods;
  • Language: Real-time translation to overcome language barriers;
  • Education: Digitization of materials from textbooks or blackboards;
  • Accessibility: Translating or converting text to speech for people with visual impairments.

Hand Pose Detection

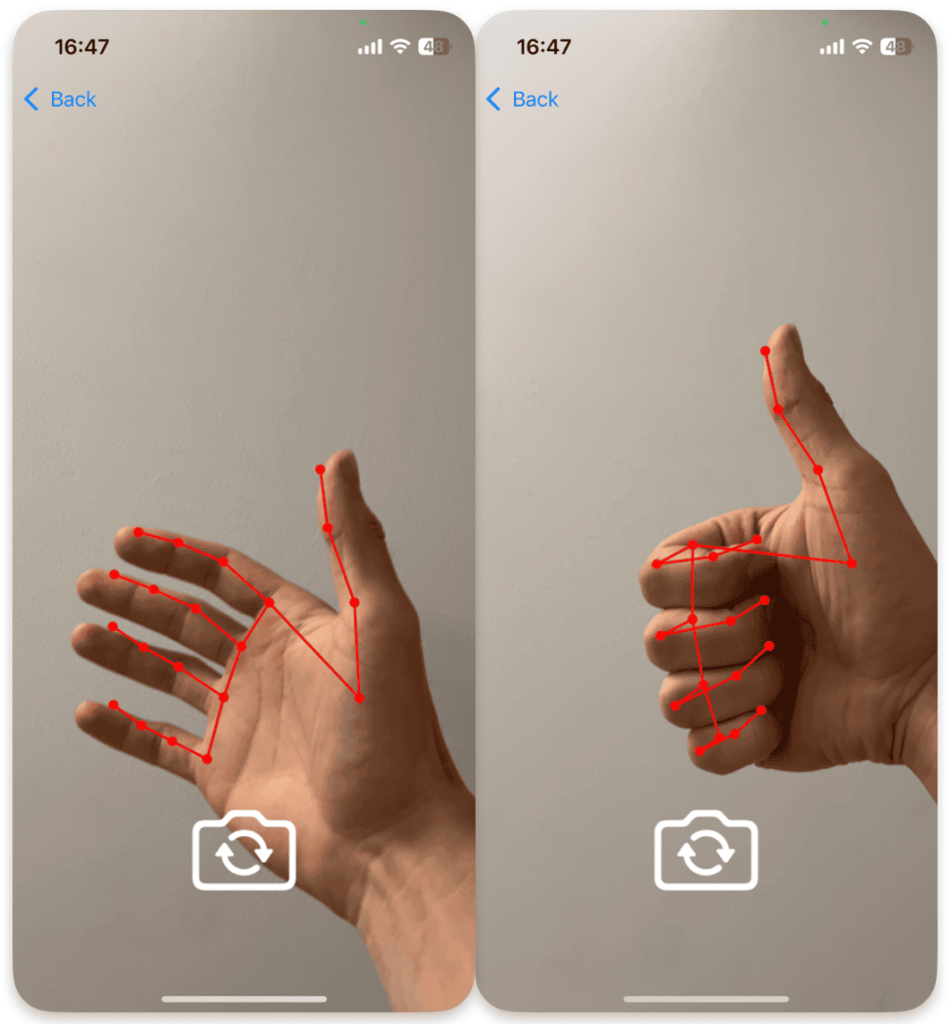
This feature enables real-time tracking of hand movements and poses, opening up new possibilities for interacting with virtual objects in augmented reality applications. This technology is especially relevant today with the rapid advancement of AR and VR headsets, where natural, controller-free interaction is becoming a key part of the user experience.

Hand tracking detects the palm’s contour and each finger individually (Thumb, Index, Middle, Ring, Little), as well as the joints’ positions. When configuring, you can specify the maximum number of hands to track. This represents a first step toward creating future interfaces, where interaction with the digital world will feel as natural as interacting with the physical one.

 Apple Vision Framework Hand Pose Detection

// MARK: - Hand Detection Request
extension InputProcessingServiceImpl {
    func setupHandDetectionRequest() {
        let request = VNDetectHumanHandPoseRequest { [weak self] (request, error) in
            guard
                let results = request.results as? [VNHumanHandPoseObservation],
                error == nil
            else {
                return
            }
            self?.eventSubject.send(results)
        }
        
        /// The default value for this property is 2
        /// The maximum value for VNDetectHumanHandPoseRequestRevision1 is 6.
        request.maximumHandCount = 2
        
        visionRequests = [request]
        logger.log(.info(.visionHandDetectionRequestSetup))
    }
}
// MARK: - Hand Detection Drawing
extension OutputVisualisationServiceImpl {
    func drawHandPoseObservations(_ observations: [VNHumanHandPoseObservation]) {
        for handObservation in observations {
            if let points = try? handObservation.recognizedPoints(.all) {
                /// Draw the hand skeleton using the recognized points for joints and connections
                drawHandSkeleton(points: points)
            }
        }
    }
    
    func drawHandSkeleton(points: [VNHumanHandPoseObservation.JointName: VNRecognizedPoint]) { … }

The hand and finger tracking capabilities in Vision Framework open up new possibilities for intuitive interaction with digital content, particularly in virtual and augmented reality applications.

These features provide a more natural, controller-free experience, which can greatly enhance workflows in a variety of professional fields. Examples include:

  • Design and prototyping: Finger tracking allows designers to interact with 3D models, manipulate objects, and review prototypes without using physical controllers. This is especially useful in the automotive, aerospace, and manufacturing industries, where high levels of detail and realism are critical.
  • Virtual reality training: In scenarios where employees use their hands (e.g., in maintenance or on production lines), hand tracking enables the simulation of real working conditions. This helps bridge the gap between training and actual tasks, providing more accurate preparation.
  • Remote collaboration: Hand and finger tracking in VR helps professionals working in remote teams effectively communicate and manipulate 3D models simultaneously, improving communication and speeding up decision-making during product development or project reviews.

What’s coming next?

The use cases described here showcase the incredible power and versatility of Vision Framework, but they are just the beginning for creating innovative computer vision applications. Integrating with CoreML opens up new possibilities, allowing you to use custom machine learning models for more complex and specialized tasks. This significantly expands Vision’s functionality, adapting it to the unique needs of your projects, and improving both accuracy and flexibility.

How do you plan to leverage these capabilities in your future projects?

AI Trainee Program 2024 by It-Jim

Are you passionate about AI? Excited to work with groundbreaking technologies? 

The It-Jim Trainee Program is your gateway to kickstarting a career in AI! Since its inception in 2021, our program has received over 2,000 applications, and many of our trainees have advanced to become full-time engineers with us 🔥

Focus Areas:

🔹 2D/3D Computer Vision
🔹 Deep Learning
🔹 Audio & Speech Processing
🔹 Generative AI,
and more!

📝 Application Deadline: 15th May 2024

🔗 Apply here: link

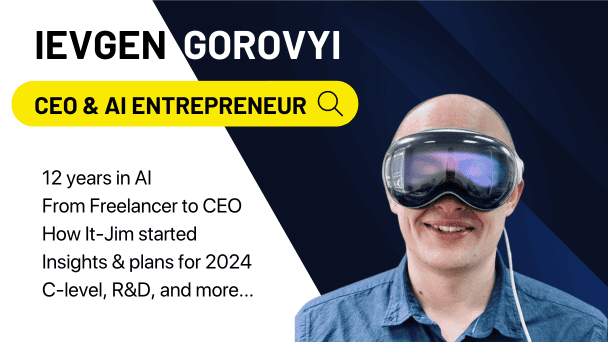
Interview with Ievgen Gorovyi, CEO at It-Jim

In a candid conversation that traces the amazing journey of It-Jim from its beginnings to its current status as a leader in the field of artificial intelligence and computer vision, our CEO shares a fascinating story of innovation, growth, and relentless passion for his work. From a graduate student who ventured into freelancing to the team that eventually laid the foundation for It-Jim in 2015, the journey has not been easy. It-Jim has evolved, overcoming challenges and seizing opportunities to push the boundaries of technology. This interview offers an in-depth look at the company’s inception, its dynamic growth, the day-to-day of the CEO, and the values that drive us forward. Join us as we dive deeper into the insights and lessons learned along the way, showcasing how It-Jim continues to innovate and inspire in the ever-evolving world of artificial intelligence.


Q1: Could you introduce yourself, touching on your key achievements and journey, for those meeting you for the first time?

Ievgen: My self-description varies based on the listener’s background. In a nutshell, I started as a scientist, earned a Ph.D., and evolved into a founder. Currently holding the roles of both founder and CEO, I’m not just an executive director – I’m deeply involved. Whether I remain solely a founder or not in the future is something I find intriguing. I’m also a speaker, invited to share insights with diverse audiences, from schoolchildren to corporate leaders. As a mentor, I guide others’ growth, and seeing them flourish is incredibly rewarding. Beyond that, I’m an avid news reader, particularly in artificial intelligence. While I can’t keep up with everything, I believe that’s perfectly okay. In a nutshell, that’s me.


Q2: How long have you been in this industry?

Ievgen: Ah, that’s a story we’ll dive into. It all kicked off around 2011. So, in the grand world of R&D, we’re talking a solid 15 years. When it comes to the AI realm, let’s say around 11-12 years. It started with my discovery and love affair with Computer Vision, and it hasn’t let go since. I can’t predict when it will! But let’s clarify – the duration is one thing, and the experiences, events, challenges, and the sheer variety of them, that’s another ball game. Some folks might repeat a one-year experience twenty times, while others boast a solid 20-year run. I’d say I’ve got over 10 years of hands-on AI experience.


Q3: Describe the origins of It-Jim and the challenges you faced along the way.

Ievgen: Oh, that’s an interesting story. I was a Ph.D. student at a research institute when a friend of mine, looking to earn extra money, introduced me to freelancing. While I enjoyed my Ph.D. journey with aspirations to defend it, my friend opened my eyes to freelancing websites. At that time, freelancer.com was the buzz. So, I decided to give it a shot, and surprisingly, it worked out well.

My friend quickly secured his first client, but it took me a bit longer. Oddly, my first freelancing gig was in engineering rather than the typical Data & IT tasks. He remarked, “Ievgen, that’s a good sign.” I thought, “Alright, cool.” I started working independently, navigating the freelance world, securing orders, and delivering them. I found it exhilarating. Despite being young and working long hours, sometimes up to 20 hours a day, with minimal sleep, I had the energy. I could skip social media, receive project offers after a sauna session with friends, and work through the night.

In essence, I was a solo freelancer with fellow Ph.D. students and colleagues. During a meeting with Ph.D. students, I casually suggested, “Want to try something with me?” I had a project idea for a diploma in Signal Processing, and they were on board. We completed the project, and despite the low budget, it was a fantastic experience. Inspired by this, I thought, “Let’s create something, maybe a brand.” Initially, I named it IT Team, but then, for a unique touch, I thought of associating it with a gym – It-Jim. Officially, the company is considered founded at the end of 2015, but the name and logo for It-Jim were conceived in 2012.


Q4: How have the processes changed over these years? It seems like the team has been scaling every year.

Ievgen: Yes, they are always evolving. I’ve read a lot of books about business changes, how it’s necessary, how it’s challenging. But if there are no changes, it’s a sign of stagnation. Changes have been constant. In the early years, we had a small team, around 6-8 people, up to 10 contractors. Very few. We didn’t pay much attention to processes. We had orders, and I handled it all, managed everything, and essentially did everything myself. They were just developers, let’s say, computer engineers. I taught them myself, fixed bugs, and rewrote things when they made mistakes. There were hardly any processes.

Then, we got the first managers – they were, in fact, the most responsible engineers whom I could rely on. I suggested they take responsibility for projects, take on communication, and slowly started to delegate it. And then, not so long ago, maybe 3-4 years ago, we hired actual Technical Project Managers. “Technical” is an important word here, because not everyone can handle working as a manager in such a field. But everything started to become more systematic, with processes, formalized rules, and people responsible for them.

Today, everything has fallen into such a pattern that we take the best from standard things in companies but try to preserve the values of the academic world, such as freedom in research, and idea validation. So, everything went according to a plan of slow transformation towards the business side. Probably, in the first few years, I didn’t even feel that it was a business. People gathered, engaged in something interesting, and could have a drink on weekends. And this realization that it’s serious business didn’t come immediately.


Q5: You mentioned R&D. Can you elaborate on whether there’s currently more focus on research or development?

Ievgen: We try to take the filtering of projects that come to us very seriously. Fortunately, there is a high demand, we can afford to choose. There’s always an element of research in a project – something to validate, check, or test. Research contributes to about 70% of the company’s projects. Often, a project involves guiding clients, making decisions, and providing technical reports – a classic example being a project we did at It-Jim five years ago. The remaining 30% involves clients wanting MVPs, working solutions, which is interesting because without knowledge, skills, and expertise in programming languages, mobile & web development standards, and cloud infrastructures, it won’t work. Engineers at It-Jim are transforming a bit – while they are more into research, they still need to possess development and engineering skills. Often, we get paid for a research project that doesn’t yield much, except the understanding that the idea under test doesn’t work. Someone has to do it. In short, I believe the current 70-30 ratio will be maintained, and even as we scale, I hope the 50-50 spirit will remain – the spirit of someone seeking answers, a valuable component of It-Jim.


Q6: I’ve noticed that everyone on your team really knows their stuff and emphasizes expertise as a team’s core trait. That’s impressing. How do you keep this level of skill and knowledge across the team?

Ievgen: Super, thanks. And I’ll tell you, it’s not by chance. I believe in luck, in general, but it’s meticulous work. These values just exist, and we embody them every day – in our work, minimal interactions, the events we organize, and so on. It confirms that people feel it. The thing is that a mid-level employee from an outsourcing company may not match a junior position in It-Jim, especially in machine learning.


Q7: Tell us about the main achievements of 2023.

Ievgen: I won’t list them in any particular order, just provide a random list. In 2023, after wrapping up two editions of our Trainee Program, we brought on six talented engineers. This is an achievement because I’m aware of the journey they’ve undertaken – on average, the conversion is 150 applications to 1 employee.

Also, we re-opened an office in Kharkiv. We had a large one before the war, but we had to close it down. Now, we’ve reopened a smaller one, and people are genuinely happy about it. It’s an accomplishment, especially since I wasn’t even present at the time of the opening. I just arrived, inaugurated it, and left. Nevertheless, it’s a significant feat, and I can see tangible connections emerging with the advent of this offline office.

Additionally, we organized an offline corporate event. We gathered our team and had a substantial team-building event, and around two-thirds of the people attended. I believe the impact of this achievement will be profound.

As for other accomplishments, we underwent a management reshuffle at all levels; our CTO changed. The new CTO, who joined at the beginning of the year, has made significant contributions to the company throughout the year.

In late 2022, we ventured into NLP with limited initial knowledge but successfully launched it, expanding our portfolio and generating significant revenue. This proved that with a strong foundation in intelligence, we can create value and profit even in new domains. Additionally, we’ve made substantial advancements in Visual Processing, Text to Image, and Text to Video, exploring a broad array of topics and emphasizing continuous learning as a core part of our journey.

This year, we’ve seen remarkable personal and professional growth among our engineers. Many discovered their leadership abilities, taking on responsibility with excellent results in both project delivery and mentoring. This growth wasn’t limited to individual development; our ambitions soared as team members excelled in specific projects, pushing our collective expertise further.

A noteworthy aspect of our journey has been our health and safety, a credit not to us but to the brave efforts of the Armed Forces of Ukraine.

On reflection, our growth in expertise stands out. We’ve deepened and broadened our knowledge without merely increasing headcount. This qualitative improvement across various projects is something I’m particularly proud of, marking a significant achievement for us.


Q8: You mentioned the arrival of the new CTO. Tell us about the C-Level at It-Jim in general. How do they come into these roles, and who are these individuals?

Ievgen: In our tight-knit team of just under 30, we maintain a relatively flat organizational structure – it’s not entirely flat but certainly not steeply hierarchical either. Stepping into a C-Level role here is about a harmonious mix of qualities: deep expertise, rich experience, genuine human qualities, alignment with our core values, a result-oriented mindset, and an intense passion for our field. Moreover, a critical aspect is the readiness to shoulder responsibility – not just for oneself but for the team.

From my perspective, fostering these qualities is key. I strive to create an environment where leaders and individuals alike can feel their impact and significance. Regarding C-Level leadership, ambition is essential, but it’s not about seeking dominance. Instead, it’s about holding an edge in both expertise and responsibility. When I spot these attributes and a clear desire in someone, it becomes straightforward to discuss and define their role at this level.

For a company our size, the number of people at the C-Level isn’t the focus. What matters is covering our bases efficiently – our overarching strategy, business and technological directions, financial management, and operational processes, and fostering an environment of continuous development and learning. That’s the essence of our leadership structure: no more, no less.


Q9: You mentioned the alignment of values. Could you elaborate on that?

Ievgen: Aligning values is crucial, yet it’s often hard to pin down in just rational terms. To me, values resonate with a profound passion and love for research, AI, and technology. It’s about harboring a relentless desire to learn, to never settle because you think you know enough. The desire to be in the flow, so to speak. It’s focusing on what truly matters – delivering value to clients and colleagues, prioritizing these relationships and advancements over mere material gains. When this focus is right, everything else naturally aligns. A key value for me is the willingness to share knowledge, to not just walk by when you see an opportunity to help, but to stop and assist. This gesture of sharing and supporting without expecting anything in return defines the essence of the community and collaboration I cherish. We often encounter moments where someone could easily take advantage of the situation or pretend everything’s fine, but it’s those who choose to help, who go out of their way to offer support, that embody the values I look for. It’s about asking, “How can I be useful?” before wondering what you’ll get in return. Such individuals typically have a natural inclination to reciprocate, and finding ways to motivate them further is part of the journey. Reflecting on values, trust emerges as a critical, perhaps consequential, aspect. Understanding and embodying these core values is fundamental, shaping the very foundation of our team and our work.


Q10: Are you involved in the hiring process?

Ievgen: Absolutely, I take an active role in the hiring process, though not for every position. I’m involved in screening some candidates, liaising with colleagues for initial screenings, and typically, I conduct the final interview. It’s crucial to align on values, skills, and abilities, but finding that Culture Fit can be tricky. Yes, the final decision often rests with me, and honestly, I value this part of my role. I’ve become adept at navigating both hiring and letting people go, maintaining some level of control over these decisions. Especially for critical, non-linear roles, I’ll always stay deeply involved. My experience and intuition have sharpened over the years, enabling me to sense whether someone is the right fit quickly. It’s fascinating to see how often my initial feelings align with how well someone integrates into our team. So, yes, I’m actively involved, and it’s part of why we’ve managed to gather a team that shares common values, as you’ve likely noticed.


Q11: Regarding further team scaling. Will you base it on people? Is there a scaling plan?

Ievgen: For me, scaling isn’t about just increasing headcount. We might grow to around a hundred people, but what’s crucial is how we’re organized and the development of our departments. I envision each department evolving into a mini It-Jim within its specific niche, reminiscent of our structure four years back but focused on their areas. They’ll likely grow, maybe even double in size, and then we’ll evaluate our next steps.

My interest in new directions leans towards AR, VR, XR, and particularly Robotics. Our algorithms are crafted not just for data processing but to culminate in tangible mechanical actions, like those performed by robotic manipulators. Establishing a lab for continuous research in these areas is something I find compelling.
These new ventures, especially when combined with our expertise in text analysis, voice recognition, and vision sensors, position us uniquely for advancements in robotics compared to firms transitioning abruptly from different sectors.

I dream of creating a sort of “university” within our structure, not in the traditional sense given our size, but a dedicated space for educational initiatives that cater to a broad audience, from students to professionals seeking advancement. This education arm, alongside an R&D Lab that’s constantly exploring new ideas, writing scientific papers, and a core company focused on creating MVPs to fuel profit and reinvestment, forms a strategic triangle of growth.

This triangle isn’t about sheer size but about maintaining a focus on quality over quantity. It’s the concept of doing great work, creating potentially transformative products, and not merely scaling for the sake of expansion or perceived “coolness.” To me, the essence of being “cool” lies in quality, not the number of people. My goal is quality, envisioning a future where It-Jim might not just be a service company but also one with a product line capable of significant impact.


Q12: Let’s discuss the top 3 insights from the past years.

Ievgen:

Deep Learning is Inseparable from Computer Vision:

– Don’t assume that classic Computer Vision is all you need. Without Deep Learning, it’s just not possible. You cannot afford to ignore the significance of Deep Learning in this field.

Diversify Knowledge for Enhanced Vision Expertise:

– While Computer Vision is fantastic, a profound understanding of theories in other modalities like Audio, Text, and NLP can make you a stronger Vision Engineer or Specialist. Look beyond your immediate focus, and you’ll be surprised by the implicit effects it has on your work direction.

Distinctive Traits of Generation Z:

– Generation Z, those born between the mid-1990s and early 2010s, stands out significantly. Their characteristics differ greatly from those of my generation, aged 30 and above. The gap of ten years makes a substantial difference. As a conclusion, it’s essential to acknowledge and utilize these differences. I try to leverage this in my approach, recognizing that this generation is unique.


Q13: What advice do you have for aspiring tech enthusiasts and students in Ukraine, especially those just starting out?

Ievgen: I have great faith in our young minds, even high school seniors; I believe in their potential. We are fortunate to have such an intellectually developed nation.

My primary advice is not to hurry into choosing your major or specialization within the first year of your studies. Give it at least two years, allowing time for the education system, which we are actively working to improve alongside the Ministry of Digital Transformation and many others, to offer you a broader perspective.

A solid mathematical foundation is crucial – English proficiency is a given.

Resist the immediate allure of mobile or web development solely for the paycheck. There’s ample time to grow in your career and reap financial rewards. Focus on understanding the broader landscape. Fields like Research and Development might not initially seem accessible, but passion for your work brings both interest and deserving compensation.

Stay curious and eager to learn. The information age presents a vast ocean of opportunities; don’t rush to narrow down your IT specializations too soon. Your unique talents could one day lead to groundbreaking advancements in technology or steer you towards a path less traveled but equally rewarding.

Also, consider joining our Trainee Program. Even if it doesn’t work out on your first attempt, the experience is invaluable. It’s highly regarded, not just by me but by all who have participated.


Q14: What message do you have for current and potential clients of It-Jim?

Ievgen: To our existing clients, thank you for standing by us and believing in us. Your support, especially in the challenging times following the onset of the war, has been invaluable, both financially and morally, towards our company, our country, and our Armed Forces. Your choice to stand by us means everything.

To potential clients, this message is for you as much as it is for those considering the services of Ukrainian professionals: choose Ukraine. We’re resilient, innovative, and capable, perhaps more so in the face of adversity. Our strength and creativity have only grown. Choose us not because of cost but because of our unmatched skills and expertise. You might be hesitant, questioning preconceived notions, but give us the opportunity, and we’ll prove our superior performance and competence, beyond just being a cost-effective option. Work with us to experience the exceptional capabilities that make us stand out in our field.


AI Video Generation Tools

Just over a year ago, ChatGPT became a household name, capturing the imagination of nearly everyone. Before we could fully grasp the potential of advanced language models, the world was dazzled by the emergence of visual generation models, showcasing their ability to create stunning images. And just as we were starting to understand the impact of image generation, video generation models began making waves. 3D generation is going through the same transition right now. The two fields also connect in practice: generated 3D geometry gives video models the spatial consistency that frame-by-frame synthesis struggles to maintain. Our article AI 3D Generation: From Prototype to Production covers where 3D generation stands today and what a production pipeline looks like. Despite the fact that this field is still at the relative beginning of its development (everyone remembers the meme that appeared a year ago, hence the “relative”🙂), everyone can touch the sublime and create their own spaghetti-eating bizarre character. In this blog post, we’ll explore some popular services accessible even to non-tech-savvy people, alongside sophisticated techniques for creating videos right on your personal computer:

  • PixVerse
  • Pika
  • Gen-2
  • Several open-source tools, including AnimateLCM and Stable Video Diffusion.

It’s important to note that each of these services has the potential to deliver impressive results; it often just comes down to the luck of the draw with the random seed you get. This post isn’t a ranking but rather an exploration of the services’ functionalities and versatility. We’ll delve into the img2vid and txt2vid features found across these platforms and highlight some of their unique offerings. And if you happen to end up with a static video, don’t be alarmed – it’s a common challenge in video generation, particularly with services that don’t allow you to adjust motion intensity.

Before we dive deeper, let’s talk about how we designed our experiments. We chose a captivating toad image from kc as our reference, with the negative prompt being “((human)), deformed, artifacts” and used the random seed 1239193645.

Video Generation with PixVerse

PixVerse stands out as the newest addition among the services we’re discussing. Honestly, it’s a bit behind in terms of offering control over aspects like camera movement or frame rate. However, what sets PixVerse apart is its cost-free access. Plus, it offers a choice among three predefined styles, which is a nice touch, especially when your prompts might not always yield the desired results, such as an anime-themed output.

  • txt2vid

txt2vid is quite straightforward: you can send a positive and negative prompt, aspect ratio, style, and random seed for results repeatability.


PixVerse text-to-video generations in realistic, anime, and 3D styles
  • img2vid

img2vid lost negative prompting and predefined styles but gained motion strength, so you won’t get a static image here. Here are comparisons of 0.1, 0.5, and 1 motion strength:


Although the outcomes might not always align perfectly with the prompts, PixVerse presents a viable option for those looking to explore video generation without spending extra money. Overall, despite some limitations, PixVerse effectively does its job.

Video Generation with Pika

Pika emerges as an intriguing, mostly free service that began its journey with Discord bots before transitioning to a more user-friendly web interface. Setting it apart from PixVerse, Pika offers a wealth of customizable options for video creation, including camera movement, frame rate, and motion intensity. It’s certainly worth exploring. The web version of Pika limits users to three free generations daily, but its Discord bots offer an economical alternative for those willing to navigate the queues alongside other VidGen enthusiasts.

  • txt2vid

Unlike PixVerse, Pika lets you set the motion strength even with txt2vid, as well as the camera motion. The strength range is from 0 to 4, so here are examples with values 0, 2, and 4.


  • img2vid

The img2vid results with our well-known shaman-frog with the same strength values as above:


Apart from camera motion and video upscaling, also available in PixVerse, you can extend the video with 4 additional seconds of content. It may harm the consistency of the objects, but look at this badass transformation of our frog from a civilized dude to some primal beast.


Video Generation with Gen-2

Gen-2 positions itself as a powerhouse in video generation services, extending its capabilities far beyond just video creation. It offers a comprehensive suite of features, including text-to-image, text-to-speech, video-to-video, and even the ability to train custom models. When it comes to the degree of control over the generation process, it stands on par with Pika, further distinguishing itself with an innovative feature known as the motion brush. This tool allows users to specifically designate parts of the image they wish to animate, adding a layer of precision and creativity to the process. It also gives out a certain amount of free credits, but if you get too excited, you will have to purchase some additional credits.

  • txt2vid

Motion control is available in txt2vid, too, and varies from 1 to 10. Here a some examples of the results with strengths 1, 6, and 10:


  • img2vid

Let’s conduct the same experiment as with the services above:


Arguably, Gen-2’s standout feature is the motion brush, which revolutionizes how movement is applied within videos. With five distinct brushes, each representing a different color, you can create up to 5 regions that move independently. You can also specify 3 dimensions of movements and add some noise to them.

The result is incredible. And yes, you can extend this video as well:


Open Source Tools for AI Video Generation

For enthusiasts ready to dive into the technical depths of AI video generation, platforms like ComfyUI and Automatic1111 present a sandbox of nearly limitless creative possibilities. These interfaces to Stable Diffusion unlock unrestricted access to countless generations, durations, camera movements, and image styles. The key to harnessing this vast potential lies in the willingness to learn and experiment with the myriad models and methodologies available, albeit with a notable learning curve as the trade-off for not opting for more user-friendly services. You also need a powerful video card, but nowadays, this is no longer a problem with many cloud services available.

Highlighting the innovative edge of this domain, the recent unveiling of models like AnimateDiff and LCM-SDXL – each acclaimed within their respective focuses on video generation and image generation acceleration – marks a significant leap forward. When combined, these models birth AnimateLCM, a powerhouse capable of producing a 10-second video in as little as 1.5 minutes, depending on the GPU’s prowess. While challenges such as frame consistency in longer videos persist, they can be addressed through careful post-processing and the strategic selection of random seeds. Here, we used ComfyUI and this workflow to create the demo:


Another model was created by the authors of Stable Diffusion itself – Stable Video Diffusion 1.1. This model, an enhancement over its predecessor SVD 1, is trained to produce 25 frames at a resolution of 1024×576, with the primary improvement being in the quality of the output. However, initial experiments indicate that the model’s performance can be somewhat… “unstable”.


You will say, “Hey, it’s trained on horizontal videos!” and be completely right. But…


Hmm, let’s try it with humans. Frogs are probably too unusual for this model.


So, our relationship with this model did not work out. We’ll probably come back to it later, as the previewed results are quite good.

Of course, this blog has only scratched the surface of what’s possible with AI video generation models. You can create a much bigger and more complicated pipeline to achieve the best results with higher resolution and consistency. As much as we’d like to dive deeper into this fascinating area, the breadth of innovations and developments in generative AI extends far beyond what we’ve covered. Thus, we pass the baton to you, our reader.

Sora, Ladies and Gentlemen

As we were putting the finishing touches on this blog post, a groundbreaking development emerged, capturing our collective imagination. Its name is Sora, and it is a monumental step forward in video generation. Sora brings to the table the capability to produce long, seamless, photorealistic videos, as well as videos that boast a unique, stylized flair. Currently, OpenAI has kept Sora under wraps, without public access, leaving us to enjoy some of the videos they have posted on the model and X page. We (and our beloved frogs) eagerly await the chance to experiment with Sora. For those eager to see Sora in action, a collection of videos is available at https://soravideos.media/. As the landscape of video generation continues to evolve, we hold onto the hope that Sora will soon become an accessible tool in our creative arsenal, promising new horizons for our explorations.

We hope to have ignited a spark of interest and curiosity, encouraging you to explore further, experiment, and perhaps even contribute to the advancements in video generation technology.

Interview with Yurij Gapon, Head of iOS development at It-Jim

We are happy to introduce Yurij Gapon, the Head of IoS development and 3D Expert at It-Jim. In this interview, gain insights into Yura’s multifaceted role, from spearheading iOS development to navigating the exciting intersection of 3D and AR technologies. Uncover his perspectives on the XR industry, including the anticipated impact of Meta Quest 3 and the role of AI in augmented reality. Join us as we show the backstage of Yurij’s path and his unique take on team dynamics.

Q1: When talking about you with your colleagues, I’ve heard “head of iOS,” “3D expert,” “AR enthusiast,” “business analyst,” and “PM”… Quite a few roles! How do you identify yourself?

Yurij: Indeed, I’m heavily involved in iOS development, leading a small team of iOS engineers that focus on AI-powered application development. I’m essentially the Head of Mobile, overseeing iOS projects and making decisions regarding them. Long ago, I started working as a business analyst, yet my interest in 3D has always grown alongside this. Over time, I explored its application in the context of art, eventually aligning it with my current work at It-Jim. Here, I discovered a whole industry where my skills could be applied. While our CEO largely determines the overall vision for It-Jim, I’m involved in shaping the company’s future in the realms of XR, iOS, and 3D. Projects that combine iOS with 3D (and we’ve had quite a few of those) are of special interest to me, of course. We keep an eye on industry developments and strive to stay current. It’s exciting when clients are willing to explore cutting-edge technologies.


Q2: And what about XR?

Yurij: While the company had expertise in augmented reality and developed solutions from scratch, with my arrival, we started working using Apple frameworks. We built prototypes using them and created a decent portfolio. I feel like over the last 1.5 years, I was a catalyst for developing even deeper AR/XR expertise in the company. One of the coolest things that happened was making a video prototype of the product in augmented reality using After Effects and then learning to create similar solutions “in the wild” using our iOS and AR knowledge.

Q3: Have you already tested Meta Quest 3?

Yurij: I wanted to buy it but haven’t used it yet. I believe it will change the XR industry as an affordable device capable of Mixed Reality. Previously, there was no equivalent device, and phones handled it poorly. The Quest 3 provides acceptable quality for both virtual and real worlds, though it may be overshadowed by VisionPro, which is seven times more expensive. Apple is entering Mixed Reality, with VisionPro primarily focusing on Augmented Reality, while Quest 3 offers full immersion in VR and optional augmented reality. Both cater to different audiences, and I believe both will survive and may converge in terms of cost and features.


Q4: Will Augmented Reality involve AI?

Yurij: Yes, AI will be ubiquitous across platforms and devices. Powerful AI tools often run on remote servers, and in most cases, it doesn’t matter where you access them from. There are more specialized solutions in 3D or neural networks that run directly on devices, possible with Apple Vision Pro due to its support for iOS and neural networks. Quest 3 also supports AI tools but with lower performance and lacks a dedicated Neural Engine. AI tools will be applicable in both cases.


Q5: Which is better, processors from Google or Apple?

Yurij: I’m impressed by Apple’s progress and ecosystem but acknowledge criticisms. I recognize that a company consists of many people and departments. Apple demonstrated high-quality hardware with the Apple Silicon processors, efficient, quiet, and fast. I’m particularly impressed with the battery life they achieve, setting a standard for others. Occasionally, there’s a desire to develop for Android, researching frameworks. In XR, Apple leads due to AR Kit, and I note the evolution of iOS and its ecosystem. Android, on the other hand, faces challenges with ad launches. In the desktop gaming sphere, they lost ground. Let’s see how it unfolds.

Image Source Image Source

Q6: Awesome. Back to your work at It-Jim. What does your typical workday look like? What do you focus on?

Yurij: There are a lot of meetings and operational activities. The creative aspect constitutes about 10% of my time, and while creative tasks like designing in 3D/2D don’t come too often, I am always excited to engage in them. What’s more? Gathering requirements, delving into user experience… I often try not to manage but to lead the project. I try to participate or take the lead in anything where decisions need to be made or where you need to influence someone. Then, there’s a lot of communication with clients and project delivery. Sometimes, I am also involved in lead generation and sales activities. Sometimes – in hiring and firing.


Q7: What is the most important when hiring a person to It-Jim?

Yurij: In interviews, it’s pretty groundbreaking to filter people based on culture, mindset, and the areas a person has dealt with. I filter and pass the candidate further. The skill to filter the right person based on character, culture, and worldview is crucial.


Q8: And what is it like to fire a person?

Yurij: I haven’t had to fire people at It-Jim personally, but I initiated that a person wasn’t keeping up, for example. Collectively, we then looked for confirmation. Firing someone at another company was harder because many things were forgiven. There, you’re more “mortal” – just one of the employees; everyone here is outstanding and unusual. At It-Jim, it’s not enough to be just an employee. Everyone is High-Performance. Everyone works at a high level. If a person is not keeping up, it will be very tough; it’s advisable to clarify that the company wants a lot and the employer isn’t a failure. A person can’t be a full-fledged player at It-Jim if they can’t keep up; it’s not personal, just challenging tasks, high competition, smart people. In that sense, it’s not difficult to fire at It-Jim.


Q9: You have partially replied to this, then, but what do you think about working with the It-Jim team?

Yurij: It’s pleasant to work with smart people; they impress you. It’s a cool experience working with very talented, unique individuals who make things happen in this world. It’s nice to be part of it. I lack many technical skills, and many things surprise me. It’s very joyful when you can make a contribution that the guys appreciate, too.


Q10: What would you say to yourself in 2019?

Yurij: Change jobs more often 😄 Don’t sit in one place too long. If there’s a drive, try to express yourself. Try more, fear less. Do it, then think.

AI HOUSE Camp 2023

On September 11, a 5-day camp will start in Lviv. Designed to create new solutions in the field of generative AI, it will bring together talented AI/ML enthusiasts, experienced mentors, and industry practitioners.

We are proud to be among the partners of this exciting event and look forward to seeing the results and congratulating the best of the best finalists! 🙌