AI Trainee Program 2023

Are you passionate about AI and looking to kickstart your career in this exciting field? Join our trainee program,
designed to give aspiring talents like you a head start in the world of:

🔹 2D/3D Computer Vision
🔹 Deep Learning
🔹 Natural Language Processing
🔹 Generative AI,
and beyond.

📝 Application Deadline: 27 August 2023

🔗 Apply now:  https://bit.ly/trainee2023-Oct

Top Free Chat GPT-3 Alternatives for Developers & Businesses

Top Free and Open-Source GPT-3 Alternatives to Cover Your Business Needs

Large Language Models (LLMs) have emerged as highly successful and widely adopted AI technologies in recent times. Major players in the industry, including OpenAI, Google, Nvidia, Meta, and Microsoft, leverage these models either for their products or to offer access to them.

Among the current LLMs, GPT-3 (Generative Pretrained Transformer) and its successor, GPT-4, reign supreme in terms of popularity. Developed and released by OpenAI, GPT-3 possesses the remarkable ability to generate text that closely resembles human language. 

It has been put to the test across various domains, including poetry, chatbots (such as ChatGPT), machine translation, QA, and even coding. All GPT-3 required to generate such content is a prompt with instructions expressed in human language.

These huge models often serve as the foundation for customers’ own AI products, for which they fine-tune the LLMs with minimal additional training. But models like OpenAI’s GPT-3 are proprietary; their source code is not freely available, and access to their capabilities comes at a cost. The GPT-3 is available through OpenAI’s API, but the API is expensive, even though OpenAI recently dropped the price for it.

Despite the costs and proprietary nature of GPT-3, which has limited its usage and applications, a vibrant community of researchers and enthusiasts has emerged, actively working on developing an open-source Chat GPT free alternative for harnessing the power of large language models today.

Benefits and Challenges of Open-Source Chat GPT3 Alternative

As we have discussed, GPT-3 presents certain drawbacks regarding data privacy, customization, and costs. regarding data privacy, customization, and costs. Fortunately

Benefits of Chat GPT-3 Alternative

What are the benefits of utilizing free alternatives to GPT-3? Let’s explore:

1. Open-source code

These Chat GPT alternatives provide developers with the freedom to customize the model and automate processes, all without compromising on features or security.

2. Enhanced control over data flow

By opting for a self-hosted chat GPT-3 alternative, you eliminate the need to transmit your data through external servers via an API. This grants you transparency and peace of mind regarding data privacy. Moreover, you can implement crucial safeguards to prevent any potential misuse of the technology.

3. Cost-effectiveness

The self-hosted LLM and some of the best ChatGPT alternatives are much cheaper to use, particularly when handling a substantial volume of requests.

Challenges of Open-Source Chat GPT-3 Alternatives

However, several challenges must be addressed for these alternatives to compete effectively:

1. Training data

The process of labeling training data for free ChatGPT alternatives requires significantly more manual effort compared to GPT-3, which benefited from the extensive resources of a well-funded organization and access to vast amounts of human-written data.

2. Scalability

To train language models rival and alternative to GPT-3, engineers require substantial computational power, which can pose difficulties for organizations with limited funding.

3. Human resources

While many NLP tasks are relatively straightforward and can be handled by individuals with basic proficiency, certain domains necessitate the expertise of highly skilled professionals. However, it may be challenging to find such professionals who are willing to contribute on an unpaid basis.

In this article, our focus will be on comparing various free alternatives to GPT-3, including GPT-Neo, BLOOM & BLOOMZ, FLAN-T5, OPT, and StableLM, in multiple tasks.

We will demonstrate how you can use these free GPT-3 alternatives independently. Before delving into the details of these alternatives, let us first provide a comprehensive overview of GPT-3.

GPT-3 Overview

GPT-3, developed by OpenAI, is the third iteration of their language model. It has been specifically designed to address various problems, including machine translation, question answering, and text generation.

By employing either few-shot or zero-shot learning, GPT-3 is capable of generating text and making accurate predictions. This versatility has made it a powerful tool for tackling various problem domains. 

The model is constructed using large datasets and trained through unsupervised learning, enabling it to provide answers to questions without requiring manual input or specific training data.

The extensive capabilities and deep understanding of human language exhibited by GPT-3 have garnered recognition from the research community. However, due to OpenAI’s policies and limitations, many individuals have begun exploring free alternatives to GPT-3 to address their NLP challenges.

Currently, GPT-3 is available in four versions, each with varying capabilities and price points. Ada, the smallest and most affordable version, is followed by Babbage, Curie, and Da Vinci, which is the largest and most expensive. 

While the exact number of parameters for each model has not been disclosed, estimations suggest that Ada has approximately 350 million parameters, Babbage has 1.3 billion parameters, Curie has 6.7 billion parameters, and Da Vinci boasts a staggering 175 billion parameters.

Parameters of Ada, Babbage, Curie, DaVinci ChatGPT models

As a general observation, models with more parameters tend to offer improved accuracy, albeit at a higher cost. OpenAI calculates the pricing based on token usage, where approximately 100 tokens can be equated to 75 words. The pricing details for usage are outlined below:

Pricing per token number of ChatGPT models - Ada, Babbage, Curie, DaVinci

Top 5 Free and Open-Source GPT-3 Alternatives

In this part, we discuss some ChatGPT free alternatives as one of the most popular Large Language Models. These best alternatives to ChatGPT are also trained on a vast amount of data to perform tasks such as translation, summarization, answering questions, and text generation.

1. BLOOM and BLOOMZ

BLOOM, developed by BigScience, is a multi-lingual open-source LLM that boasts a diverse community of contributors. The complete versions of BLOOM are freely accessible through Hugging Face Transformers.

By its nature, BLOOM is a casual, autoregressive language model, which means it was trained to predict the next token. A simple strategy for predicting the next tokens has demonstrated the ability to capture a certain degree of reasoning abilities in LLMs, enabling BLOOM and similar models to solve uncommon problems, such as arithmetic, translation, and programming, with fair accuracy.

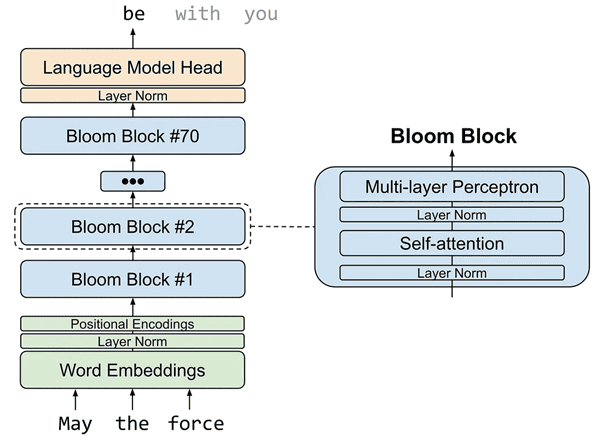
BLOOM, as one of the best chat GPT alternatives, is built on the transformer architecture, which encompasses an input embedding layer, 70 transformer blocks, and an output language-modeling layer. Each transformer block comprises a self-attention layer and a multi-layer perceptron layer. The diagram below illustrates the architecture of the BLOOM model.

Architecture of the BLOOM model, one of the best chat gpt 3 alternatives


BLOOMZ is just a fine-tuned version of the BLOOM model on the xP3 dataset. The xP3 dataset comprises 13 training tasks across 46 languages, enabling the model to follow human instructions in dozens of languages without requiring zero-shot learning.

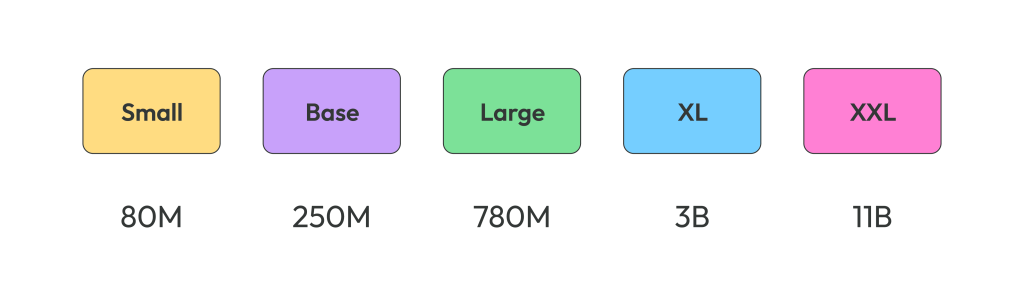
Both BLOOM and BLOOMZ exist in a few sizes:

Different BLOOM and BLOOMZ options with parameters numbers

2. GPT-Neo

GPT-Neo, an open-source large language model (LLM), was developed by EleutherAI to create more accessible AI for everyone. EleutherAI’s mission centers on creating and releasing open-source models and datasets, enabling a broader range of individuals to engage with artificial intelligence.

Due to the limited access to extensive datasets, EleutherAI sourced its dataset known as “The Pile,” which spans a substantial 825 gigabytes. This dataset comprises data from various sources, including PubMed, Wikipedia, GitHub, and others, providing a diverse range of information for training the model.

The architecture of GPT-Neo closely resembles that of GPT-2, with one notable distinction. GPT-Neo incorporates local attention in every alternate layer, utilizing a window size of 256 tokens. GPT-Neo was trained as an autoregressive language model, so its core functionality is to predict the next token in a sequence.

GPT-Neo, as one of the chat GPT 3 alternatives, is available in different sizes, ranging from 125 million to 2.7 billion parameters, allowing users to choose the variant that best suits their specific requirements.

3. FLAN-T5

FLAN-T5, developed by Google, stands as another notable free alternative to GPT-3. It is an enhanced version of the T5 model, which has undergone fine-tuning across a diverse range of tasks.

This approach significantly enhances the model’s performance in zero-shot learning scenarios. FLAN-T5 is a combination of a model and a technique of fine-tuning: T5 is a language model by Google, and FLAN refers here to a collection of instruction-based fine-tuning tasks and methods.

FLAN-T5, ChatGPT-3 alternative, high-level architecture and fine-tuning tecnhique

This model was trained on a large corpus of text data to predict missing words in an input text via a fill-in-the-blank style, which means FLAN-T5 is a masked language model.

FLAN-T5 model, as a chat GPT free alternative, comes with a few variants:

FLAN-T5 model options with parametes, as one of a free ChatGPT-3 alternative

4. OPT

Another noteworthy self-hosted alternative to GPT-3 is the OPT (Open Pretrained Transformer) model developed by Meta AI. It was introduced to the public in May 2022, offering a robust solution for various natural language processing tasks.

Primarily trained on English text, OPT contains a small amount of non-English data within its training corpus, sourced via CommonCrawl. The model was pretrained with a causal language modeling objective. OPT also belongs to the same family of decoder-only models as GPT-3.

The OPT model is available in various sizes. The available options span from 125 million to an impressive 175 billion parameters.

5. StableLM

StableLM, one of the latest additions to the open-source LLM landscape, comes from StabilityAI.

Currently, the alpha version of the model is available in two variants: 3B and 7B. However, the developers have promised to release larger models in the future, ranging from 13B to an impressive 65B.


To gain further insights into the comparison between StableLM and GPT-3 and GPT-4, you can refer to our brief post on the matter.


Based on EleutherAI’s GPT-J and GPT-NeoX models, StableLM was trained using an extended version of the ThePile dataset, which encompasses 1.3B tokens.

Comparing Performance: GPT-3 vs. Free GPT-3 Alternatives 

In the table below, check out GPT-3 versus its top free and open-source alternatives, focusing on performance, scalability, and cost-effectiveness.

Model  Performance Scalability Cost-effectiveness
GPT-3 (OpenAI) Strong general performance; proprietary model trained on massive data scales. Scalable through the OpenAI API; users pay for tokens. Subscription and API costs: closed-source with paywalls and proprietary pricing.
BLOOM / BLOOMZ (BibScience) Designed for multilingual tasks; performs well in many languages, competitive with GPT‑3 in specific areas like text generation. Available in multiple sizes (560M – 176B); designed for distributed training and inference. Open-source; training dataset and process fully transparent; compute-intensive for large models but cost-effective with community hosting options.
GPT-Neo / NeoX (EleutherAI) Solid performance for basic use and simple text generation; below GPT‑3 on complex reasoning or few-shot tasks. GPT‑Neo: up to 2.7B; GPT‑NeoX: up to 20B; scales reasonably well on consumer hardware. Open-source and lightweight models; very cost-effective for smaller-scale applications.
FLAN‑T5 (Google) Enhanced in zero‑shot learning via instruction fine‑tuning. Versatile; available in multiple sizes, can run on TPU/GPUs for larger variants.  Entirely free/open-source; self-hosted infrastructure is required – no API fees, but requires compute investment.
OPT (Meta) Comparable to GPT‑3 across tasks, matches GPT-3’s performance. Models vary from 125 M to 175 B parameters, with flexible deployment options. Open-source; less energy consumption (1/7 carbon footprint compared to GPT-3). It is self-hosted, so compute costs only.
StableLM (Stability AI) Early-stage models; good performance on standard benchmarks for small models (1.5B – 7B); better for experimentation than production. Currently available up to 7B; future larger models announced. Open-source, very lightweight; ideal for budget-conscious developers and academic research.

In terms of performance, open-source Chat GPT-3 alternatives such as FLAN-T5 and OPT achieve comparable results to GPT-3, particularly in instruction-following and zero-shot contexts. 

The models we have discussed come in multiple sizes, ranging from hundreds of millions to hundreds of billions of parameters, allowing for flexible deployment on various hardware setups.

Since FLAN‑T5 and OPT are fully open-source, there are no licensing fees. You only need to consider hosting and computation costs, which are often significantly cheaper than GPT-3’s API pricing.

How to Implement GPT-3 Alternatives in Your Projects

Many developers and organizations strive to integrate open-source and free ChatGPT alternatives to get automation and streamlined business operations. As mentioned, models like FLAN-T5, OPT, or GPT-Neo offer this flexibility and integration possibilities.

Next, we outline the crucial steps to integrate these free ChatGPT alternatives into your application successfully.

1. Model selection and setup 

Choose the right language model for your use case, whether you need an alternative to ChatGPT for translation, summarization, or similar. Also, assess your performance requirements and hardware constraints or limitations (e.g., whether it will run on a single GPU or a multi-GPU cluster).

You may use Hugging Face Transformers to load these models easily.

2. Choose from local and cloud hosting

When integrating open-source ChatGPT alternatives, you can choose between local deployment and cloud hosting.

Local deployment provides you with full control and enhanced data privacy and eliminates recurring costs. However, this method requires powerful hardware, especially for models with more than 7 billion parameters.

Cloud hosting offers scalable and convenient access through platforms such as Hugging Face Inference API, AWS SageMaker, GCP Vertex AI, RunPod, Replicate, or Modal. This option reduces infrastructure overhead and simplifies integration.

3. API integration with the selected ChatGPT alternative

After deployment, either locally or via the cloud, the next step is to make it accessible to your application via a RESTful API. This method allows front-end apps, microservices, or external clients to interact with the model securely and consistently.

One of the easiest ways to do this is by wrapping the model in a lightweight backend using frameworks like FastAPI or Flask. FastAPI is particularly well-suited due to its support for asynchronous operations, validation, and excellent performance with a Python backend.

4. Consider the tools and tech stack you may require

Choosing the right tools and tech stack depends on the scale of your application demo versus production and the skill level within your team, including the technologies they are experienced with (e.g., Python, JavaScript, DevOps).

This stack will define how easily your model integrates with the rest of your system, how users interact with it, and how it will operate in production.

System Component Recommended Tools & Services 
Model Serving Hugging Face Transformers, Text Generation Inference
Backend API FastAPI, Flask, Node.js with Express
Deployment Docker, Kubernetes, or serverless (e.g., Modal)
Hardware Local GPU (e.g., RTX 3090) or cloud GPU (A100)
Monitoring Prometheus + Grafana or cloud-native solutions

The general recommendation is to start with a basic and lean setup, using Transformers, FastAPI, and Docker for local testing. As traffic and complexity grow, introduce monitoring, security, and cloud orchestration tools gradually.


Need help integrating ChatGPT or open-source LLMs into your product?

Whether you’re building a smart assistant, automating customer support, or enhancing internal tools, our team at IT-Jim is here to help. Let’s talk about how we can bring language models into your application, tailored to your needs. 

Contact us for a consultation.


Using Open-Source Alternatives to GPT-3 with the HuggingFace Transformers

All the tested models are available in HuggingFace Hub, so we will use the HuggingFace Transformers package to use them.

Here is the code we used to test our model; you just need to insert the model name and your prompt.

from transformers import AutoTokenizer, AutoModelForCausalLM

prompt = "Your prompt here"

def generate_text(input_text):
   input_ids = tokenizer(input_text, return_tensors="pt").input_ids.to("cuda")
   output = model.generate(input_ids, pad_token_id=tokenizer.eos_token_id)
   return tokenizer.decode(output[0], skip_special_tokens=True)


tokenizer = AutoTokenizer.from_pretrained("<model_name>")
model = AutoModelForCausalLM.from_pretrained("<model_name>").to("cuda")
# Load model in 8bit mode, in case you don’t have enough memory for inference
# model = AutoModelForCausalLM.from_pretrained("<model_name>", load_in_8bit=True, device_map=”auto”)

generated_text = generate_text(prompt)

You can choose different decoding strategies for your prompt by customizing the model generate function. You can read more here about available options.

Parameters to consider are temperature, do_sample, top_p, top_k, and, of course, max_new_tokens.

Results

We used the code above and some open-source models to solve tasks from OpenAI Examples: tweet sentiment analysis, TL;DR summarization, keywords extraction, and creating a summary from notes.

Because the size of the models varies greatly (the largest GPT-3 model, Da Vinci, has 176B parameters), we will compare our results with the outputs of GPT-3 Curie (6.7B) and GPT-3 Babbage (1.3B) models.

As for the generation parameters, we used the proposed parameters for the example, making a few minor adjustments.

Tweet Sentiment

The prompt for tweet sentiment has the following structure:

Decide whether a Tweet’s sentiment is positive, neutral, or negative.

Tweet: “I loved the new Batman movie!”

Sentiment:

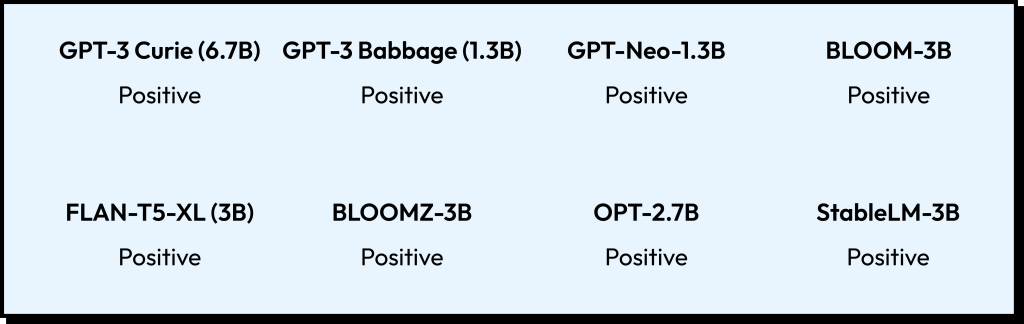
Chat GPT alternatives are solving a task and deciding whether a Tweet’s sentiment is positive, neutral, or negative

As we can see, open-source models have effectively solved this task.

TL;DR Summarization

The next task is to perform TL;DR summarization to highlight the key ideas from the text. The prompt: 

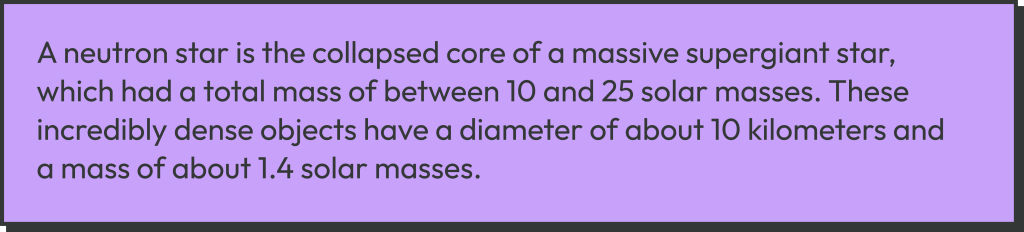
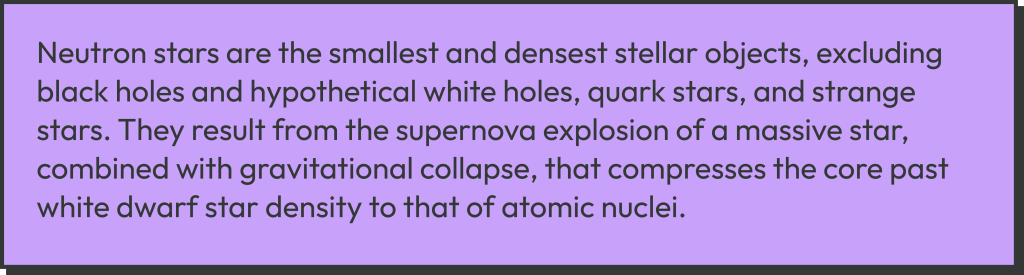
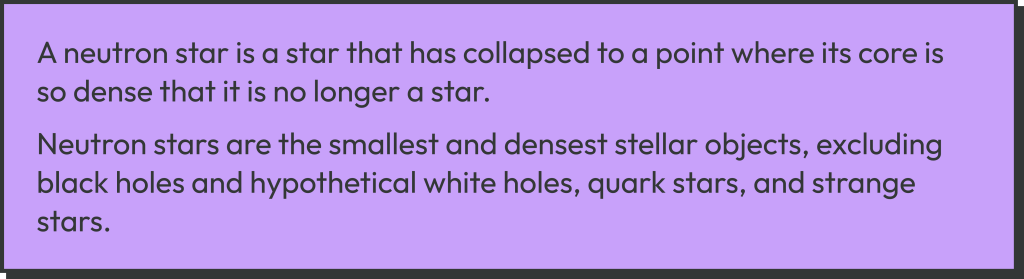
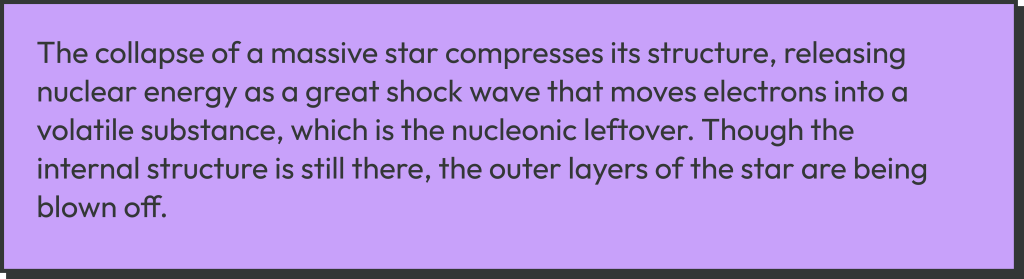
A neutron star is the collapsed core of a massive supergiant star, which had a total mass of between 10 and 25 solar masses, possibly more if the star was especially metal-rich.[1] Neutron stars are the smallest and densest stellar objects, excluding black holes and hypothetical white holes, quark stars, and strange stars.[2] Neutron stars have a radius on the order of 10 kilometres (6.2 mi) and a mass of about 1.4 solar masses.[3] They result from the supernova explosion of a massive star, combined with gravitational collapse, that compresses the core past white dwarf star density to that of atomic nuclei.

Tl;dr

GPT-3 Curie (6.7B)
GPT-3 Babbage (1.3B)
GPT-Neo-1.3B
BLOOM-3B
FLAN-T5-XL (3B)
BLOOMZ-3B
OPT-2.7B
StableLM-3B

From these results, some models stick pretty closely to the structure and content of the prompt, while others hallucinate by inventing new facts. To fix this issue, we should consider changing the temperature parameter and/or sampling methods for new tokens. 

Keywords Extraction

Now, we will be extracting keywords and keyphrases from the text using our open-source models. Our prompt looks like this: 

Extract keywords from this text:

Black-on-black ware is a 20th- and 21st-century pottery tradition developed by the Puebloan Native American ceramic artists in Northern New Mexico. Traditional reduction-fired blackware has been made for centuries by pueblo artists. Black-on-black ware of the past century is produced with a smooth surface, with the designs applied through selective burnishing or the application of refractory slip. Another style involves carving or incising designs and selectively polishing the raised areas. For generations several families from Kha’po Owingeh and P’ohwhóge Owingeh pueblos have been making black-on-black ware with the techniques passed down from matriarch potters. Artists from other pueblos have also produced black-on-black ware. Several contemporary artists have created works honoring the pottery of their ancestors.

GPT-3 Curie (6.7B) Comparison of chat GPT alternatives with a prompt “extract keywords from this text”
GPT-3 Babbage (1.3B)
GPT-Neo-1.3B
BLOOM-3B
FLAN-T5-XL (3B)
BLOOMZ-3B
OPT-2.7B
StableLM-3B

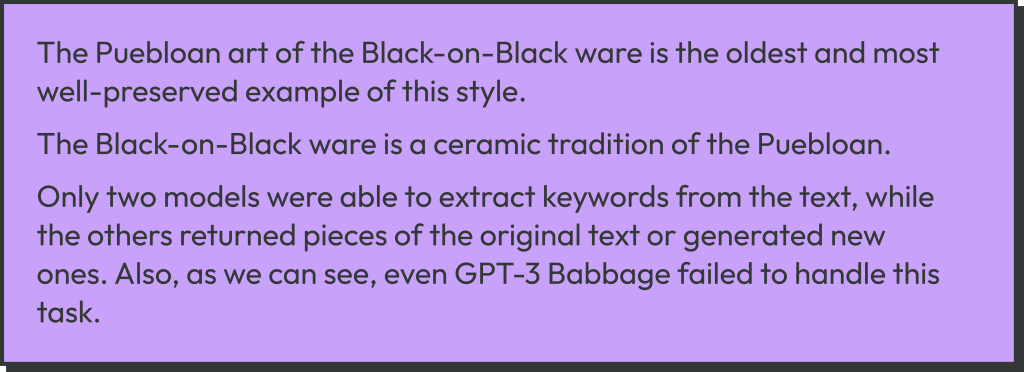
Only two models could extract keywords from the text, while the others returned pieces of the original text or generated new ones. Also, as we can see, even GPT-3 Babbage failed to handle this task.

Notes to Summary

Let’s try to create a summary from the meeting notes.

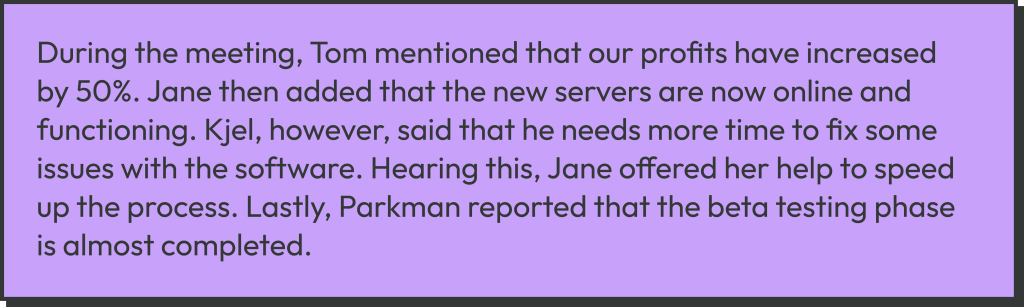
The prompt: Convert my short hand into a first-hand account of the meeting:

Tom: Profits up 50%

Jane: New servers are online

Kjel: Need more time to fix software

Jane: Happy to help

Parkman: Beta testing almost done

GPT-3 Curie (6.7B)
GPT-3 Babbage (1.3B)
GPT-Neo-1.3B
BLOOM-3B
FLAN-T5-XL (3B)
BLOOMZ-3B
OPT-2.7B
StableLM-3B

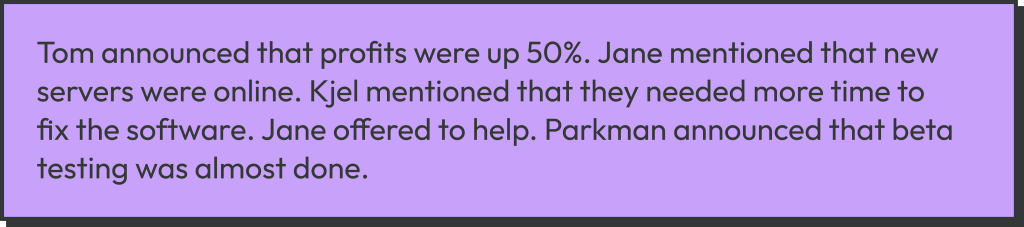
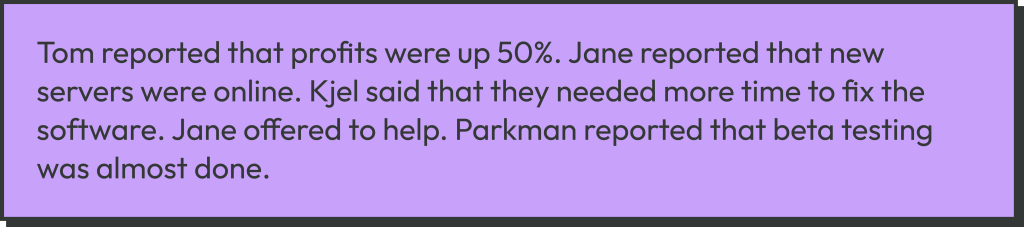
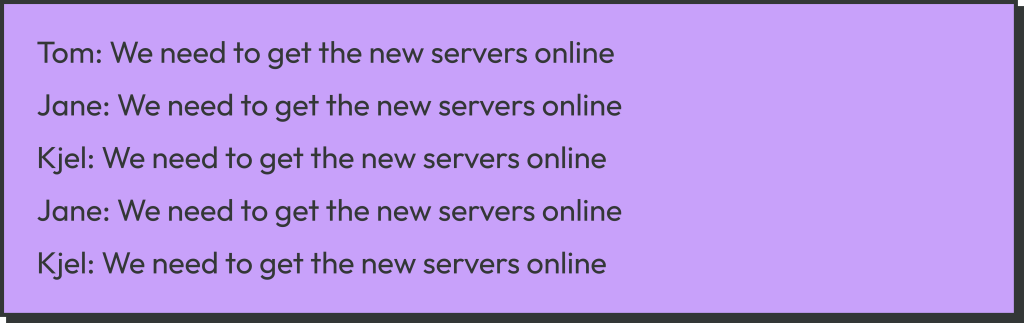
None of the open-source alternatives to GPT-3 could solve the problem of creating a summary from meeting notes, while GPT-3 Curie and Babbage easily handled it. 

What about GPT-4?

The latest addition to OpenAI’s lineup of LLMs is GPT-4, which made its debut on March 14, 2023. This new version introduces significant advancements compared to its predecessor.

Notably, GPT-4 now possesses the capability to utilize image inputs to generate text, expanding its range of applications. Additionally, it boasts a larger context window, enabling it to consider more extensive contextual information during text generation.

While specific technical details about the architecture and training data of GPT-4 are limited, OpenAI affirms that it surpasses the accuracy of both GPT-3.5 and GPT-3. Furthermore, it showcases impressive performance across a diverse range of challenges, including tasks such as passing academic tests and coding websites based on images.

Presently, GPT-4 is exclusively available in chat mode via API, with completion mode only accessible for GPT-3. However, after gaining approval from the waitlist request, users can leverage GPT-4’s capabilities through the provided API. We are fortunate to have access to GPT-4 and are eager to test it on our selected problems. 

Tweet Sentiment
TL;DR Summarization
Keywords Extraction
Notes to Summary

As expected, GPT-4 handled all the tasks extremely well.

How to Choose the Right GPT-3 Alternative for Your Needs 

ChatGPT and GPT-3 have revolutionized the way businesses utilize artificial intelligence to automate communication, generate content, and streamline operations. 

Here, we help you choose the right Chat GPT 3 alternative for your business needs and technical requirements, whether you’re looking for a service with better pricing, privacy, or performance or want to try out free alternatives to GPT-3.

Why Businesses Are Looking for GPT-3 Alternatives

OpenAI’s GPT-3 and ChatGPT have established high standards for performance and quality for natural language generation, but they also come with limitations:

  • API access can be expensive at scale
  • Data privacy and compliance may be a concern
  • Limited customization or fine-tuning
  • Dependency on external cloud providers

As a result, businesses are actively seeking ChatGPT free alternatives and other advanced large language models that offer greater flexibility, cost control, and deployment options.

Step 1: Define Your Use Case

Before you compare models, start by defining your core use case. Are you:

  • Automating customer support with a chatbot?
  • Generating blog content or marketing copy?
  • Creating internal AI tools or copilots?
  • Extracting and summarizing large documents?

Each of these use cases has different technical requirements. For example, content creation needs language fluency and creativity, while enterprise data processing might need long context windows and privacy controls.

In the table below, you can check some of the best alternatives to ChatGPT for a specific function.

Task Type Best Chat GPT Alternatives Reasoning
General QA and chatbots LLaMA-13B, FLAN-T5 XL Balanced performance, instruction-tuned
Code generation GPT-J, CodeLLaMA GPT-J trained on code; strong performance
Multilingual tasks BLOOM, LLaMA-3 BLOOM covers >40 languages
Content generation LLaMA, GPT-NeoX High coherence, long context
Fine-tuning  GPT-Neo, GPT-J Hugging Face-friendly; easy to adapt

Step 2: Assess Model Capabilities

Once your goals are defined, the next step is to compare the capabilities of the available ChatGPT-3 alternatives.

Modern LLMs vary in their language fluency, reasoning capabilities, speed, and context window size. For example, Claude 3 and Gemini 1.5 have huge context windows (hundreds of thousands of tokens), which is great for long documents.

GPT-4o, Claude 3.5, and Gemini also support tool use and multimodal inputs (text, images, even audio) for more complex and interactive applications.

On the other hand, open-weight models like LLaMA 3, Mistral, and Mixtral have strong performance and customization. These ChatGPT alternatives are great for businesses that need domain-specific fine-tuning or full control over the model’s behavior.

Consider the following aspects in evaluating Chat GPT-3 alternatives:

  • Language quality: Does the model produce human-like, coherent text?
  • Context window size: Can it handle long conversations or documents?
  • Speed and responsiveness: Is it fast enough for real-time applications?
  • Multimodal input: Does it accept both text and images?
  • Support for tools and APIs: Can it act as an intelligent agent or plug into business systems?

Some of the best Chat GPT alternatives in 2025 include:

  • Claude 3.5 by Anthropic – Great for reasoning and long context use.
  • Gemini 1.5 by Google – Multimodal, powerful, and deeply integrated with tools.
  • GPT-4o by OpenAI – The latest and most capable from the GPT series.
  • Mistral & Mixtral – Lightweight open-source options for self-hosting.
  • LLaMA 3 – Meta’s open-source family with strong performance and fine-tuning capabilities.

Step 3: Choose Between Cloud and Self-Hosted Solution

When choosing a GPT-3 alternative, you need to consider your deployment:

  • Cloud-based APIs (e.g., OpenAI, Google, Anthropic, Cohere): Fast to deploy, but third parties process your data.
  • Open-source and self-hosted (e.g., LLaMA 3, Mistral, Falcon): Full control and privacy, ideal for regulated industries or offline environments.

If your business handles sensitive data or needs full compliance with regulations like GDPR or HIPAA, a self-hosted chat GPT alternative may be the best fit.

Step 4: Free and Open-Source Options

If budget is a concern, there are many free alternatives to GPT-3 that work well. They require more engineering effort to deploy and maintain but are ideal for businesses seeking cost-effective solutions.

Some top ChatGPT free alternatives in 2015: 

  • OpenChat: Lightweight conversational model with good dialogue handling.
  • Mistral 7B: Good performance with low hardware requirements.
  • LLaMA 3 (8B and 70B): Customizable models for your use case.
  • Gemma by Google: Compact and efficient open-weight model.

You can run these free GPT-3 alternatives on your infrastructure (local or cloud), so you have more control over privacy and cost.

Step 5: Pilot and Compare GPT-3 Alternatives

Before committing to any solution, run a pilot project. Use the same prompts or tasks across 2–3 models and evaluate:

  • Text quality and accuracy.
  • Latency and scalability.
  • Cost per generation.
  • Integration ease (APIs, SDKs, third-party tools).

Many providers offer API tiers, allowing you to test the ChatGPT alternatives for free before making a purchase.

In conclusion, choosing the right Chat GPT-3 alternative is a strategic decision that depends on your specific use case, budget, infrastructure, and privacy requirements. Whether you’re building a chatbot, automating content workflow, or processing internal documents, there are now dozens of options beyond GPT-3.

What’s Next for Open-Source LLMs?

Open-source large language models (LLMs) have gone from research experiments to production-ready solutions.

LLMs like Mistral, Mixtral, LLaMA 3, and BLOOM are being adopted across industries. These models give you access to the latest language modeling innovations without being locked into expensive, closed platforms.

Today, enterprises, startups, and even hobbyist developers can use state-of-the-art models without closed APIs.

Until recently, Chat GPT alternatives were limited to text-only interactions. But in 2025, we’re seeing rapid growth in multimodal open-source models. These tools can process text, images, and even audio content.

  • LLaVA and OpenFlamingo are vision-enabled LLMs.
  • Bark and Whisper (developed by OpenAI but with open weights) are used for speech generation and transcription.
  • More multimodal open models will appear shortly, rivaling commercial models like GPT-4 and Gemini 1.5 Pro.

This opens up new opportunities in virtual assistants, AR/VR, accessibility, AI-powered mobile development, and real-time surveillance powered by free, open tools.

Here’s where we at IT-Jim think the open-source LLM movement is headed:

  • Enterprise-Ready Alternatives: Open models will match GPT-4 performance, enabling you to deploy securely and privately across healthcare, finance, and manufacturing.
  • Multilingual Growth: Models like BLOOM 3 will address the lack of high-quality tools in underrepresented languages, making AI more inclusive and global.
  • Edge and Mobile AI: Thanks to efficient architectures and quantization, we’ll see LLMs running natively on devices, phones, IoT hubs, and even cars.
  • Custom, Domain-Specific LLMs: Fine-tuned, lightweight models trained on your company data will outperform general-purpose models for specific tasks.
  • Open Multimodal Assistants: Fully open-source, multimodal agents (text + vision + speech) will power the next generation of personal and business AI.

To Sum Things Up

In conclusion, the rapid development and impressive capabilities of GPT-3 have taken the world by storm, sparking interest in the potential applications of AI in a wide range of domains.

However, the limited accessibility and affordability of GPT models by OpenAI have prompted a growing demand for open-source and free alternatives that can cater to a broader audience.

This article has provided an overview of GPT-3 and explored several chat GPT alternatives. While these options may not match the raw power of GPT-3 in specific tasks, they serve as valuable resources for developers and researchers.

The prominence of these best alternatives to ChatGPT has fostered an environment of innovation within the AI community, driving the continuous improvement and development of new language models. Future LLMs may eventually reach or even surpass the capabilities of GPT-3 and GPT-4.

Thus, businesses no longer need to rely solely on GPT-3 or closed APIs. With today’s ecosystem of free GPT-3 alternatives like Mistral, LLaMA 3, and BLOOM, it’s possible to build scalable, private, and cost-effective AI and machine learning solutions tailored to your needs.


Need Help Choosing or Integrating the Right AI Model?

At IT-Jim, we specialize in helping businesses integrate AI tools into real-world products. Whether you’re migrating away from GPT-3, building your chatbot, or exploring ChatGPT-3 alternatives, we can guide you through every step, from strategy to deployment.

Contact us today to explore how we can help you find and integrate the best LLM solution for your business.


Video Game Review Summarization Using OpenAI GPT-3 Python API

Normally, computers only understand their own programming languages, like Python or C++. If you want to teach them human languages, like English, Ukrainian, or Japanese, it is possible, but it takes effort. The respective branch of science is called Natural Language Processing (NLP), which combines computer science (including machine learning and deep learning) with traditional linguistics.

In this article, we will walk you through a toy-level solution to a real and rather challenging NLP problem with a complete functional Python code. The article is generally beginner-level, but it requires basic knowledge of programming in Python. Minimal knowledge of machine learning and data science will not hurt either, but it is not strictly required. We are deliberately going to create a pipeline of several steps to demonstrate different techniques used in NLP, namely:

  • Data pre-processing with the pandas library
  • Performing zeros-shot NLP tasks with GPT-3 via OpenAI Python API
  • Selecting relevant statements using traditional NLP (i.e., without neural networks)
  • Using pre-trained modern neural networks, in our case Bert Extractive Summarizer (bert-extractive-summarizer), based on transformers and sentence-transformers.

Customer Review Summarization 

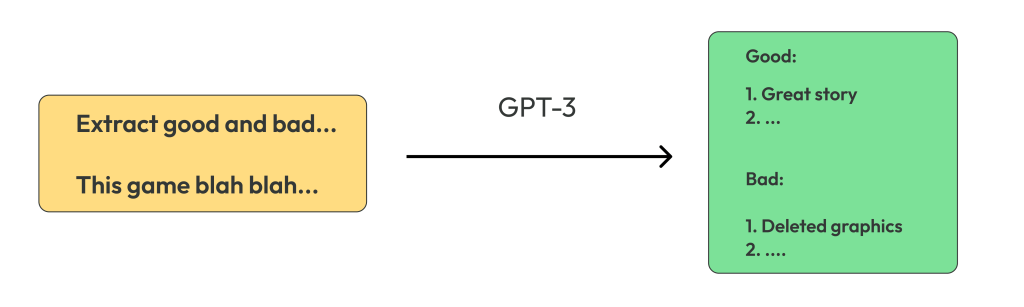
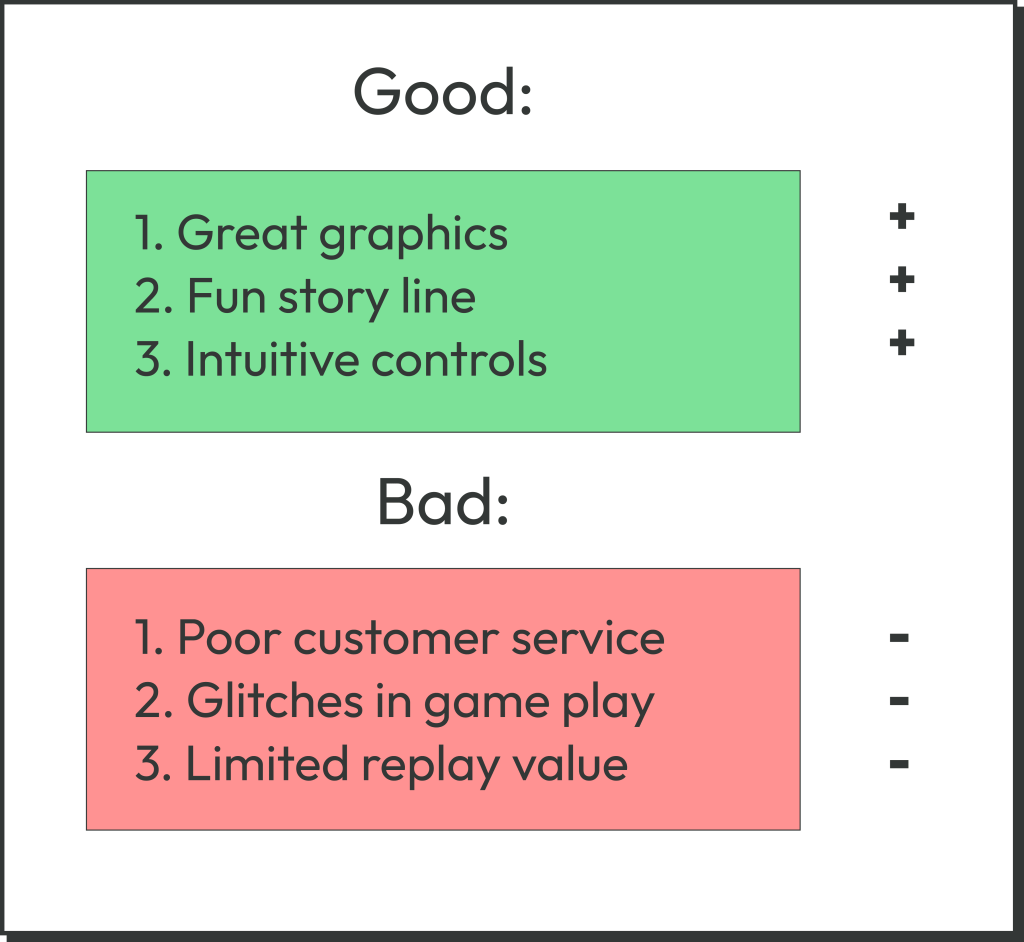
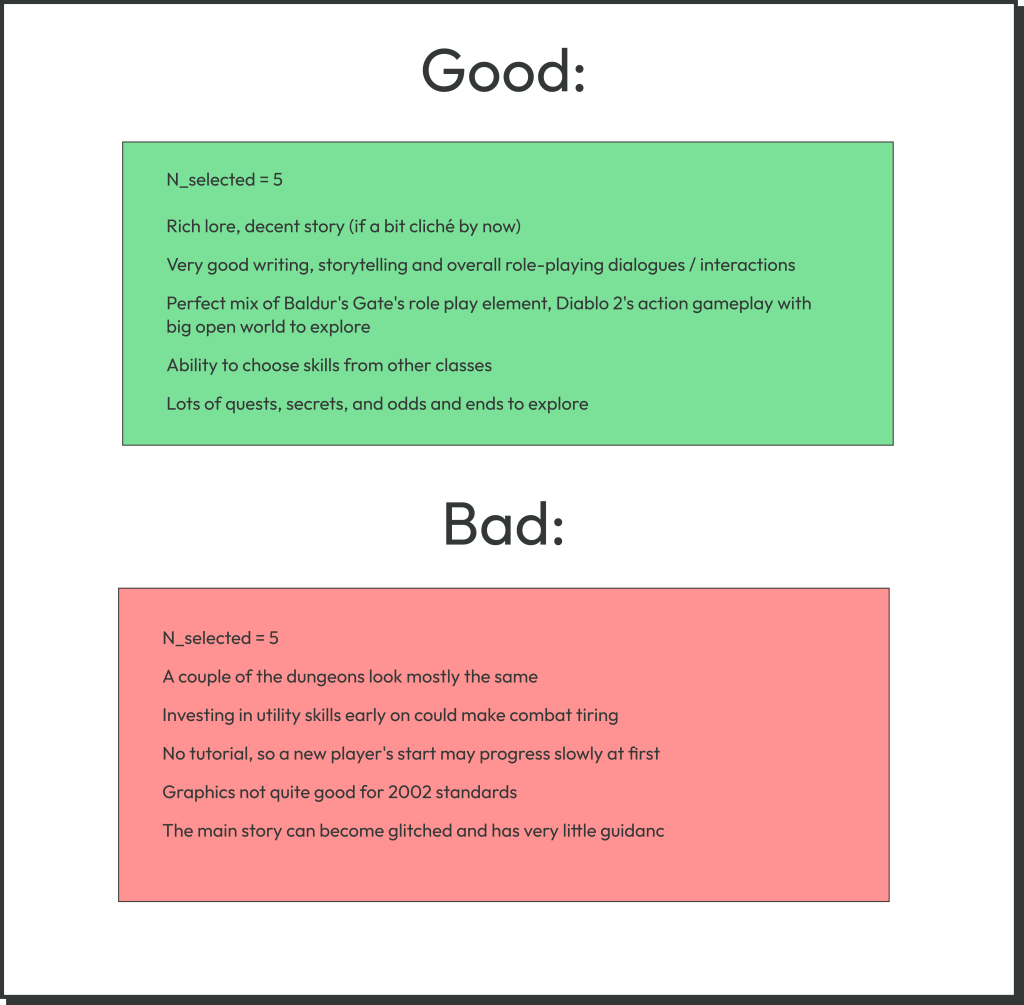
Companies deal daily with tons of customer reviews. Processing them all by human readers is not very cost-efficient, and here NLP comes to the rescue. We want to write a code that analyzes video game reviews automatically. Given multiple (possibly hundreds or even thousands) reviews of a single video game, we would like our code to create a list of five good things about this video game and a list of five bad things. Like this:

Good:
1. Amazing story
2. Rich and balanced skill tree
3. …
4. …
5. …

Bad:
1. Seriously outdated graphics
2. Frequent crashes on Windows 11
3. …
4. …
5. …

For our experiments, we will use a popular Steam Reviews dataset from Kaggle, which contains thousands of user reviews from Steam collected in 2017 (no modern games).

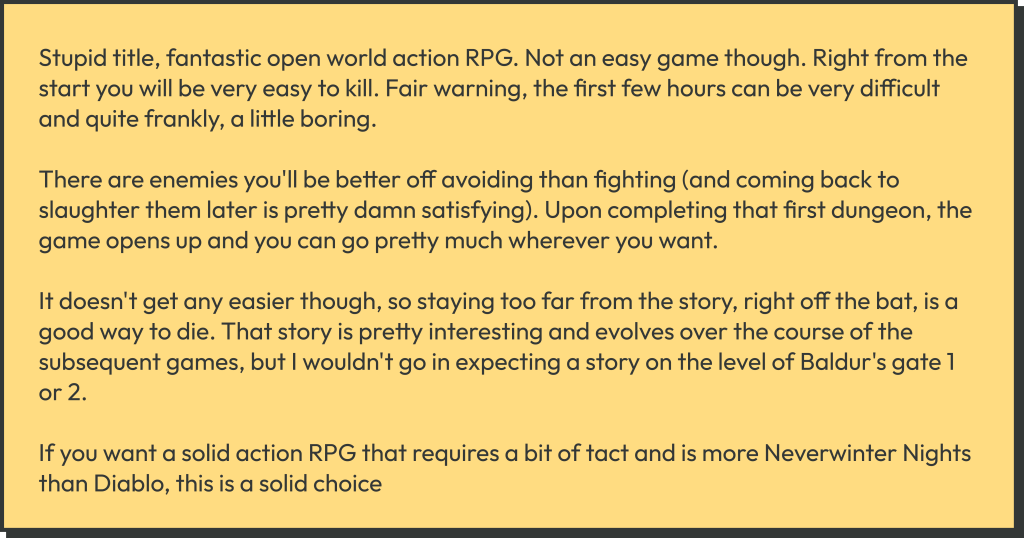
An example of a Steam Review

Chapter 1: Text Dataset Preprocessing with Pandas

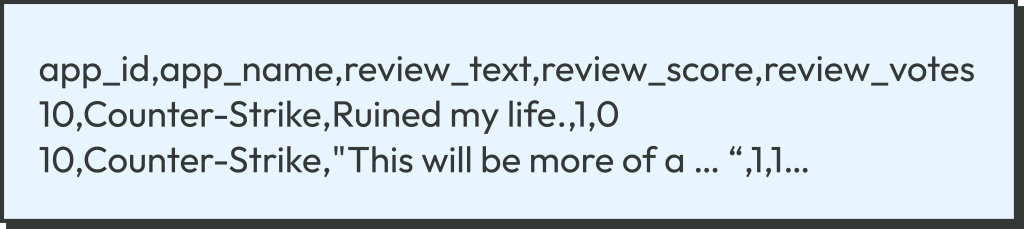
Let’s download the Steam Review dataset from this page. You will have to register in Kaggle to do it. Save the ZIP file somewhere on your hard drive and unzip it. You now have a whopping 2 Gb CSV file called dataset.csv. Let’s have a look at our dataset. CSV stands for “comma-separated values”. CSV files look like this:

The first row contains column names, while the remaining rows contain the data, exactly one data record per line. The columns are separated by commas, hence the name of the format. If we look at the top of our monstrous CSV files, it looks like this:

There are five columns, but we are only interested in the first three. The dataset contains 6417106 (~6.4 million) reviews of 9972 (~10k) games. Note how the third column review_text can contain a long text. If the text contains commas, it has to be enclosed in double-quotes.

Why do we want to preprocess the dataset? There are several reasons.

  1. Algorithms, including neural networks, typically cannot work with raw data (like CSV), and the data has to be transformed.
  2. Data often has to be cleaned by removing the bad data.

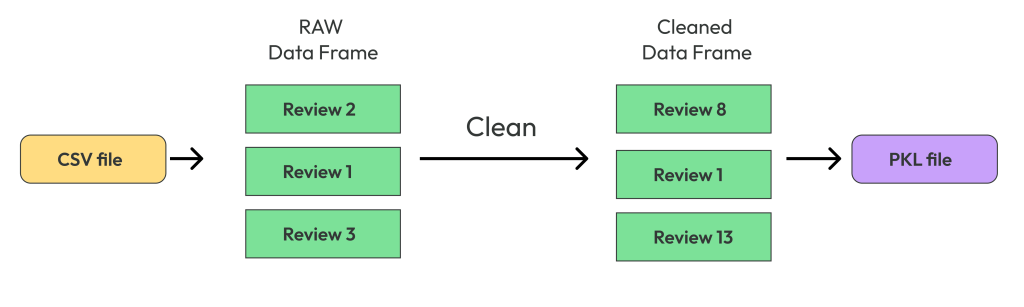
In our case, we transform the data into the tabular DataFrame of the Pandas library, and clean it by removing too short reviews, like the “Ruined my life.” one-liner in the first row of the dataset. Let’s start coding. The first file, pipe1_clean_dset.py, corresponds to this chapter. Let us walk you through the code.

First, we read the CSV file into the Pandas DataFrame (table object).

df = pd.read_csv(DSET_PATH, keep_default_na=False)

You will have to replace DSET_PATH in the code with the actual path to the dataset.csv file on your hard drive. What is the flag keep_default_na? It assures that an empty cell (two commas in a row “,,”) will be interpreted as an empty string “” and not as a float NaN. This is important for us because some game IDs in our dataset have empty names.

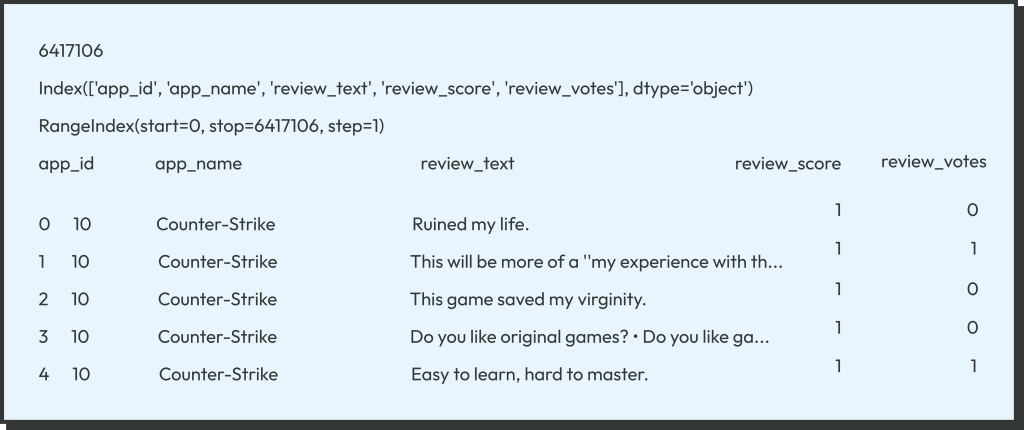
Let’s look at our DataFrame (see Pandas documentation for more)

print(len(df))
print(df.columns)
print(df.index)
print(df.head())

We get the following output

Now let’s clean the dataset. We want to discard one-liners and keep only the more informative reviews, which are over 300 characters long. With Pandas this is easy:


rev_len = df['review_text'].apply(lambda s: len(s) if isinstance(s, str) else 0)
df_clean = df[rev_len >= 300]
 

The very useful method apply() of pd.DataFrame applies a function to each cell of a column, generating pd.Series, a new column-like object. We then select rows with rev_len >= 300. The function is a python lambda function in our case. In fact, if the column contains only good strings and no garbage, you can simply use the python built-in len instead, like this:

 
rev_len = df['review_text'].apply(len) 

After the cleaning, we have 1649359 ~ 1.6 million reviews remaining, about 25% of the original number. Finally, we save the cleaned dataset as the binary file temp/data_clean.pkl using the famous Python serializer Pickle. But first, we make sure that the subdirectory temp exists in the current directory:

pathlib.Path('temp').mkdir(exist_ok=True)
df_clean.to_pickle('temp/data_clean.pkl')

This is interesting. Usually, toy-level machine learning examples on the web do everything in a single Python (or, rather, Jupyter notebook) file, and data preprocessing (if any) is done on the fly. In contrast, in professional machine learning, the intermediate results are saved to disk as much as possible to save time. For example, the dataset can be preprocessed once and used for multiple training experiments. The intermediate data should be organized in a neat hierarchical directory structure, like the temp directory in our case (NEVER save multiple data files in your code directory). While our code is a toy example, we still wanted to show (in a toy version) some of the good practices of professional machine learning and data science.

By the way, does saving the cleaned dataset as the PKL file speed things up? Yes. Despite Pandas being a highly optimized library, parsing a 2 Gb CSV file alone takes some time (over 15 s on the laptop we’re using), while deserializing a PKL file is very fast. Note that here we assumed that 2 Gb worth of data will fit into your computer’s RAM, a reasonable assumption in 2023. But larger datasets will not fit into RAM, forcing us to process them incrementally, an interesting topic beyond the scope of this article.

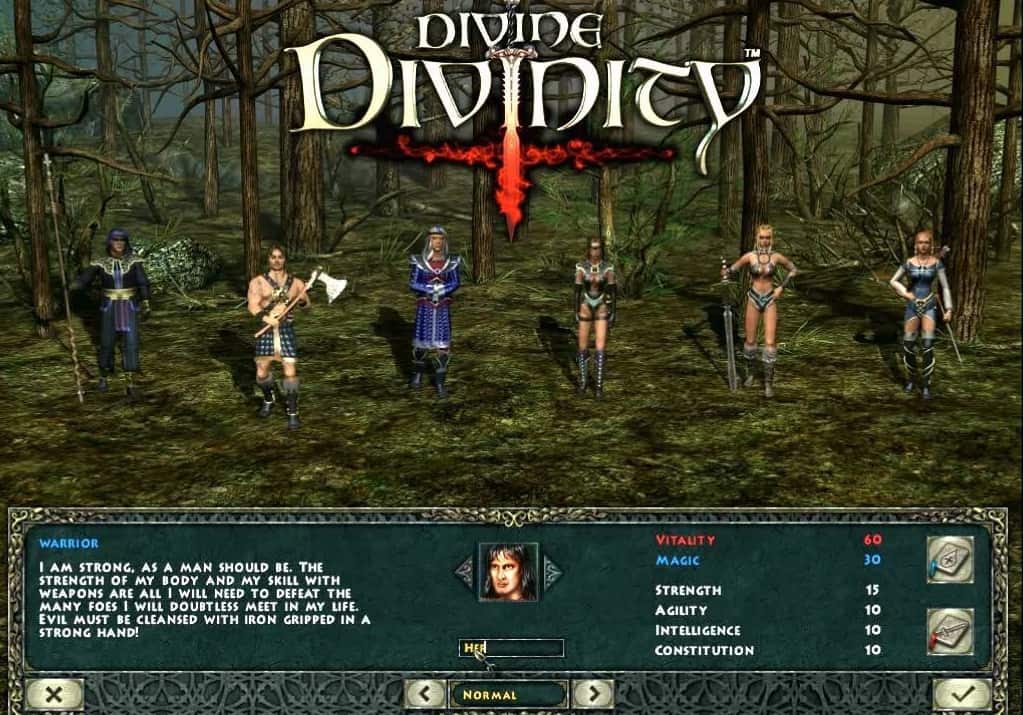
While our dataset contains almost 10k games, it would take a long time (and money, in the case of GPT-3) to process them all. So, let’s pick up one game and stick with it. We chose the game called Divine Divinity, which has ID=214170 (the choice of the game is the author’s and is not based on any objective criteria). Selecting reviews by the ID is very easy:

app_id = 214170  # Divine Divinity
df_id = df_clean[df_clean['app_id'] == app_id]

Exercise: Use Pandas to find if your favorite video game is in the dataset and what its ID is.


Chapter 2: Summarizing Each Review with OpenAI GPT-3  Python API

Large Language Models and GPTs

Large language models (LLMs) from OpenAI generated a lot of buzz in the media recently with the release of ChatGPT and later GPT-4. How do these models work? They are large neural networks (technically, transformer decoders) that are able to continue a given text, for example:

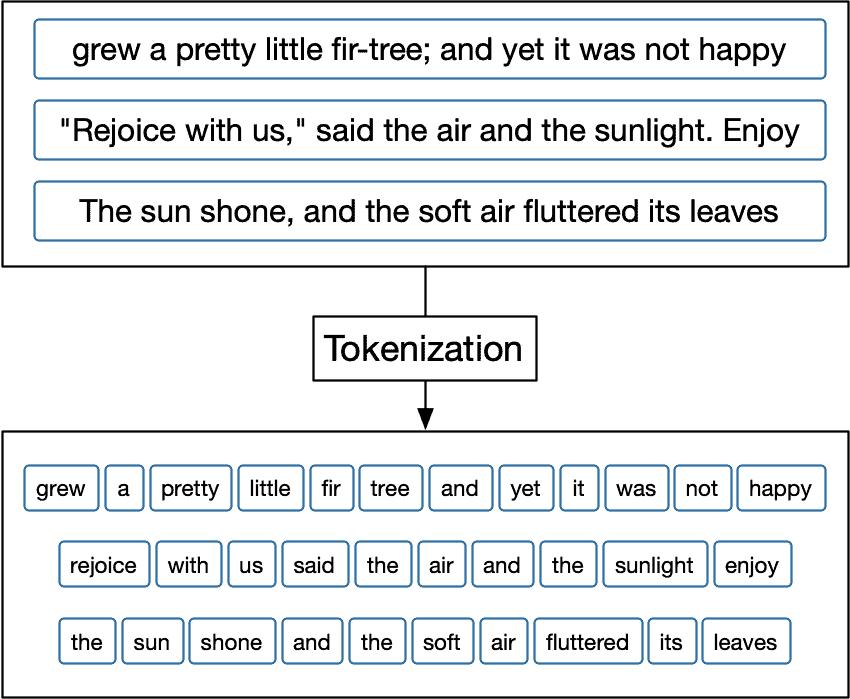
However, neural networks cannot process the text directly, so first, the text has to be tokenized, i.e., broken into separate words. The word “token” comes from transformer slang, and in the context of models like GPT or BERT, it basically means “word”.

Image Source

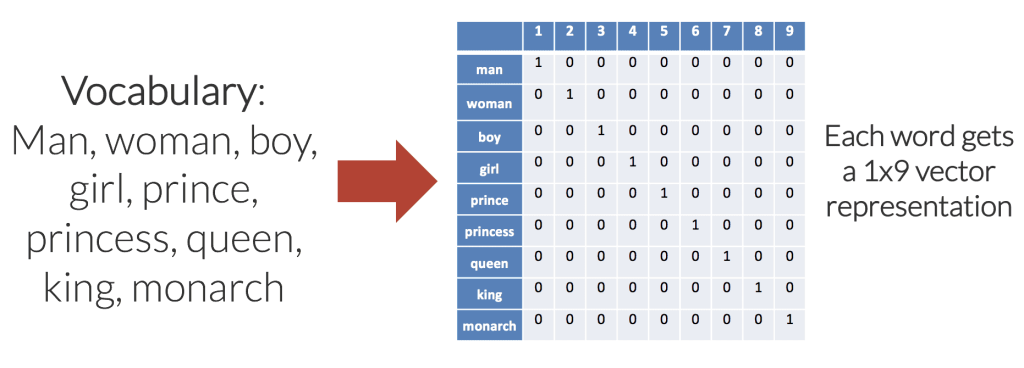
Tokenization is followed by embedding, where each word is replaced by either an integer number or a multi-dimensional floating-point vector from a pre-defined dictionary.

Image Source

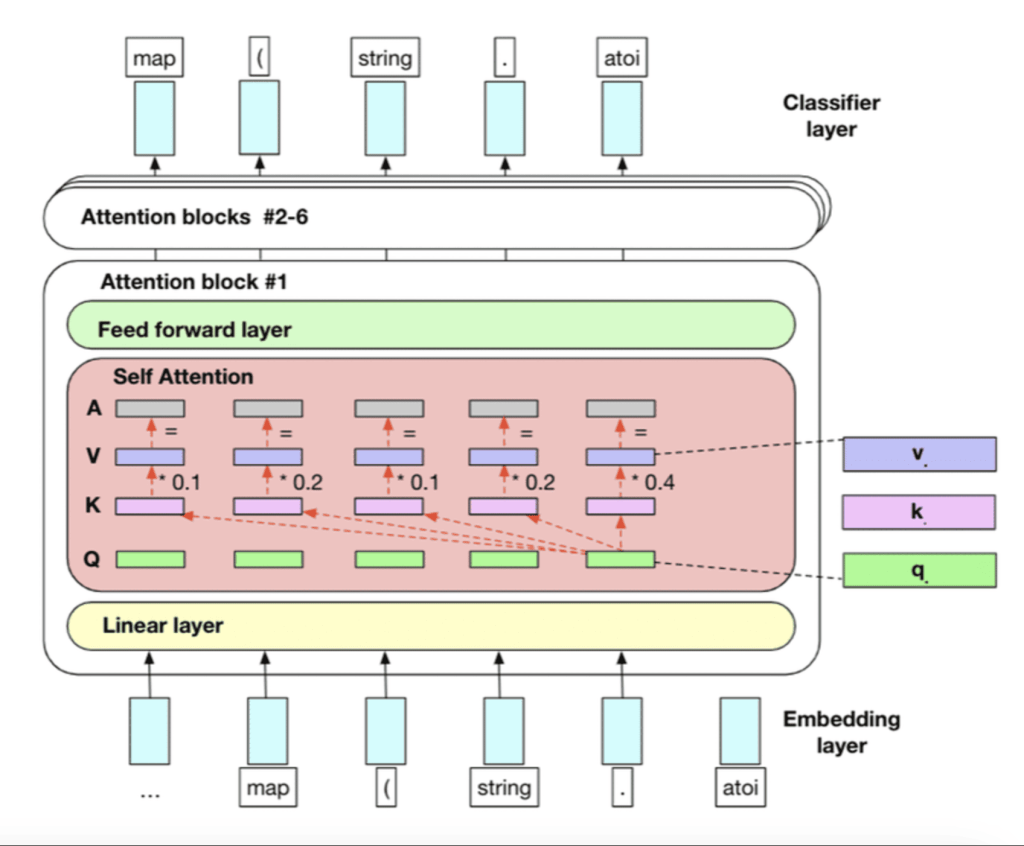
Finally, the word embeddings can be fed into the transform model properly.

Image source

GPT and Zero-Shot Tasks

We can give you two pieces of news about GPT models: a good and a bad one. Good news: zero-shot tasks.

The ability of GPT models to generate text is the consequence of their being transformer decoders; other language models like BERT (a transformer encoder) aren’t able to do that. Older versions of GPT (1 and 2) could pretty much only continue the text in a meaningful way. However, modern versions can do much more than that. You can ask it, “What year was Shakespeare born?” and hopefully get an answer. Or it can process prompts like:

Or it can give you a completely different text, as GPT generation is somewhat random.

It means that GPT-3 and above can perform zero-shot NLP tasks, i.e., tasks it is not explicitly trained to perform, without any neural network training or finetuning. In many cases, it can perform on par with or even better than models specifically trained for a given narrow task (e.g., translation); this is especially true for GPT-4.

Using OpenAI GPT-3 Python API for Summarization

However, there is a price for such a power. These models are huge. Far too big to run on a single desktop or laptop machine. For this reason, and also because of secrecy, OpenAI currently does not release GPT-3 and above publicly. While you can easily download and run GPT-2 on your computer (e.g., with the Hugging Face transformers framework), you can only run GPT-3 on OpenAI servers using OpenAI API. What does it mean in practice?

  • You have to pay money for each GPT-3 API call (although you get free $15 at the registration time)
  • You require an internet connection, plus OpenAI servers occasionally suffer outages
  • In some countries, OpenAI API is not available (though they are getting better)

If you want to use GPT-3 in your application, decide for yourself whether or not such a business model suits you.

Before we continue, please sign up for OpenAI (if you haven’t already) and try GPT-3 at the GPT-3 Playground here. Have fun with different prompts. Note that there are actually four (at the moment of writing this) different GPT-3 versions, from smallest to largest: ada, babbage, curie, davinci. Note also the two main parameters: temperature and max length. Next, go into your OpenAI personal cabinet and generate an API key. Be careful not to lose the key; save it into a text file on your computer.

This is all very nice, but how can we use such models in Python? For that, we need OpenAI Python API, which is a thin wrapper around OpenAI Web API. We can try it out in fun_opeanai.py, and we encourage you to play around with it. The API is very simple.

First, read your API key from the file (change KEY_FILE to the actual path to your file).

with open(KEY_FILE, 'r') as f:
	key = f.read().strip()
openai.api_key = key

Warning! Never include your key in the code itself! Next, send your prompt to the OpenAI servers and wait for the answer


prompt = 'Translate this to French ...'
response = openai.Completion.create(model="text-davinci-003", 
                        prompt=prompt, temperature=0.7, max_tokens=256)
result = response['choices'][0]['text']
print(result)

This works exactly like the GPT-3 playground you tried before. Once again, you have two main parameters:

temperature : Higher temperature means GPT-3 is more random and more creative
max_tokens : Maximal number of words the model is allowed to generate

Note that we are not doing here any tokenization or text embedding; GPT -3 does this for us on the OpenAI servers.

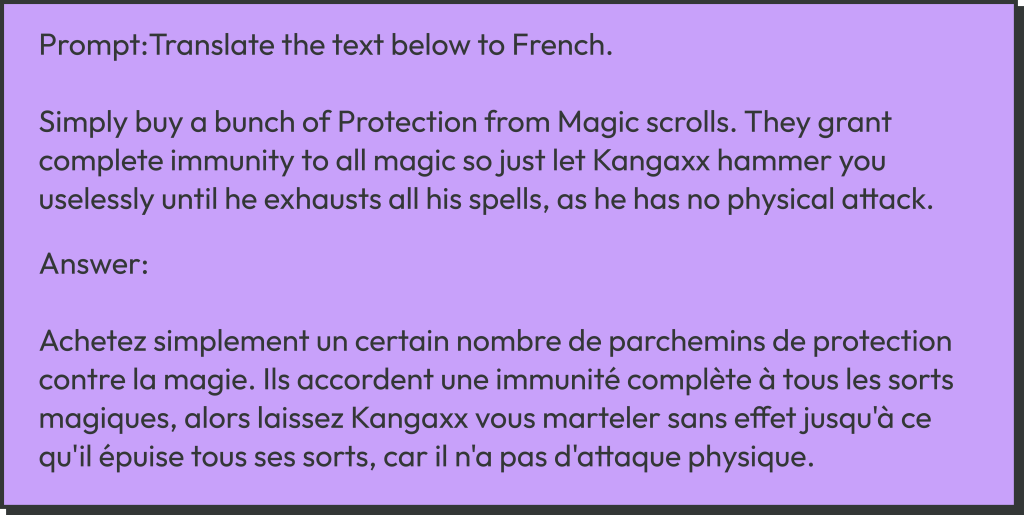
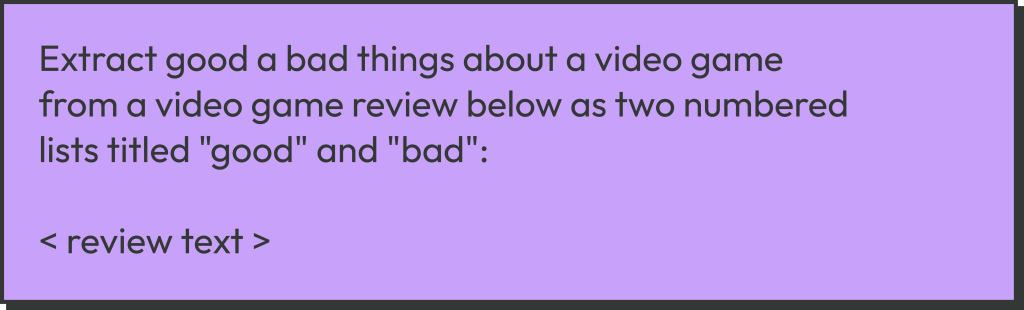
But what exactly do we want GPT-3 to do for us? We want to use it to perform a zero-shot NLP task: extract a good and bad list (separately) from every single review. This is similar to summarization but much more complicated. To do that, we use the following prompt:

GPT-3 processes our prompt

You can try to tweak this prompt if you want (after all “prompt engineering” is a hot fashion nowadays), but this one is already good enough. It produces two lists in basically 100% cases with the davinci model. Smaller models are not smart enough to follow such a prompt reliably, so we will use davinci. But now comes the bad news we promised you.

Exercise: Try different prompts with video game reviews.

Ouch: GPT Hallucinates!

When you start playing with GPT-3, you will quickly realize that, while it can perform various tasks remarkably well, it is far from perfect. While GPT-3-generated texts tend to be grammatically well-written and highly self-confident in tone, they often contain fantasies instead of facts. People say that “GPT is hallucinating” (official OpenAI terminology), or, in a less formal language, GPT-3 is a “notorious bullshitter”. By the way:

Why does GPT-3 lie? Because it does not know the truth and even doesn’t have a concept of “truth”. While LLMs are extremely good at working with text, they are trained on nothing but text and have no consistent “world model” outside the realm of text. They are super-good with text, but they don’t really think. We recommend an excellent video with Yann LeCun or this article on this topic.

Does the fact that GPT lies decrease its usefulness for applications? It depends on the application, but we would not use GPT for anything with high ethical or judicial responsibility. It might sometimes be possible to filter GPT results using various NLP techniques, but generally, it’s comparable in difficulty with the original problem we are trying to solve.

An example of hallucination can be seen with our “Extract good a bad things about …” prompt if we put the one-liner “Ruined my life.” there. The model gives something like (the actual result is random)

This is your typical GPT: When there is not enough information, it makes things up that look plausible but contain no factual truth. Moreover, as GPT-3 was trained on a huge corpus that contained video-game-related texts among other things, it can make up stuff that uses the proper terminology and superficially looks like a real thing.

Running Our Dataset through GPT-3

Or rather not the entire dataset, but a single game. The code is in pipe2_run_gpt3.py, and it’s very similar to fun_openai.py. First, we load the cleaned-and-pickled dataset from the previous step and select Divine Divinity by the ID.


df_clean = pd.read_pickle('temp/data_clean.pkl')
df_id = df_clean[df_clean['app_id'] == APP_ID]

We run over all reviews of this game, up to IDX_END=100 of them.


for idx in range(IDX_START, min(IDX_END, len(df_id))):
    text = df_id.iloc[idx]['review_text']

For each text, we form a prompt and run it through GPT-3 API:

prompt = 'Extract good a bad things about a video game from a video game review below as two numbered lists titled "good" and "bad":'
prompt = prompt + '\n\n' + text
response = openai.Completion.create(model=MODEL_GPT3, prompt=prompt, 
                              temperature=TEMPERATURE, max_tokens=256)
result = response['choices'][0]['text']

Finally, we save the result to a disk file in our temp directory:

p_out_file = p_out_dir / f'{idx:05d}.txt'
with open(p_out_file, 'w') as f:
    f.write(result)

Chapter 3: NLP from Scratch: Truth/Lie Filtering after GPT-3

In this chapter, we will try in pipe3_aggregate_good_bad.py to filter the ”good” or “bad” items generated by GPT-3 to keep only truthful statements. We will also aggregate the results from all reviews into two long lists: ‘good“ and “bad”. True to our “sequential pipeline” logic, we will not try to do it on the fly but work on disk files generated at the previous step. The advantage of such an approach is obvious: you can run GPT-3 (and pay money) only once and then experiment endlessly with filtering. The filtering task itself is very similar to natural language inference: to check if a given “hypothesis” follows from the “premise”.

N-Grams from Gcratch

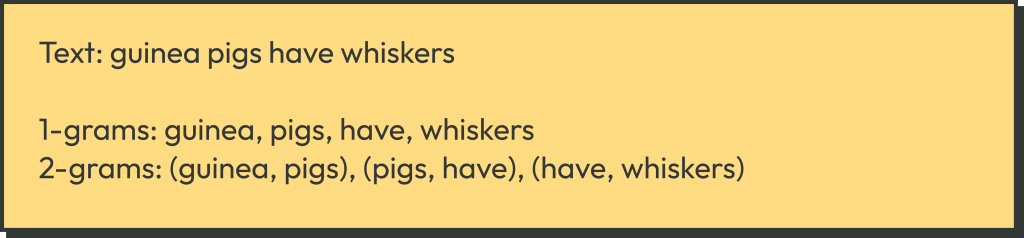
In this chapter, we will deliberately NOT use any LLMs, even moderate-sized ones like BERT or GPT-2, but instead, we will show how to write the simplest possible NLP models from scratch in Python. For this, we are going to use N-grams. An N-gram is a tuple of length N of consequent words, e.g., 1-grams (unigrams) are simply words, and 2-grams (bigrams) are word pairs. For example, let’s find all 1-grams and 2-grams in the following text:

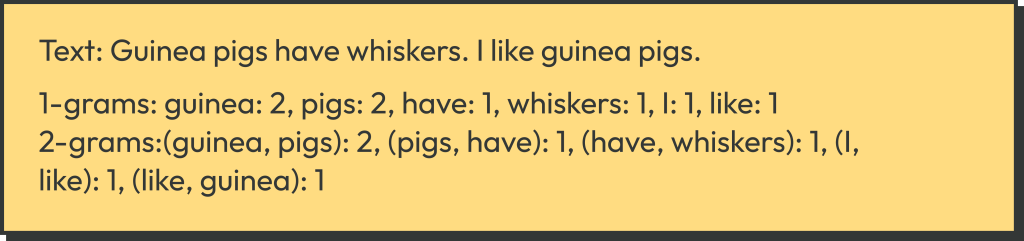
An N-gram model simply finds all N-grams in a text and builds a multiset of all N-grams and their repetitions. For 1-grams, this is known as the Bag of Words (BoW) model. N-grams are typically not allowed to cross sentence boundaries. For example:

We calculate N-grams in calculate_n_grams():


def calculate_n_grams(text: str, n: int):
	"""Calculate n-grams, it's first broken into sentences"""
	assert isinstance(text, str)
	# Split with .!:
	text = re.split('\.|\?|\!', text)

	# Remove all other punctuation, numbers, junk
	text = [re.sub(r'[^\w\s]', '', s.lower()) for s in text]

	ngrams = set()
	for line in text:
         	line_split = line.split()
    	for i in range(len(line_split) - n + 1):
        	ngrams.add(tuple(line_split[i: i+n]))
	return ngrams

First, we split the string into a list of sentences with regular expressions. Next, we remove all non-alphabetic characters and put all words in lowercase. Finally, we find all actual N-grams. We are using Python set here, as we don’t need counts for our algorithm, but if you do, you can use collections.Counter or multiset.Multiset

Truth/Lie Filtering using N-Grams

To filter out the lies from the GPT-3 results (created at step 2 of the pipeline), we need texts from the processed dataset (created at step 1 of the pipeline). We run a loop over all reviews:

for idx in range(len(df_id)):
    p_txt = p_data_dir / f'{idx:05d}.txt'
    if not p_txt.exists():
        continue
    # Extract good + bad from a file
    list_good, list_bad = extract_good_bad(p_txt)

First, we extract two lists of strings (good and bad) in our function extract_good_bad(). This function is somewhat ugly, as the GPT output format is not perfectly stable, e.g., it can randomly put a blank line after a header “Good” or not. But ideologically, it’s pretty simple; see the code for details.

Once we have the two lists, we check each item in the “good” list for truthfulness. If true, it is added to the aggregated (over all review) list list_total_good. The same is repeated for the “bad” list. But before that, we calculate the 1-grams and 2-grams for text, the original review.

ng_t_1 = calculate_n_grams(text, 1)
ng_t_2 = calculate_n_grams(text, 2)
list_good = filter_irrelevant(ng_t_1, ng_t_2, list_good)
list_bad = filter_irrelevant(ng_t_1, ng_t_2, list_bad)
list_total_good.extend(list_good)
list_total_bad.extend(list_bad)

The actual filtering takes place in filter_irrelevant()

def filter_irrelevant(t1, t2, candidates):
    """Filter a list of candidates"""
    res = []
    for bc in candidates:
        ng_bc_1 = calculate_n_grams(bc, 1)
        ng_bc_2 = calculate_n_grams(bc, 2)
        if score_ngrams(t1, t2, ng_bc_1, ng_bc_2, None):
             res.append(bc)
    return res

For each line of the list (aka “candidate”), we calculate the N-grams of this line and score the line against the N-grams of the text (the actual review)

def score_ngrams(t1, t2, b1, b2, b_text=None):
    p1 = calc_percentage(t1, b1)
    p2 = calc_percentage(t2, b2)
    res = p1 > 0.7 and p2 > 0.2
   
    return res

def calc_percentage(t, b):
    if len(b) == 0:
        return 0
    b = list(b)
    f = [(x in t) for x in b]
    return np.mean(f)

The idea is simple. If a short sentence is extracted from a longer text, then most of its N-grams will be present in the original text. If the sentence is hallucinated, it will contain words and 2-grams not from the original text. We take the N-grams (N=1, 2) t1, t2 of the text and b1, b2 of the good/bad list line and calculate the percentages p1, p2 of N-grams of the line present in the text. If the two numbers are sufficiently large, we accept such a line.

For example, let’s look at the review with index 2:

It’s a pretty good informative review, and GPT-3 works reasonably well. Our N-gram model accepts all lines in the list but one:

GOOD

Satisfying to come back and slaughter enemies.

Interesting story that evolves over the course of the game. +

Requires tact and strategy. +

BAD

Stupid title. +

Very easy to kill right from the start. +

First few hours can be difficult and boring. +

The one rejected line is actually a false positive (due to the crudeness of our method and misspelled “ememies”), it should have been accepted. 

The opposite example is the review with an index 0. As happens very often on Steam, the review, while rather poetic, contains no factual information about the game:

Such reviews really trigger GPT-3 into the mass-hallucination mode. However, our N-gram filter could reject 100% of the made-up lines.

GOOD

Fun and engaging gameplay –

Interesting story –

Variety of enemies –

BAD

Limited replayability –

Poor graphics –

Unbalanced difficulty –

Our N-gram model actually works quite well for such a trivial model. And its faults are quite predictable: it doesn’t handle synonyms, word endings (come vs. coming) and misspelled words (“ememies”). Of course, in the decades of NLP history, much better models were created. 

If you want to use traditional (i.e., without deep learning) NLP methods in real projects, don’t implement them from scratch! Instead, use one of the existing Python libraries, such as NLTK, spaCy, or GenSim.

Chapter 4: Extractive Text Summarization with BERT-Extractive-Summarizer

After the previous stage of the pipeline, we have two filtered lists: GOOD and BAD, aggregated over all reviews (of one game) and saved as two disk files. Now we want to summarize each list by selecting five “most typical” lines from each.

Extractive vs. Abstractive Text Summarization in Python

There are two main ways to summarize a text. Extractive summarization selects the most representative bits of the original text verbatim. It usually works on the level of whole sentences.  

In contrast, abstractive summarization uses generative models (typically LLM-based) to generate a free-form summary from the original text. The Python framework transformers from Hugging Face has a number of such models. We (in IT-JIM) have tried such models on both individual video game reviews and aggregated lists and found the results unsatisfactory. In particular, just like GPT, abstractive summarization models are very prone to hallucinations, especially when the input text is too short or not very informative.

In this section, we use extractive summarization instead, using the library bert-extractive-summarizer.

Extractive Summarization with Bert-Extractive-Summarizer

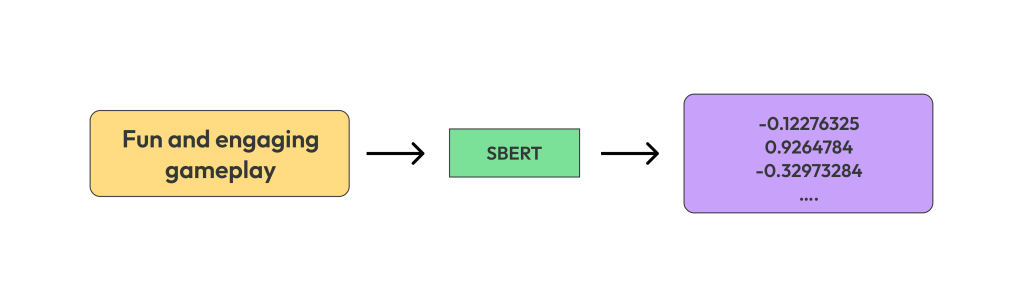
This library uses the Sentence BERT model from the library sentence-transformers under the hood. The model is automatically downloaded from the hub and cached. The idea is the following. Sentence BERT processes a sentence and produces a multi-dimensional numerical embedding vector.  The more similar in meaning the sentences are, the closer are their embeddings (via cosine similarity). 

bert-extractive-summarizer can also use BERT models from the transformers library. BERT produces and embedding of each word (instead of the sentence), which are later averaged to get a sentence embedding.

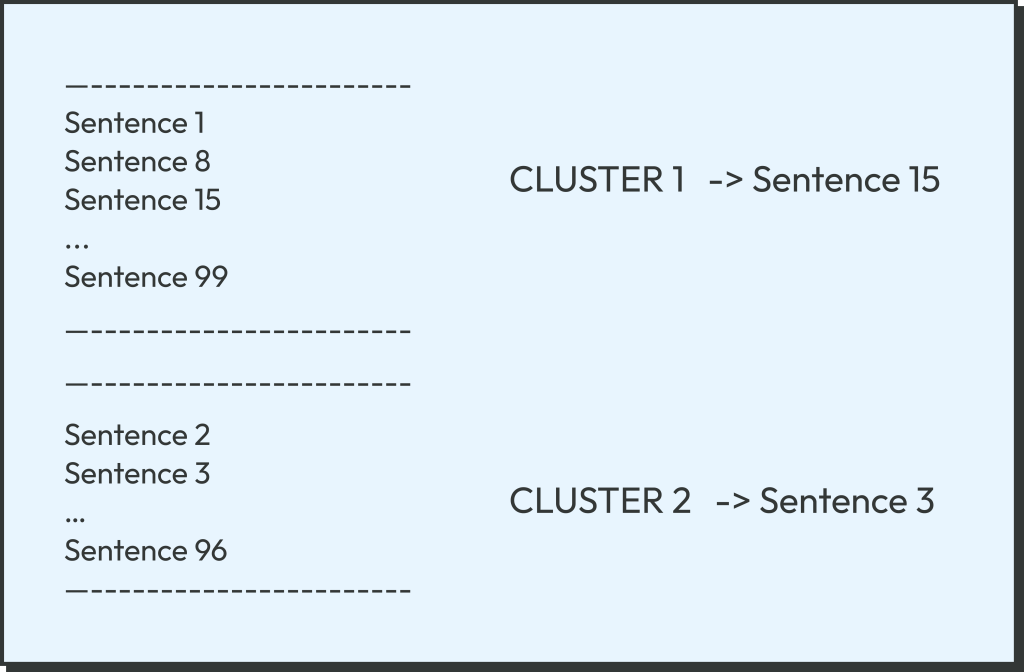
After we get the sentence embedding (numerical vectors), the library clusters these embeddings by similarity, using a variation of the K-means clustering.

Finally, it selects one most representative sentence from each cluster, i.e., the one closest to the cluster center.

In the last part of our code, pipe4_cluster_good_bad.py, we read the good list (the bad list is processed later in the same way) and run it through bert-extractive-summarizer. But first, we have to convert the list into a single long string separated by the period (“.”) characters while removing any period characters inside the list items themselves.

lines = [line[:-1] if line[-1] == '.' else line for line in lines]
lines = [line.replace('.', ',') + '.'  for line in lines]
joined_lines = ' '.join(lines)

Next, we create an SBertSummarizer model (based on SBERT) and run our text through it:

model = summarizer.sbert.SBertSummarizer()
result = model(joined_lines, num_sentences=5)

This is it! The result contains five lines, as requested. This is the final result of our entire pipeline. For us, it looks like this:

This is the end. We hope we were able to interest you in NLP and not scare you away with too many technical details.


Natural Language Processing

Natural language is the most natural (pun intended) way to store and share information for humans. Software solutions that can understand, analyze and even use it for communication are becoming the key to success in many industries, with the recent rise of Large Language Models (LLMs) and AI chatbots being yet another proof of this. Stick with us and see how It-Jim’s expertise in Natural Language Processing (NLP) can boost your business to the next level and bring to life your most daring project ideas.

Data Analysis

Analyzing data and making correct conclusions is an extremely valuable decision-making tool for both well-established companies and emerging startups. It can also be a successful product on its own, providing users with a concise summary of what they were looking for just in one click.

Yet, the data one might be interested in doesn’t always come in nice structured tables. A corpus of unstructured text might have different origins: various documents, e-mails, product descriptions or reviews, and so on, but for all of them, we’ve got all the tools needed to extract the information you’re actually looking for.

Our expertise in Information Extraction from text includes

  • Named Entity Recognition
  • Sentiment Analysis
  • Topic Modelling
  • Building Knowledge Graphs
  • Text Summarization
  • Question Answering.

We utilize major NLP libraries (SpaCy, NLTK, Gensim) as well as Deep Learning models (BERT, RoBERTa, BART, T5). For our DL solutions, we use both PyTorch and TensorFlow and of course, as NLP enthusiasts, we couldn’t have missed the HuggingFace Transformers framework.

One of our core competencies is fine-tuning these models for particular tasks, with all techniques of efficient data engineering and model training being at our disposal. If there is not enough data to train on, we offer one- and few-shot solutions that require only a couple of examples to learn how to complete certain tasks.

Content Сreation

Working with texts isn’t limited to analyzing them; there is also great potential in automatically generating new texts for your needs. From creative and persuasive ads based on a list of keywords to a touching personalized letter given just a couple of sentences – all that is perfectly achievable with proper NLP tools and corresponding expertise. Depending on how many examples are available, we can offer either fine-tuning a language model or using it with just a few examples (or even without them at all) through careful prompt engineering. This is achievable with open-source models like T5, as well as with GPT 3&4 – all depending on what suits your project best.

We also don’t restrict ourselves to generating just text. Modern text-to-image models like DALL-E and StableDiffusion are capable of creating wonderful art, limited mostly by how well one designs a text prompt for it. But if you want to bring their image creation capabilities to your users without making them go through a crash course on prompt engineering, we are here to help. By applying proper NLP techniques, we can turn an unstructured heap of ideas or even just an arbitrary piece of text into a well-designed prompt that will make generated images surpass your expectation. To see how this works in practice, check out our project for generating illustrations for poems.

Conversational AI

Systems that can keep up a conversation with a user come in different forms: customer support chatbots, AI assistants, educational roleplay solutions, and many more. If you’re looking to build a similar system of your own, we’ve got you covered.

Customer support is probably the most common example of conversational AI right now. Building a proper customer support chatbot requires forming a good understanding of the domain and analyzing typical scenarios that need to be automated. We always take a close look at the historical record of customer inquiries to uncover common patterns and obtain necessary data for training the chatbot. We then design a conversation flow to be clear and unambiguous for a user, ensuring that the chatbot would really be a helpful component rather than just an annoying step before getting to a human operator. We use dedicated chatbot frameworks (DialogFlow and Rasa), which allow for rapid development and easy integration with all major messengers and platforms.

For tasks that require more human-like conversations, we use LLM-based chatbots, namely ChatGPT, as well as solutions built on top of it, like AutoGPT and LangChain. Proper application of these tools allows us to provide users with a much more personalized and engaging conversation experience, which is simply impossible to achieve with classic approaches to building chatbots.

NLP on the Edge

Cutting-edge LLMs that run on extremely powerful servers are incredible, yet there are kinds of data that users don’t want to leave their device at all, let alone to be sent to a third-party API for processing. Understanding this challenge, we’re constantly improving our expertise in deploying AI solutions on edge devices (be it a smartphone or embedded systems). Our engineers have a unique skill set for solving any compatibility issues and converting Deep Learning models, including LLMs, to CoreML, TensorFlow Lite, and TensorRT. Through techniques like knowledge distillation, quantization, and pruning, we make sure that the performance of our Deep Learning solutions on mobile devices meets the highest expectations of our customers.

Yet, it is always better to solve problems before they happen. While it is common nowadays to solve any complicated task just by plugging in more and more capable (and heavier) LLMs, we leverage our long experience in NLP to achieve the same quality of results with classic algorithmic and ML solutions or by using much lighter DL models. We also optimize our code specifically for the target platform (including both iOS and Android), ensuring that our solutions always run as fast as possible on the given hardware.

Training and Fine-Tuning GPT-2 and GPT-3 Models Using Hugging Face Transformers and OpenAI API

At the moment this article appears, generative large language models (LLMs) are discussed a lot in the media. After the release of OpenAI ChatGPT and later GPT-4, GPT became the “word of the day”. In this blog post, we’ll cover the following questions:

  1. What are GPT models, and how do they work?
  2. Can I run GPT on my computer locally?
  3. Can I train or fine-tune GPT models myself?

This article is generally beginner-level but requires elementary knowledge of Python and Deep Learning. We’ll gently introduce you to both Hugging Face transformers and OpenAI GPT-3 (Python and CLI) API.

Language models like GPT belong to the branch of computer science called Natural Language Processing (NLP). By the way, in case you didn’t know, the acronym “GPT” stands for “generative pre-training” (in the original GPT-1 paper, which actually never used the acronym), or sometimes “generative pre-trained transformer” nowadays.

Can I Run GPT locally? Hugging Face Transformers and GPT-2

Let’s start with the second question. The short answer is: You can run GPT-2 (and many other language models) easily on your local computer, cloud, or google colab. You cannot run GPT-3, ChatGPT, or GPT-4 on your computer. These models are not open and available only via OpenAI paid subscription, via OpenAI API, or via the website. Obviously, any software using this API has to pay OpenAI and rely on a stable internet connection.

The easiest way to run GPT-2 is by using Hugging Face transformers, a modern Deep Learning framework for Python from Hugging Face, a French company. It is mainly based on PyTorch but also supports TensorFlow and FLAX (JAX) models.  Before we start, you need a functional Python 3.x environment (either vanilla Python or Anaconda, we use the former). Follow the installation instructions here. Namely, for the vanilla Python with PIP, type in your terminal:

pip3 install torch 'transformers[torch]'

For Anaconda, type:

conda install -c huggingface transformers

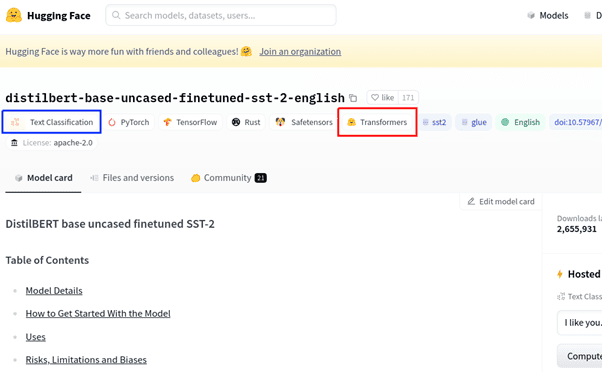
Now we are ready to start coding. The complete code for the Hugging Face part of the article can be found here. What do we need to know about the transformers framework? First, it does not implement neural networks from scratch but relies on lower-level frameworks PyTorch, TensorFlow, and FLAX. Second, it heavily uses Hugging Face Hub, another Hugging Face project, a hub for downloadable neural networks for various frameworks. Its use is very simple: go here, find a model you like, and view its page (called Model Card), see the screenshot.

What information do we see here?

  • Model name distilbert-base-uncased-finetuned-sst-2-english on top.
  • Framework (the red box is ours): transformers
  • Task (the blue box is ours): Text Classification
  • Supported underlying frameworks: PyTorch + TensorFlow
  • Files and Versions tab, which contains model file sizes etc.
  • Other things: online demo, usage code example, etc.

Now let’s try GPT-2 in Python. It is pretty simple. For our first example, we use the pipelines, the highest-level entity of the transformers framework. Our full code is in fun_gpt2_1.py in our repo. First, we create the pipeline object:


MODEL_NAME = 'gpt2'
pipe = transformers.pipeline(task='text-generation', model=MODEL_NAME, device='cpu')

On the first run, it downloads the model gpt2 from the Hugging Face Hub and caches it locally in the cache directory (~/.cache/huggingface on Linux). On the subsequent runs, the cached model is loaded, and the internet connection is not required. Now, we generate text from a prompt:

print(pipe('The elf queen'))

The output we had was:

However, if you run the code, the result will be different. Why? Because the GPT text generation is random, every time you run the code, the result will be different. This randomness is regulated by the parameter called temperature. Note that the result is actually a Python dict with a single key generated_text. In fact, we will see dicts and dict-like objects again and again, the transformers framework uses them a lot.

Note that in transformers, “pipeline” is very different from “model”. “Model” is the thing we download from the Hub, gpt2 in our case, which is, in fact, a valid PyTorch model with some additional restrictions and naming conventions introduced by the transformers framework. “Pipeline” is the object which runs the model under the hood to perform a certain high-level task, e.g. text-generation. The correspondence is not one-to-one, you can use various models for text-generation: gpt2, gtp2-medium, gpt2-large, fine-tuned GPT-2 versions, and custom user models. But you cannot use models with no generation capabilities, such as Bert, in this pipeline. 

While pipelines are what Hugging Face newbies typically start with, for us, they are not very interesting. Pipelines perform a lot of steps under the hood, which are hard to understand and even harder to reproduce. They are hard to customize and totally useless for model training or fine-tuning, custom models, performing custom tasks, or in general, everything the developers in Hugging Face did not plan in advance. You only really know the transformers framework if you can do things in a pipeline-free way.

Let’s try to reproduce the text generation example without pipelines. First, we create the model and tokenizer objects by downloading their weights from the Hugging Face Hub.

model = transformers.GPT2LMHeadModel.from_pretrained(MODEL_NAME)
tokenizer = transformers.AutoTokenizer.from_pretrained(MODEL_NAME)

Note that only the trained model weights are downloaded from the Hub, while the PyTorch models themselves are Python classes defined in the transformers framework code. GPT2LMHeadModel is the GPT-2 model with the generation head.

But what on Earth is a tokenizer? Neural networks are not able to work with raw text; they only understand numbers. We need a tokenizer to convert a text string into a list of numbers. But first, it breaks the string up into individual tokens, which most often means “words”, although some models can use word parts or even individual characters. Tokenization is a classical natural language processing task. Once the text is broken into tokens, each token is replaced by an integer number called encoding from a fixed dictionary. Note that a tokenizer, and especially its dictionary, is model-dependent: you cannot use Bert tokenizer with GPT-2, at least not unless you train the model from scratch. Some models, especially of the Bert family, like to use special tokens, such as [PAD], [CLS], [SEP], etc. GPT-2, in contrast, uses them very sparingly.

Next, we tokenize our prompt.


enc = tokenizer(['The elf queen'], return_tensors='pt')
print('enc =', enc)
print(tokenizer.batch_decode(enc['input_ids']))

The output is:

The result is a dict-like object with two keys: input_ids (tokens), and attention_mask (an array of ones in all our experiments). The return_tensors=’pt’ option means returning PyTorch tensors; lists are returned otherwise. The batch_decode() method decodes tokens back to the string “The elf queen”. Finally, we generate the text using the generate() method of our model, then decode the new tokens.


out = model.generate(input_ids=enc[
'input_ids'],
attention_mask=enc['attention_mask'], max_length=20)
print('out=', out)
print(tokenizer.batch_decode(out))

We’ll get the result:

This is perfect! Or is it? If we run this code several times, we’ll see that something is wrong. The result is always the same! Why is that? Because the pipeline tweaks the model config while we use the default one. Let’s look at the config.

config = transformers.GPT2Config.from_pretrained(MODEL_NAME)

It’s not a dict, but a Python class with numerous fields:

There are tons of parameters here, most of which we probably do not want to modify, such as model size. The dict task_specific_params contains parameter adjustments for pipeline tasks, in this case text-generation. To activate these parameters, we copy them by hand to the object proper:

config.do_sample = \
        config.task_specific_params['text-generation']['do_sample']
config.max_length = \
        config.task_specific_params['text-generation']['max_length']

Now we create the model from pretrained weights, but with a modified config

model = transformers.GPT2LMHeadModel.from_pretrained(MODEL_NAME,
                                                    config=config)

Voila, now the model generates random results (with the default temperature of 1.0 in the config). But how exactly does the generation work? We’ll explain it in the next chapter.

How Does GPT Work? Transformer Encoders, Decoders, Auto-Regressive Models

GPT-2 is a transformer decoder model (here, the word “transformer” stands for network architecture and not the Hugging Face transformers framework). “Transformers and attention” is a very interesting topic, which I don’t have time to go into detail in this article. If you look for introductory-level articles on transformers, we will often find a picture like this:

Image source

This “classical transformer” architecture has two blocks: encoder on the left and decoder on the right. This “encoder-decoder” architecture is rather arbitrary, and that is not how most transformer models work today. Typically, a modern transformer is either an encoder (Bert family) or a decoder (GPT family). So, GPT architecture looks more like this:

Image source

The only difference between encoder and decoder is that the latter is causal, i.e., it cannot go back in time. By “time” here, we mean the position t=1..T of the token (word) in the sequence. Only decoders can be used for text generation. GPT models are pretty much your garden variety transformer decoders, and different GPT versions differ pretty much only in size, minor details, and the dataset+training regime. If you understand how GPT-2 or even GPT-1 works, you can, to a large extent, understand GPT-4 also. For our purposes, we drew our own simplified GPT-2 diagram with explicit tensor dimensions. Don’t worry if it confuses you, we’ll explain it step by step in a moment.

Previously, we transformed the text “The elf queen” into a sequence of tokens [464, 23878, 16599]. This integer tensor has the size BxT, where B is the batch size (B=1 for us), and T is the sequence length (T=3). Most transformers are able to receive sequences of variable length without re-training, however all sequences in the batch must be of the same length (or padded). The transformer itself works with a D-dimensional vector at every position, for GPT-2 D=768. The total dimension of transformer data at each transformer layer is thus BXTxD, and the data is floating-point. This is different from the integer BxT encodings from the tokenizer. Thus every integer token has to be transformed to a D-dimensional floating point vector input_embeddings in the embedder. Unlike the tokenizer, the embedder is a part of the GPT-2 model itself (class GPT2LMHeadModel), so we don’t have to worry about it. 

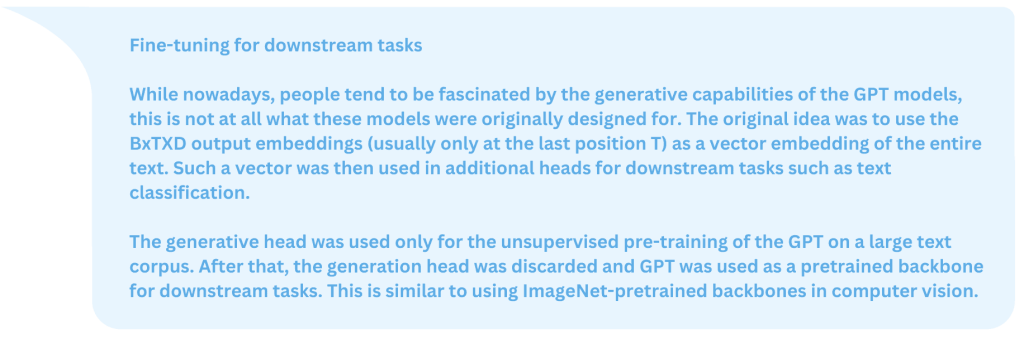
The output of the transformer blocks is of the same size as its input, BxTxD, or a D-dimensional vector output_embeddings at each position. If we use a headless GPT-2, class GPT2Model, this is exactly its output called last_hidden_state, which can be used for downstream NLP tasks. However, we want to use GPT2LMHeadModel, the model with a generation head. In order to understand the generation, let’s try to generate a text without using the generate() method. If we run the model inference:

out = model(input_ids=input_ids, attention_mask=attention_mask)

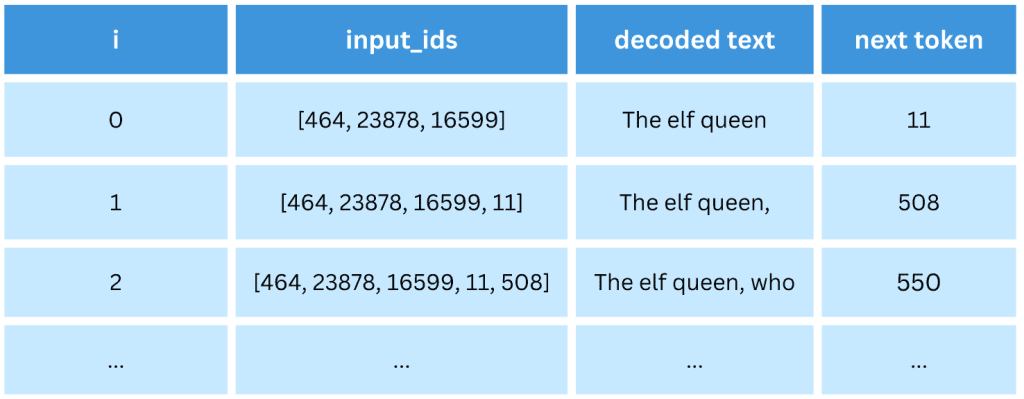
we get a dict-like object out containing a BxTxV tensor logits, where V=50257 is the GPT-2 dictionary size. How does the generation work? GPT-2 is trained so that the generation head predicts the next token at each position. If ztj is the logits tensor (t=1..T, j=1..V, we skip batch for simplicity), then the token t+1 is predicted as argmaxj (ztj). It is an integer token which can be decoded by the tokenizer.

But what is the meaning of logits at position T (the last position)? It is the prediction of the next token after the current T-sequence. We can add it to the end of the sequence, then repeat the process to generate as many tokens as we want. The important thing is that tokens are generated one at a time, so that in order to generate N tokens we need to run the model N times. Such models (which generate new data one step at a time) are called auto-regressive models.

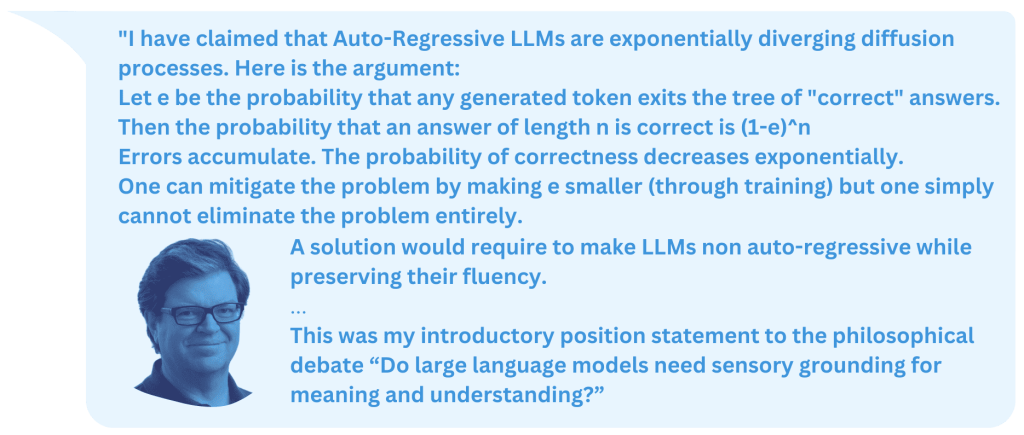
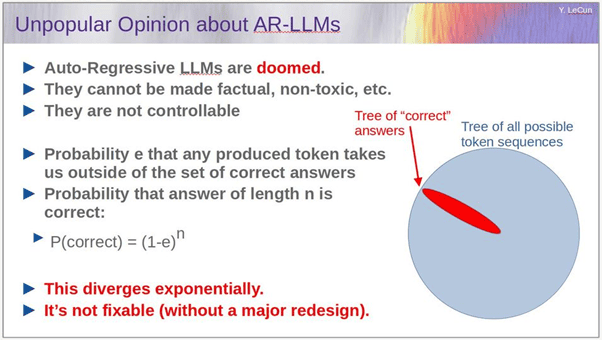
Let’s see what Yann Lecun, one of Deep Learning’s founding fathers, says about them:

The full slide deck is here

Do you find his arguments persuasive?

The code for sequence generation is the following:

input_ids = enc['input_ids']
for i in range(20):
    attention_mask = torch.ones(input_ids.shape, dtype=torch.int64)
    logits = model(input_ids=input_ids,
                  attention_mask=attention_mask)['logits']
    new_id = logits[:, -1, :].argmax(dim=1)   # Generate new ID
    input_ids = torch.cat([input_ids, new_id.unsqueeze(0)], dim=1)

print(tokenizer.batch_decode(input_ids))

And it generates the sequence one word at a time.

This was a non-random generation. The random generation differs in the way it generates each next token from logits. Instead of the argmaxj (ztj), we randomly sample probability distribution pj of generating token j=1..V:

pj = 1/Z exp( zTj / Θ) = softmax(zTj / Θ) , where Z = 𝛴k  exp( zTk / Θ),
zTj are logits at the last position, and Θ is the temperature.

How to Train and Fine-Tune GPT-2 with Hugging Face Transformers Trainer?

GPT models are trained in an unsupervised way on a large amount of text (or text corpus). The corpus is broken into sequences, usually of uniform size (e.g., 1024 tokens each). The model is trained to predict the next token (word) at each step of the sequence. For example (here, we write words instead of integer encodings for clarity) :

The labels are identical to input_ids, but shifted to one position to the left. Note that for GPT-2 in Hugging Face transformers this shift happens automatically when the loss is calculated, so from the user perspective, the tensor labels should be identical to input_ids. The training is demonstrated in the code train_gpt2_trainer1.py on a rather small toy corpus.

In function break_text_to_pieces() we load the corpus gpt1_paper.txt from the disk, tokenize it and break it into 511-token pieces plus the [END] token, which brings the sequence length to 512. Next, we split the data into train and validation sets in train_val_split() and in prepare_dsets() wrap them in the PyTorch datasets. The dataset class we use looks like this:

class MyDset(torch.utils.data.Dataset):
    """A custom dataset"""
    def __init__(self, data: list[list[int]]):
        self.data = []
        for d in data:
            input_ids = torch.tensor(d, dtype=torch.int64)
            attention_mask = torch.ones(len(d), dtype=torch.int64)
            self.data.append({'input_ids': input_ids,
                'attention_mask': attention_mask, 'labels': input_ids})

    def __len__(self):
        return len(self.data)

    def __getitem__(self, idx: int):
        return self.data[idx]

In the constructor, it preprocesses the tokenized data into a dict with keys input_ids, attention_mask and labels for each data sequence, with tensor labels being equivalent to input_ids as explained above. The method __getitem__() simply serves the element idx in the dataset. As all sequences are of the same length T=512, they can be collated into a batch by the standard PyTorch collator (which understands such dicts just fine), there is no need for a custom collator with padding. 

There are two ways to train Hugging Face transformers models: with the Trainer class or with a standard PyTorch training loop. We start with Trainer. After loading our model, tokenizer and two datasets, we create the training config.

training_args = transformers.TrainingArguments(
    output_dir="idiot_save/",
    learning_rate=1e-3,
    per_device_train_batch_size=1,
    per_device_eval_batch_size=1,
    num_train_epochs=20,
    evaluation_strategy='epoch',
    save_strategy='no',
)

There are tons of customizable parameters here, see the docs. The only reason we use batch sizes of 1 is because our dataset is so small. For larger datasets, we would use larger batch sizes, as much as fits into the GPU RAM. Now, we create the trainer and train.

trainer = transformers.Trainer(
    model=model,
    args=training_args,
    train_dataset=dset_train,
    eval_dataset=dset_val,
)
trainer.train()

Pretty simple, isn’t it?

Once our model is trained, we can save it to disk if we want.

model.save_pretrained('./trained_model/')
tokenizer.save_pretrained('./trained_model/')

We can also use it for text generation to test the trained model in action.

While the Trainer class is “nice” for beginners, if you try to use it “in real life”, questions arise, such as:

    • How exactly does it work?
    • Where is the loss function?
    • Validation loss is printed at each epoch, but where is the training loss?
    • What device (CPU or GPU) is training running on and how to change that?
    • (and many many other questions)

Following the usual pattern we see again and again in software development, dumbed-down tools for beginners actually become inconvenient for serious use. In fact, if we run the code train_gpt2_trainer1.py, does the validation loss actually increase at each epoch? Is something wrong, or is the model just overfitting to the tiny training set? Who knows. In the next section, we’ll show how to train this model in a much more controllable way.

How to Train and Fine-Tune GPT-2 with PyTorch Training Loop?

Note: this section requires minimal knowledge of PyTorch. If you don’t know any PyTorch, then you will have to believe us. In PyTorch, there is no equivalent to transformers.Trainer or the fit() method of Keras or scikit-learn. Instead, you are supposed to write a training loop yourself in order to have complete control over it. Don’t worry, it’s just a few lines of code. The typical PyTorch training loop looks like this (rather schematically):

for i_epoch in range(n_epochs):
    for x, y in loader_train:
        optimizer.zero_grad()
        out = model(x)
        loss = my_loss_function(out, y)
        loss.backward()
        optimizer.step()

In train_gpt2_torch1.py, we implement this approach for the training of GPT-2. The model, tokenizer, and two datasets are created identically to the previous chapter. Then we create the two data loaders. PyTorch data loaders compose individual dataset elements into batches.

loader_train = torch.utils.data.DataLoader(dset_train, batch_size=1)
loader_val = torch.utils.data.DataLoader(dset_val, batch_size=1)

Next, we move the model to the requested device (GPU); in PyTorch, such operations are always performed explicitly by the user, and we create the Adam optimizer.

DEVICE = 'cuda'    # or 'cpu'
model.to(DEVICE)
optimizer = torch.optim.Adam(model.parameters(), lr=1e-3)

The training loop itself is

for i_epoch in range(20):
    loss_train = train_one(model, loader_train, optimizer)
    loss_val = val_one(model, loader_val)
    print(f'{i_epoch} : loss_train={loss_train}, loss_val={loss_val}')

Here we run training and validation for each epoch and print both training and validation losses. The function train_one() is:

def train_one(model, loader, optimizer):
    """Standard PyTorch training, one epoch"""
    model.train()
    losses = []
    for batch in tqdm.tqdm(loader):
        for k, v in batch.items():
            batch[k] = v.to(DEVICE)
        optimizer.zero_grad()
        out = model(input_ids=batch['input_ids'],
                    attention_mask=batch['attention_mask'],
                    labels=batch['labels'])
        loss = out['loss']
        loss.backward()
        optimizer.step()
        losses.append(loss.item())


    return np.mean(losses)

This is very similar to the “generic” PyTorch training loop, but note a couple of things:

  • Our batch is now a dict containing both input tensors and labels
  • Every tensor in this dict must be moved to the DEVICE (e.g., GPU) by hand
  • The loss is calculated by the model itself when labels are provided and returned in out[‘loss’]. This is a convention of transformers and not the typical behavior of PyTorch models. The loss itself is the cross-entropy loss (a standard classification loss) over V=50257 classes, averaged over T positions.

The validation function val_one() is similar but with no backpropagation. If we run the code, we can clearly see that the training loss decreases while the validation loss increases, which means we are indeed overfitting to the tiny training corpus (far too small for a relatively large GPT-2 model).

What is the difference between training and fine-tuning? All training we performed so far was technically fine-tuning, as we started from a pre-trained GPT-2. Fine-tuning is a fine art (pun intended); by overfitting to a new dataset too much, you can easily forget the previous learning. For successful fine-tuning, you might want to limit the number of epochs and/or decrease the learning rate. Here we fine-tuned GPT-2 on a custom corpus by its native next-token-prediction task, the first type of fine-tuning.

In contrast, training (or training from scratch) means starting from a randomly-initialized model with no pre-trained weights.

model = transformers.GPT2LMHeadModel(transformers.GPT2Config())

We can train GPT-2 on our tiny corpus successfully, but it will take more than 20 epochs, a few hundred at least. You can try that.

Fine-tuning the GPT-2 backbone with a new head for downstream tasks is a second kind of fine-tuning GPT-2. We’ll discuss the third possible kind of fine-tuning below in the GPT-3 fine-tuning chapter.

How to use GPT-3 with OpenAI (Python, CLI) API?

Large OpenAI models such as GPT-3, ChatGPT and GPT-4 are not publicly available and can be used only via paid OpenAI subscription, via OpenAI web sites (such as GPT-3 playground) and OpenAI API. The models themselves run on OpenAI servers. Before we proceed, please sign up for OpenAI if you didn’t already and try the GPT-3 playground. Next, generate an OpenAI API Key in your cabinet. Store it safely somewhere on your computer. This cryptographic key will allow you to access OpenAI API.

This API (see the documentation) is a web API that you can access directly via, e.g., curl utility or with various language bindings. In this article, we are going to use OpenAI Python API and command line interface (CLI). Both are installed via PIP as:

pip3 install openai

Now openai is available as both a Python package and as a shell command. Next, I recommend that you set up your API key as the environment variable. In Linux, type in the terminal

export OPENAI_API_KEY="<OPENAI_API_KEY>"

Where <OPENAI_API_KEY> is your API key. You can also put this line into your ~/.profile file.

If you prefer not to use this environment variable, you will have to use the –k <OPENAI_API_KEY> every time you run openai in terminal, or, in a Python code set

openai.api_key = key

where key is the string containing your key.

CLI API is pretty easy (though not sufficiently documented). To see all available models, type

openai api models.list

Or to get the info on one particular model

openai api models.get -i text-ada-001

Note: there are currently four main versions of GPT-3 (from small to large): Ada, Babbage, Curie and DaVinci. We are going to use the smallest (and cheapest) one, Ada (text-ada-001). To generate the text from a prompt, type

openai api completions.create -m text-ada-001 -p "The elf queen"

and see the result. To see additional options, type

openai api completions.create -h

This was the CLI API. Now, how do we do the same in Python? It’s not much harder:

prompt = 'The elf queen'
response = openai.Completion.create(model="text-ada-001",
                        prompt=prompt, temperature=0.7, max_tokens=256)
print(response['choices'][0]['text'])

But what if we don’t want text generation but text embeddings? It’s also possible; however, generating embeddings is not allowed for common models such as text-ada-001. Instead, we have to use specialized models like text-embedding-ada-002. The Python code is:

text = 'The Elf queen'
res = openai.Embedding.create(model='text-embedding-ada-002',
                              input=text)
emb = res["data"][0]["embedding"]
print(emb)
print(type(emb), len(emb))

The result emb is a Python list of length 1536, presumably the raw transformer output embedding at the last position.

How to fine-tune GPT-3 with OpenAI API?

GPT-3 fine-tuning is described here. However, you are not allowed to train a model from scratch. Neither are you allowed to fine-tune on a text corpus or fine-tune with additional heads. The only type of fine-tuning allowed is fine-tuning on prompt+completion pairs, represented in JSONL format, for example:

Note: classification can be emulated by using “yes”/”no” completions. Of course, it is NOT a proper and efficient way to use GPT for classification.

How exactly is GPT-3 trained on such examples? We are not exactly sure (OpenAI is very secretive), but perhaps the two sequences of tokens are concatenated together, then GPT-3 is trained on such examples, but the loss is only calculated in the “completion” part.

Let’s try fine-tuning in action! We created a small JSONL dataset file colors.jsonl with a few pairs such as ‘banana is’ : ‘yellow’. Next, we run the (optional) utility to analyze the file and pre-process it if necessary

openai tools fine_tunes.prepare_data -f colors.jsonl

We got two suggestions from this tool:

  1. Add a suffix ending `\n` to all completions
  2. Add a whitespace character to the beginning of the completion

We said “Yes” to both suggestions and received the updated file colors_prepared.jsonl. Time for actual training.

openai api fine_tunes.create -t colors_prepared.jsonl -m ada

You can choose the model (ada, babbage, curie or davinci, without “text”) and the file to train on. The file will be uploaded into the OpenAI cloud and will get a unique ID of the form file_<ID>. You can use such a file for the subsequent fine-tunings by writing -t file_<ID> instead of the file name. You can list uploaded files with

openai api files.list

and delete an unneeded file with

openai api files.delete -i file_<ID>

Back to our training. Upon submission, your job (called fine-tune) is assigned its own unique ID of the form ft_<ID>. The client disconnects soon (with a “Stream interrupted (client disconnected)” message), but it’s OK. Your job is queued for half an hour or so and then starts training. You can check the status of all your fine-tunes (including completed ones) with:

openai api fine_tunes.list

You can check on a particular job (aka follow) with

openai api fine_tunes.follow -i ft-<ID>

Once the job is complete, you will get a detailed report  of the type

The fine-tuned model gets its own unique ID ada:ft-personal-<TIME>. You can list all your personal models with

openai api models.list | grep personal

As suggested, you can now try your model for text generation with

openai api completions.create -m ada:ft-personal-<TIME> -p <YOUR_PROMPT>

The result for me was rather ambivalent. On one hand, I succeeded in teaching the model to “think colors”. On the other hand, for some reason the model hallucinated in haikus and produced a longer output than desired, for example

Even for a training set prompt “orange is” the result was still a three-line haiku (something we definitely did NOT train the model to do).

You can try to train GPT-3 for more epochs or on your own dataset. Enjoy GPT models!

Generative AI

In a rapidly evolving world, emerging technologies present new and exciting possibilities. One such technology is generative AI, which has experienced remarkable growth and unlocked a multitude of opportunities.

Unlike the traditional discriminative approach that focuses on solving problems related to understanding, interpretation, or analysis, generative AI takes a different path. It enables the creation of diverse content, spanning text, images, video, audio, and even 3D models. By harnessing the power of generative AI, we can explore the boundless creative potential and reshape how we interact with technology.

Generative AI across Different Verticals

Harnessing the potential of generative AI opens up a multitude of opportunities across various industries. Here are some notable applications where generative solutions are making a significant impact:

    1. Creative industries: Huge progress in image generation was recently shown by DALL-E 2, MidJourney 5, and similar models. Things are changing very fast and images are just one example. From image generation to text, video, audio, and 3D asset creation, generative AI enables artists, musicians, designers, and business owners to save time and tap into new realms of creativity. 
    2. Sales and marketing: Another field where Generative AI already leads the revolution. Content generation (text posts, blogs, photos, videos), personal recommendations, social media management (SMM), captions, hashtags and comments generation, personal recommendations and predictive analytics. As for sales and lead generation, Generative AI can automate a huge fraction of processes like lead scoring and profiling, content generation, customer support, and many more.
    3. Entertainment and gaming: Generative AI is reshaping the entertainment and gaming landscape by creating virtual characters, animations, and immersive experiences. It introduces a new layer of reality through virtual environments, interactive storytelling, and game level generation. Additionally, generative AI plays a pivotal role in automating content generation for a dynamic and engaging user experience. Still, this is just the tip of the iceberg.
    4. Software development: In the field of software engineering, generative AI tools, such as Copilot, enhance productivity and efficiency. While they do not replace skilled engineers, these tools provide suggestions, coding pattern advice, and improve coding efficiency. For instance, Copilot analyzes existing code and libraries, offering relevant suggestions aligned with the developer’s coding style. However, it is crucial to remember that human expertise and thorough code review remain essential to ensure optimal results, a responsibility that the It-Jim team excels in delivering.
    5. Education: Generative AI can help to create various educational materials, such as quizzes, and interactive learning modules, generate questions, answers, and explanations. Another big thing is personalization: from virtual tutors and chatbots, avatars, and up to hyper-personal learning experiences. All of these can substantially transform the educational experience.
    6. Research and Academia: Generative AI holds immense promise in research and academia. It streamlines knowledge discovery, aids in generating technical reports, facilitates content search, and even assists in summarizing papers. It also contributes to the creation of educational materials, fostering academic advancements, and supporting a wide range of research activities.

By leveraging the transformative capabilities of generative AI, businesses and industries can unlock new realms of creativity, efficiency, and innovation, revolutionizing how they operate and engage with their target audiences.

Generative Tasks for Different Data Types

Let’s consider popular examples of generative AI applications based on the type of input and output data.

Image to Image:

  • Style transfer: Transforming the style of an image while preserving its content.
  • Image translation: Converting images from one domain to another, such as turning sketches into realistic images.
  • Super-resolution: Enhancing the resolution and quality of low-resolution images.
  • Domain adaptation: Adapting an image from one domain to another, such as translating images from day to night scenes or from synthetic to real data.
  • Image inpainting: Filling in missing or damaged parts of an image based on the surrounding context.

Text to Image:

  • Text-guided image editing: Modifying images based on textual instructions, such as changing colors or adding specific objects.
  • Image generation: Creating new images from textual descriptions or captions.
  • Image restoration: Restoring and enhancing the quality of old or degraded images.
  • Image inpainting and outpainting: Generating images by completing or extending the visual content based on textual descriptions.

Text:

  • AI-powered blog writing: Automatically generating high-quality blog articles based on given topics or keywords.
  • Custom chatbot development: Creating personalized chatbots with conversational capabilities tailored to specific business needs.
  • Machine translation: Translating text from one language to another using AI-based translation models.
  • Development of human-like personal assistants: Building virtual assistants that simulate natural conversations and provide personalized assistance.
  • Smart agent/business-oriented text generation: Generating text for business applications like automated email responses, customer support, or product descriptions.

Speech:

  • Text-to-speech (TTS): Converting written text into natural-sounding speech.
  • Speech-to-text (STT): Transforming spoken words or audio recordings into written text.
  • Voice cloning: Replicating a person’s voice using a small audio sample.
  • Automatic speech recognition (ASR) and audio transcription: Converting spoken language into written text for transcription or voice command applications.
  • Music and voice generation: Generating music or synthetic voices based on given input or styles.

Multi-modal Examples:

  • 3D avatars with TTS and chatbot features: Creating interactive virtual avatars that can speak and engage in conversations using text-to-speech and chatbot technologies.
  • ASR and TTS integration: Combining automatic speech recognition and text-to-speech to enable voice-controlled applications.
  • Video generation: Generating synthetic videos based on textual descriptions or scripts.
  • 3D model generation: Creating three-dimensional models of objects, characters, or environments using generative AI techniques.
  • 3D to image: Generate images from the interactive positioning of 3D elements.

These examples showcase the diverse range of generative tasks that can be accomplished across different data types, enabling innovative applications in various domains.

Which Generative AI Tools Do We Use?

At It-Jim, we leverage a range of powerful generative AI tools to deliver exceptional results for our clients. Here are some of them:

  • Text LLMs: 
    • Classic LLMs: T5, GPT family, BLOOM, LLaMa
    • Instruction following and conversational AI: FLAN-T5, ChatGPT 3.5&4, Alpaca
  • Images:
    • Text-to-Image and Image-to-Image: Stable Diffusion, ControlNet, DALL-E 2, Midjourney, StyleGAN family, various task-specific GAN and VAE models
    • Inpainting: DeepFill V1&V2, LaMa
    • Super resolution: SwinIR, HAT, DeepBurst, BRST
  • Videos:
    • Human animation: RAD-NeRF, StyleTalk, Synthesia
    • Inpainting: FGVC
  • 3D models: 
    • 3D human avatars: PIFu, PIFuHD, PaMIR
    • Text-to-3D: DreamFusion, Point-E

Do you feel the potential of generative AI solutions? Just contact us, and we will help you to find the best way to start your business transformation.

NeRF in 2023: Theory and Practice

What Is NeRF (Neural Radiance Fields)?

In this article, we will give a brief beginner-level introduction to neural radiance fields (NeRF). We start with basic NeRF theory, followed by NeRF limitations and the possible ways to overcome them. We will conclude the article with the practical part: using NeRFStudio for training and rendering NeRF on a home computer or cloud.

NeRF (proposed in the original 2020 paper) is the technique to represent a 3D scene volumetrically (i.e., without any surfaces) as a function parametrized by a neural network to render 2D views of such a scene and to train the network on a set 2D views. Ouch, this sounds scary? Don’t worry, We will explain the idea slowly as we go along. 

If you want to learn more about Neural Radiance Fields, we strongly recommend the following resources in this order:

NeRF handles the view synthesis step well, but converting reconstructed views into an editable mesh with clean topology and proper materials is a separate problem. Our article AI 3D Generation: From Prototype to Production covers what that pipeline requires.

But before we continue with NeRF, let’s start with a simpler problem: 2D images.

Functional Representation in 2D

How to represent a 2D image on a computer? There are several ways:
Representation of 2D images: a) – pixels , b) – vector, c) – point cloud, d) – functional 

Most often, we use a pixel image, e.g., a square grid of tiny colored squares, implemented in formats like PNG and JPEG. On the other hand, a vector image is composed of geometric shapes such as lines, circles and curves. The third option is a point cloud, a cloud of geometric points, which can be represented as a list of coordinates (x, y) of each point or (x, y, c) if the points are colored.

Is this all? No, there are more ways to represent an image mathematically. Let’s look at functional representations (sometimes also called implicit). There are several ways to use mathematical functions. First, we can parametrize the color C of a point (x, y) as a mathematical function C = f(x, y). This is a volumetric representation for a 2D volume; it does not deal with any lines or curves (which are surfaces in 2D). On the other hand, we can have a surface representation f(x,y) = 0, a contour parametrized by an implicit function.
2D functional representations: volumetric (a), contour (b)

But how can we represent a complicated nonlinear function f(x, y) on the computer? In 2023 we all know the answer: deep neural networks. There is an experiment that probably every person really interested in deep learning has tried at least once (and many people came to the idea independently): approximate the function C=f(x, y) with a fully-connected neural network (also known as a multi-layer perceptron or MLP) and train it on all pixels of an image. The dataset here consists of tuples (x, y, C) for all image pixels of a single image. Once trained, we use this MLP to predict the color C for all pixels (x, y), and thus we use f(x, y) to render an image. The result typically looks like this:

Original image Rendered image

Representation of a 2D image (Lviv Theatre of Opera and Ballet) with an MLP C=f(x, y)

It’s not particularly good, despite the neural network having more parameters than pixels in the image, why? This representation has two problems:

  1. The raw coordinates (x, y) aren’t a particularly good input to a neural network; it struggles to capture small details. This can be solved by positional encoding.
  2. The ReLU activation function can only produce piecewise linear functions; more sophisticated activations like SIREN are better.

With these two improvements, one can get a photorealistic rendered image. Importantly, here we train the neural network to represent a single image. It will not help in any way to represent other images; we’ll have to train from scratch. If you understand this experiment deeply, you will get a pretty good idea about what NeRF is. NeRF follows the same logic but in 3D.

Functional Representation in 3D: TSDF and NeRF

How to represent 3D objects digitally? 3D representations follow the same ideas as 2D ones.

3D object representations, image source

Pixels in 3D become voxels (“volumetric” in the figure). Point cloud in 3D is defined just like in 2D. Polygonal meshes can be viewed as a special case of vector graphics. What about the functional representation? Once again, we have two types of it: surface and volumetric.

Surface functional representation is about describing the surfaces with the implicit equation f(x, y, z) = 0. This family of methods is called the (truncated) signed distance function or (T)SDF. The volumetric representation is given by the formula C=f(x, y, z), giving the color C of each 3D point (x, y, z). You can think of these as “continuous voxels” or 3D translucent object made of colored jelly.

NeRF as a translucent jelly (image from presentation Birds Eye View & Background by Angjoo Kanazawa)

This is basically what NeRF is, although in order to achieve better results, the actual NeRF adds two things: directional dependence and density.

NeRF Theory: How Does NeRF Work?

There are three main components of NeRF: scene representation, renderer and the training regime.

NeRF Scene Representation and Lighting

How does NeRF represent the scene? It encodes a function with a neural network.

NeRF scene representation (image from presentation Birds Eye View & Background by Angjoo Kanazawa)

The inputs are the coordinates r=(x, y, z) and the viewing direction (θ, φ), often replaced by a unit direction vector d=(d1, d2, d3). The actual inputs to the MLP are the positional encodings of these two vectors. The output is the color C=(r, g, b) and the density σ.


But what about the lighting? The “standard” NeRF makes the following strict assumptions about the lighting:

  • Every point of the 3D volume (not surface !) emits directional light with color and intensity C=(r, g, b), and there are no external light sources.
  • Every 3D point absorbs light, with the absorption given by the (usually non-directional) density σ.
  • There is no scattering or reflections in the model.

As a result, the lighting conditions of the scene are frozen (or “baked” in the NeRF lingo) and cannot be changed once the model is trained.

Differentiable Volumetric Rendering

As we cannot perceive a 3D scene directly, what we typically want is to render it from a certain viewpoint or view, specified by the camera parameters: intrinsic (focal length, image size) and extrinsic (camera position and direction). The result is a 2D image.
Differentiable volumetric rendering (image from presentation Birds Eye View & Background by Angjoo Kanazawa)

Each camera pixel becomes a ray in the 3D scene. The pixel color includes contributions from all points along the ray given by the sum (or rather integral, as our model is continuous) over the points along the ray

Here t is the coordinate along the ray, and t=0 corresponds to the camera. The integration limits t1, t2 are known as near and far planes. The transmittance T(t) gives the fraction of the light intensity from the point t reaching the camera (the rest is absorbed). In the rendering slang it is also called “probability of the ray reaching the point t uninterrupted”.
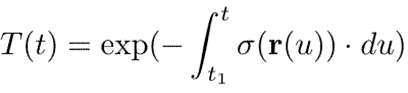
In practice, NeRF uses a set of discrete points (256 in the original NeRF) along the ray. For each point, the function C, σ  = f(r, d) is calculated. The integrals are replaced by the sums giving us the value of a single rendered pixel.

Note that the rendering is volumetric, there is no such concept as “surface” involved. In practice, however, for opaque objects the result is dominated by the small region close to the surface, and the depth can be estimated by the expected depth
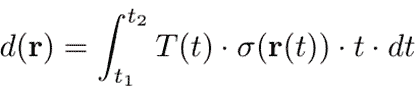
Finally the rendering is fully differentiable, which allows us to backpropagate gradients of the loss function through the renderer and train the neural network. Compare this to the polygonal mesh rendering which is fundamentally non-differentiable, and it’s very challenging to make it differentiable.

Wait, but What Problem Does NeRF Solve?

Actually, we should have started with this. Better late than never, we will now give you the answer. Strictly speaking, Neural Radiance Fields representation can be used for various 3D problems. However the most typical problem is that of 3D reconstruction.

3D reconstruction problem
Given: A number of views (images) of the same 3D scene
We want: Camera poses of all views, and the 3D scene that we can render from a new view (a viewpoint no seen in the input views)

3D reconstruction, image source

A traditional 3D reconstruction pipeline looks like this. It is implemented in software packages like COLMAP, OpenMVG+OpenMVS, MVE+MVS-texturing and many others.

  1. Structure from Motion (SfM). Find a sparse pairwise correspondences between image points (by matching SIFT keypoints or the like). Construct camera poses and a sparse point cloud.
  2. Find dense point cloud from image pixels
  3. Construct a triangular mesh model
  4. Texturize the mesh from the input images

For video input data, step 1 is often replaced by Simultaneous localization and mapping (SLAM), a variant of SfM specifically optimized for high speed on videos. Note that the SfM reconstructs the scene up to an unknown scale only, to get the absolute scale one needs a lidar or a stereo camera.

Steps 2-4 are known as the Multi-View Stereo (MVS) problem. It is exactly the problem solved by NeRF. In other words, we can formulate a typical NeRF problem like this:

NeRF 3D reconstruction problem
Given: A number of views (images) of the same 3D scene and their camera poses (from COLMAP or ArKit or 3D scanner)
We want: The 3D NeRF scene we can render from a new viewpoint

How is this problem solved? Remember, our scene description is a trained neural network C, σ  = f(r, d). So we train the neural network to describe a single scene. It is done using analysis by synthesis: we render all training views (with known poses) on each optimization step, calculate the photometric loss, and backpropagate the gradients into the neural network. Such a trained network describes one scene and is useless for any other scenes. There is no such thing as a “pretrained NeRF”! Once we have trained a NeRF scene, we can use it to render novel views.
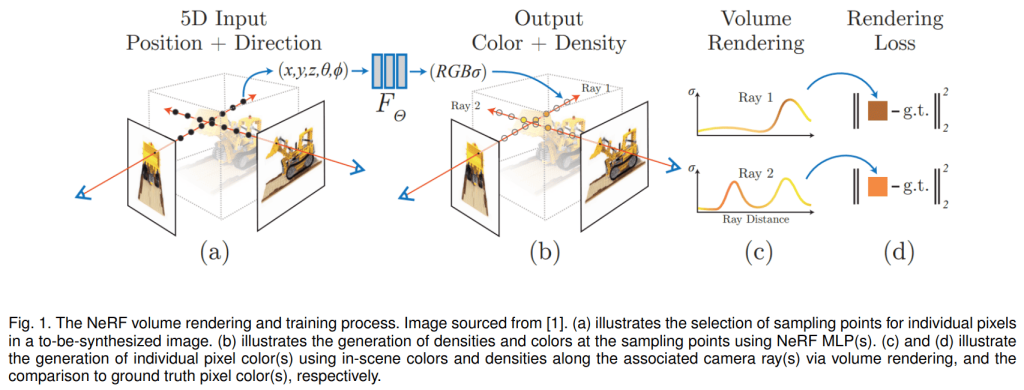
NeRF training, image source

NeRF vs Polygonal Mesh: Which Is Better?

Let us now compare NeRF to traditional MVS methods based on the polygonal mesh (such as OpenMVS). First, the strong points of NeRF:

Mesh NeRF
Pipeline Multi-stage pipeline (point cloud -> mesh -> texture) Ideologically simple single-stage training
Topology Sensitive to surface topology (e.g. sphere vs donut) Volumetric, no topology
Small details Hard to reproduce small 3D details (e.g. tree leaves) No problem with small details

3:0 to NeRF! Unfortunately, the things are not that rosy. The next point is tied in my opinion:

Mesh NeRF
Lighting Hard to model non-lambertial materials (specularities, reflections) and translucent objects, but easy to change lighting Can model reflections and translucent objects, but the lighting is baked (frozen) and cannot be changed

And now comes the “BAD” part, a long list of NeRF limitations and drawbacks. However, all is not hopeless: this list applies to the vanilla NeRF. Since then, various papers challenged nearly every bullet point from the list, with varying degrees of success. NeRF is getting better! We’ll analyze these limitations and ideas of how to overcome them in the next section.

NeRF drawbacks and limitations:

  • Very slow training and rendering
  • Can only be rendered with an Nvidia GPU with CUDA
  • No standard “NeRF scene” file format
  • Aliasing-like artifacts
  • Strictly a static scene with static lighting
  • Requires accurate camera poses
  • Models are not editable or composable (or animatable, or deformable)

NeRF Limitations and How To Overcome Them

In this section, I’ll analyze in more detail NeRF limitations, how to overcome them, and various ideas for improving or extending NeRF.

Static Scenes With a Static Lighting, NeRF-W, Nerfies
What does it mean in practice? Imagine you are capturing an outdoor scene with a phone. You will probably take pictures sequentially, one after another.  If the sun goes behind the cloud between shots, the rules are broken. If some transient objects move in the scene (people, birds, cars etc.), the rules are broken. Breaking of rules will result in bad Neural Radiance Fields artifacts. How to fix that?

NeRF-W (“in the wild”), an influential early paper, proposed two ideas:

  1. Exclude transient objects by training two scenes: a common static scene (shared between all views) and a transient scene (one per each view).
  2. Introduce a lighting latent variable, a multidimensional vector to encode the lighting conditions of each training view. At inference, you can choose it arbitrarily to generate various lighting conditions. You still cannot control the lighting directly though (like by placing a lamp object in Blender).

NeRF-W training images with varying lighting conditions and transient objects, image source

Various later papers addressed these limitations. For example, Ref-NeRF improved the reflections, but it still requires a static scene. There have been numerous attempts (e.g. NeRD, NeRV) to create a “relightable NeRF”.

Deformable NeRF (Nerfies, HyperNeRF, CodeNeRF etc.) allows for non-rigid scene deformations using latents to allow scene deformation between views, in the same way lighting is treated in NeRF-W. Some models use this technique for animation (Nerfies).

Miscellaneous Ideas

Conical rendering:
The idea is to treat the ray of each pixel as a narrow cone and not a line. This reduces aliasing artifacts, especially at low resolution rendering. Originally used in mip-NeRF, Ref-NeRF, RawNeRF; but now became a standard for most modern models.

Depth or point cloud supervision:
Use depths (from Lidar) or a point cloud (from COLMAP) for extra 3D supervision when training the model in order to improve quality and/or achieve faster and more stable training. Implemented in DS-NeRF, NerfingMVS, PointNeRF.

NeRF with GAN or VAE:
Some papers combined NeRF with GAN or VAE for various reasons: quality, composable scenes, scene generation etc. Examples: GIRAFFE, GRAF, π-GAN, GNeRF, NeRF-VAE.

Camera pose fine-tuning or learning:
Modern NeRF codes typically fine-tune camera poses by backpropagation, as the poses from e.g. ArKit are not accurate enough for a good reconstruction. Learning poses from scratch (replacing SfM), is a much harder task, attempted in works like NeRF-, BARF, SCNeRF, iMAP, NICE-SLAM, GRAF. In real life, however, people still mostly use traditional SfMs like COLMAP.

Neural Radiance Fields for large outdoor scenes:

Apart from NeRF-W, there are numerous other papers dedicated to large outdoor scenes. They’re optimized to work either at street-level: Urban Radiance Field, BlockNeRF; or for drone aerial views: MegaNeRF, BungeeNeRF, S-NeRF, SwitchNeRF (2023 paper).

Few-Shot Learning and Shape Priors

In other words, if some detail of a scene, however small, was occluded in all training views, NeRF will not learn it and will produce ugly blurred artifacts. NeRF never hallucinates what it didn’t see. As a consequence, you need a lot of views (hundreds) for a good NeRF reconstruction.

Many papers (MVSNeRF, PixelNeRF, NeuRay, DietNeRF, DS-NeRF) tried to overcome this limitation by making NeRF “smarter” or “more generative”, i.e. to teach it to “hallucinate the backside”. It is known as the “few-shot NeRF problem”. Typically such papers break the “fresh training for each scene” rule by training an auxiliary neural network trained on a large dataset of scenes (or sometimes on image datasets, like ImageNet). Such a network extracts high level image features which are supplied to NeRF alongside the usual inputs (r, d). They also use additional 3D concepts like either cost volume or 3D shape priors.
PixelNeRF vs NeRF for 3-shot learning, image source

A very closely related problem is NeRF with 3D shape priors which can be used for:

  • Generic 3D objects and surfaces: Neural Surface, Neural RGB-D, UNISURF, GRAF.
  • Human bodies: Neural Body, HumanNeRF, DoubleField, Animatable NeRF.
  • Human faces: Nerfies, HyperNeRF, HeadNeRF.
Deformable scene with Nerfies, image source

NeRF Scene Is Not Reductionistic
This is probably the biggest NeRF limitation, and it’s not radically solved (and probably will never be).

Those who worked with mesh-based 3D scenes (for example in Blender) take for granted their reductionism, and the same generally holds true for point clouds and voxels. You can take the scene apart into pieces, stick them back together, cut, paste, move and edit individual objects as much as you like. You can also animate objects, the possibility both modern games and animated movies are based on. You can also downsample and upsample the mesh, thus changing the size of the 3D model file. The whole process of designing 3D models by hand (e.g. in Blender) is inherently based on this reductionism.

This is not so for NeRF, which is holistic, like a hologram. The whole scene is encoded in a single NeRF function, and you cannot say “this part of the model is the table, that part of the model is the sofa”. Instead all model parameters encode the entire scene. It makes creating a “Blender for NeRF models” a mathematical impossibility. You cannot cut half of the scene as a new scene. Likewise, you cannot join two scenes into a combined one.

As we said, there is no radical solution, however, some papers tried to push the limits here. For example, methods like GIRAFFE construct a scene of separate objects, each with its own NeRF. Also, things like “editable NeRF” became popular recently; see below.

Rendering Requires NeRF Software (and Nvidia GPU)
Another limitation that hurts.

3D mesh models are convenient. You can create them any way you want, save them into one of the standard file formats (GLB, FBX, OBJ), and render them with any 3D software (Blender, MeshLab, Unity) or library (Open3D, ThreeJS). Moreover, all modern GPUs are specifically designed (at the hardware level) to render 3D meshes efficiently via low-level protocols like OpenGL, Vulkan, Metal or Direct3D. 3D mesh technology is very mature.

Not so with NeRF. NeRFs are neural networks typically requiring Python libraries like PyTorch (although the vanilla Instant-NGP code is pure C++). Different versions of NeRF require different software codes to render. And efficient rendering typically requires an Nvidia GPU with CUDA and sometimes CuDNN (of particular versions !) installed. This is only available on Linux or (with some limitations) Windows. Moreover, there is no “NeRF file format”, a NeRF scene is a saved neural network unique to the particular version of NeRF.

Note: For many models (Instant-NGP excluded), TPU is also an option, and even CPU, but CPU rendering is very slow. What you cannot use (at least not efficiently) is the built-in 3D rendering capacities of GPUs, like shaders.

In other words, NeRF is not yet suitable for edge devices, including common laptops and office PCs. If NeRF technology (or something like it) stays popular in the next 5-10 years, it has all chances to mature, but it’s going to be a long and arduous process requiring designing new hardware-supported GPU protocols.

Can I Extract a Mesh or Point Cloud from NeRF?

Since we cannot render a NeRF scene easily, can we transform it into a mesh with textures instead? In principle, yes. However, this is not a very natural operation, as NeRF has no inherent surfaces. Mesh extraction is typically done with TSDF-like methods. It’s time consuming and will likely result in a model of noticeably lower quality than the NeRF rendering. Moreover, it’s hard to translate the baked lighting of NeRF, with all its specularities and reflections, into a mesh texture. 

In principle, it is possible to use NeRF as an intermediate link of a reconstruction pipeline (replacing traditional MVS) and export a mesh at the very end. However, it goes against the whole spirit of NeRF, and at the moment you export the mesh most NeRF advantages will be gone. If you are planning to implement such a pipeline, ask yourself a question first “Do I really have good reasons to use NeRF here?”.

Some NeRF implementations add surface normals to the NeRF model in order to allow more accurate mesh exporting with the Poisson method. This is implemented in NeRFStudio with the nerfacto model.

Why Is NeRF So Slow and How To Fix It?

NeRF Is Slow
Training one scene on a single GPU takes hours or days, and rendering one view takes up to a minute. It’s not hard to understand why. An 1920 x 1080 image has over 2 million pixels, thus you’ll have to render over 2 million rays. Each ray has a number of points (256 in the original NeRF). You’ll have to run the neural network inference 1920 * 1080 * 256 = 530841600 ≅ 530 million times. Of course, this will be batch-parallelized via CUDA, but it is not as efficient as OpenGL shader parallelization when rendering a mesh. 

Original NeRF authors were fully aware of the problem. That is why they trained two networks and not one. First, 64 points along the ray were sampled uniformly and processed with the coarse network, and then 192 points were sampled smartly (where most needed, i.e. close to the surfaces) and processed with the fine network. This was not enough to make NeRF fast, but it would be even slower otherwise.

The good news is that this is the NeRF limitation that has seen the most progress in the couple of years since the original paper. Modern NeRFs can train in less than a minute on a single good GPU, and infer in real time. The bad news is that these models became technically complicated monsters and it is often hard to recognize the original NeRF idea in them.

Fast NeRF methods are subdivided into two categories: baked and non-baked methods. Warning! This “baking” has nothing to do with “baking the light” we discussed earlier, it’s a different baking, the terminology is confusing.

Baked, but not light. And not NeRF either. Image source

Baked Methods

So, NeRF is slow because we have to run neural network inference on millions of points per view. How can we optimize this? Is it possible to pre-compute the function f(r, d) on a regular grid and interpolate? This is the main idea of baked methods (“baking” here means computing the function and freezing the result). Once NeRF is trained, the NeRF function f(r, d) is computed on a large point grid and stored. At the rendering time, no neural network inference takes place. Instead, an interpolation between nearest grid points is used to estimate f(r, d), which is much faster.

Of course, things are not that easy in practice. The function f(r, d) is 5- or 6-dimensional, and sampling it naively on a regular grid will be intractable. The trick is to encode the angular dependence smartly, e.g. by using the first few spherical harmonics, leaving only three dimensions. In the three dimensions, there is no need to densely sample empty space or inside areas, but we need a lot of points in the “interesting” regions, i.e. close to the surface. Thus sparse grids like octrees can reduce the number of points a lot. These ideas have been implemented in a number of codes like SNeRG, PlenOctree, FastNeRF, KiloNeRF.

Baked models typically speed up rendering of the trained model but not training. That is why they fell in popularity compared to non-baked ones. However, in my opinion, the idea can be still relevant if we want to render a scene without using any neural networks (on edge devices).

Non-Baked Methods

Here the idea is kind of similar. Let’s decompose our function f(r, d) into two functions g, h, where f(r, d) = g(p), p = h(r, d), where p is some intermediate feature. Now, let’s apply the “cache and interpolate” trick to the feature variable p. Non-baked papers designed clever ways to cache and interpolate differentiably, thus exactly the same neural network setup is used for both training and rendering, or “non-baked”. Early papers used a 3D voxel grid for p : NSVF, AutoInt, DIVeR.

The real breakthrough came with the Nvidia Instant-NGP code, which uses hash tables and supports both NeRF and Neural SDF (surface representation). It is also written in low level C++ CUDA with no Python (and zero chances to port it to non-Nvidia hardware). It achieved unprecedented speeds like real-time rendering on a single GPU and one-minute training. Modern NeRFs like NeRFStudio nerfacto, however, achieve comparable speeds in pure PyTorch.

Do We Need NeRF at All?

Inspired by the success of both baked and non-baked NeRF methods, some authors decided to take things even further. OK, they asked, baked methods prove that smart voxels can generate NeRF-like rendering without using any neural networks at all. But cannot we optimize such a voxel representation directly, without using any NeRF?

This idea has been implemented in a number of codes like Plenoxels, DVGO and TensoRF. They achieved NeRF-like quality and a reasonably fast training time (but still slower than Instant-NGP). Strictly speaking, these methods are NOT NeRFs, but simply modern (perhaps NeRF-inspired) voxel methods, but the two groups are often confused.

Is NeRF Used in Any Commercial Projects or Products?

Very few I am aware of. NeRF has been recently used in a McDonalds commercial.

While it wouldn’t be too hard to implement, we haven’t seen any “NeRF on the server” web services more user-friendly than a cloud or colab running NeRFStudio. For now, NeRF is mostly popular in the academic community. It’s likely that companies are presently researching practical NeRF applications, but we are yet to see the results.

As explained above, NeRF typically requires a Linux PC or cloud with a good Nvidia GPU and CUDA installed, thus it is strictly back-end and excluded from edge devices and even common laptops. MobileNeRF can be seen as an exception (it can even run in a web browser), but its rendering is polygon based, at the rendering time it’s not a NeRF, not even voxels.

NeRF Beyond Multiple View Stereo

Most NeRF papers use NeRF for a static MVS problem. However, it has other possible uses. 

NeRF for Videos: D-NeRF, NeRFPlayer

How to use NeRF for dynamic scenes? It seems simple, just add the time variable to the NeRF function f(r, d) so that it becomes f(r, d, t). This idea has been tried repeatedly and did not work well. To reconstruct such a function, one would need a large number of views covering the scene densely in both space and time. Also frequency characteristics of space and time variables are very different. Typically one wants to reconstruct a dynamic scene from a very sparse set of cameras, often a single camera moving around. Other ideas have to be tried.
A D-NeRF dynamic scene, image source

The first paper to deal with the problem was D-NeRF, which treated the scene as deformable (i.e. objects are not allowed to appear or disappear). The time-dependent scene flow was represented by a separate neural network

This approach is very similar to deformable NeRF methods like Nerfies. Since then numerous papers have tried NeRF for videos. Some papers used things like depth or 2D optical flow. A recent 2023 paper is NeRFPlayer, which decomposed the scene into three classes: static, deformable and new, where new means “things appearing out of thin air”. The original NeRFPlayer used a TensoRF-like approach and was not really NeRF, while the NeRFStudio implementation is based on nerfacto.

NeRFPlayer rendering

NeRFPlayer rendering, image source

So, Can We Edit NeRF Scenes or Not?

While it is impossible to edit NeRF-scenes directly Blender-style, some papers tried to create limited editing capabilities based on a sketch or a text prompt.

For example, EditNeRF implemented NeRF editing based on image sketches. It is based on GRAF (a GAN+NeRF hybrid) and utilizes concepts like object classes and shapes.

ClipNeRF allows editing with both text and image prompts. It is based on the pretrained OpenAI CLIP.

A somewhat related idea is to use NeRF for a 3D semantic segmentation (or lifting 2D semantic segmentation to 3D) and 3D scene understanding. This idea has been explored in papers such as Fig-NeRF, Semantic-NeRF and Panoptic Neural Fields.

NeRF 3D Art Generation

And finally, the most beautiful NeRF applications (for a non-specialist): 3D art generation from text prompt, sketch or other inputs, or by style transfer. It has been implemented in Dream Fields, DreamFusion, Rodin, StyleNeRF. DreamFusion uses the pretrained Imagen or StableDiffusion, 2D image generation models, for guidance, thus it might be considered “not 3D enough” by purists. Still, it produces beautiful results and you can even try it yourself in the Google Colab.
DreamFusion 3D art generation, image source

Rodin, a recent 2023 paper, is specialized in creating 3D avatars from text prompts. The authors represent the 3D volume as the “roll-out” tri-plane 2D features, and train their own 2D diffusion model.
Rodin 3D avatar generation from text prompts, image source

What’s New in 2023?

Too much to cover here. At the moment of writing this (mid-April 2023), arXiv found 191 NeRF papers in 2023. You see that NeRF is still a very active field. By the time you read this, there will be many more. The most relevant papers (among the 191) were:

  1. LANe: Lighting-Aware Neural Fields for Compositional Scene Synthesis
  2. Image Stabilization for Hololens Camera in Remote Collaboration
  3. MonoHuman: Animatable Human Neural Field from Monocular Video
  4. JacobiNeRF: NeRF Shaping with Mutual Information Gradients
  5. PVD-AL: Progressive Volume Distillation with Active Learning for Efficient Conversion Between Different NeRF Architectures
  6. Neural Residual Radiance Fields for Streamably Free-Viewpoint Videos

A lot to choose from.

NeRF in Practice: How Can I Try NeRF?

OK, you can now ask, I believe you that NeRF is cool, but how can I try it myself?

There is presently no truly user-friendly software for non-specialists. The most user-friendly option is NeRFStudio. Additionally, if you want to read the code, it might be easier to understand the simpler vanilla NeRF model, implemented in PyTorch, TensorFlow or JAX.

Installing NeRFStudio

First, you need a Linux (recommended) or Windows PC with an Nvidia GPU. If you don’t have such hardware, find some cloud or colab which can run NeRFStudio. On a local computer, you can use Docker (with GPU support enabled), or install NeRFStudio directly following the installation instructions on its site.

NeRFStudio is a Python package which provides Python API and also command-line interface (CLI). You will need Python and CUDA. In principle, it is installable by PIP or Conda, but a lot of things can go wrong. We encountered (and solved) two issues on Ubuntu 22.04 with CUDA 11.5 and the system Python 3.10.

    1. The current NeRFStudio (version 0.1.19) might be incompatible with PyTorch 2.x. You have to install PyTorch 1.12.x or 1.13.x by hand. Importantly, you also have to install torchvision, functorch, torchmetrics and torchtyping of the versions compatible with your PyTorch version. Otherwise, NeRFStudio will try to install those dependencies (of their latest versions), and they will try to replace your PyTorch with 2.x. Before proceeding, check that your PyTorch works with CUDA and that it is of version 1.x and no 2.x.
    2. CUDA has an infamous issue which popped up repeatedly for years: CUDA (especially slightly older versions) is often incompatible with the latest GCC version. In particular, in Ubuntu 22.04 the default CUDA 11.5 is incompatible with the default GCC 11.x. If you see bizarre error messages involving “_ArgTypes” while building the CUDA code, this is exactly the issue. NeRFStudio requires installing Nvidia tiny-cuda-nn (with a python wrapper) for Instant-NGP. We had to add the line
      -ccbin=/usr/bin/g++-10“,
      to the
      base_nvcc_flags list in bindings/torch/setup.py of tiny-cuda-nn. We had to do the same with cuda/_backend.py of nerfacc. Note: It might be simpler to alias ‘nvcc’ to ‘nvcc -ccbin=/usr/bin/g++-10’ instead. 

NeRFStudio in Action

If you succeeded in installing NeRFStudio, congratulations! Now, let’s try it in action. Following the official manual, let’s download the poster scene and train the nerfacto model on it:

ns-download-data nerfstudio --capture-name=poster
ns-train nerfacto --data data/nerfstudio/poster

It’s as simple as that. Nerfacto is the default NeRFStudio model; it’s a modern model which incorporates many good NeRF ideas. It’s almost as fast as Instant-NGP but uses less RAM and is written in pure PyTorch.
NeRFStudio web browser visualizer showing a nerfacto model trained on the poster scene

NeRFStudio web browser visualizer showing a nerfacto model trained on the poster scene

By default, NeRFStudio does visualization while training, which can be viewed in the browser. You can disable it, and also enable TensorBoard or WandB logging. For us (on a GeForce 1660) the complete training took about 40 minutes, but already after a minute or so you see a pretty good scene. When the training is finished, you can view the results with

ns-viewer --load-config  outputs/poster/nerfacto/<timestamp>/config.yml

Where <timestamp> should be replaced by the name of the subdirectory containing your trained model. You can also render a video by selecting a camera path in the web viewer.


Finally, you can export a point cloud or (via TSDF) a textured mesh.

Exported point cloud and textured mesh

How Can I Run NeRF on My Own Images?

You need camera poses. If your images don’t have them, you’ll have to run your images through COLMAP to do SfM. But being in a lazy mood that day, we decided to test NeRF not on our own images, but on the Sceaux Castle scene (11 images), which is like a Hello World for SfM. First, we install COLMAP, then use the ns-process-data script (which is the NeRFStudio wrapper for COLMAP) to do the SfM

sudo apt install colmap
ns-process-data images --data ImageDataset_SceauxCastle/images \
                       --output-dir data/castle_processed --no-gpu

This command automatically creates the input data in the NeRFStudio format. Now we train as usual

ns-train nerfacto --data data/castle_processed

Unfortunately, the training was unsuccessful. What is going on? Sceaux castle is a frontal scene (i.e. visible only from one side). Such scenes in NeRF produce garbage when viewed from the back, but still should look acceptable from the front. However, the frontal character of the scene was an indirect reason for the failure.

When NeRF completely fails to converge to anything reasonable, this usually means one thing: problems with the scene geometry. The main NeRF action typically takes place in a limited 3D space, often the cube x, y, z ∈ [-1, +1]. Also the “near plane” and “far plane” parameters on the NeRF renderer matter a lot. If the scale or the “center” of the scene are very different from what NeRF expects, the training will fail. If you look carefully, you can see the coordinate axes, poses of all cameras and the [-1, +1] cube in the web visualizer.

When loading the data, NeRFStudio attempts to adjust the scene scale and center automatically. However, it assumes that the scene center is the mean of all camera positions, which is OK if we photograph a 3D object from all sides, but completely fails for frontal scenes. Instead, we should find the point which all cameras look at. This is achieved with the –center-method focus, and with this option we were able to train the Sceaux castle NeRF. Not nearly as good as openMVG+openMVS, but at least NeRF did train.

Sceaux castle NeRF scene

Sceaux castle NeRF scene

But Where Is the Yellow Bulldozer?

Don’t worry, we are getting to it. The yellow bulldozer which became the NeRF mascot and logo is called the Lego scene and can be downloaded from here. However the data looks different from the data we used before and it’s unclear how to use it.

NeRFStudio actually supports several input data formats (images+camera poses) via the respective data parsers (modular Python classes in the NeRFStudio code).

nerfstudio_data is the preferred format, it has a file transforms.json

blender_data is the format used in the original NeRF for synthetic scenes like Lego, it has a file transforms_train.json

Unfortunately, LLFF data, another original NeRF format used for the famous Fern scene, is not yet supported by NeRFStudio.

To train on the Lego scene, we type

ns-train nerfacto blender-data --data data/nerf_synthetic/lego

Once again, the training fails. blender_data parser is more primitive to the default one, it does not center or scale the scene. In order to train successfully, we need to adjust near and far planes. I finally succeeded with the command:

ns-train nerfacto --pipeline.model.near-plane 2 --pipeline.model.far-plane 10 \
--max-num-iterations 4000 --experiment-name bl_lego blender-data \
--data data/nerf_synthetic/lego
The famous Yellow Bulldozer (aka Lego scene)

Note, however, how NeRF doesn’t automatically work out of the box, it seems you need to tune parameters by hand for each scene individually.

NeRFStudio Python API

While we used NeRFStudio as a CLI so far, it’s actually a Python library. While the details of its Python API are beyond the scope of this introductory article, We will give the minimal example.

config = nerfstudio.configs.method_configs.method_configs['nerfacto']
config.set_timestamp()
config.pipeline.datamanager.data = pathlib.Path(DATA_PATH)
config.save_config()
trainer = config.setup(local_rank=0, world_size=1)
trainer.setup()
trainer.train()

What happens here? We take the default config for the nerfacto model, add input data path to it, create our model and train. Config and trainer are the highest-level NeRFStudio entities. This example is the 1-GPU version of the code used by ns-train. It produces a complete training with the web viewer and results saving. 

If you want to really learn NeRFStudio, however, you have to learn lower level entities such as models, positional encodings, rays, renderer etc., which is a topic for some other time.

Conclusion

Today we told you about NeRF, the general idea, and the variants. NeRF is very beautiful but has not yet been used extensively commercially.

Next, we showed you NeRFStudio, which is more user-friendly than any other NeRF but still can be a bit too hard for non-specialists.


3D Computer Vision

The field of 3D computer vision is rapidly expanding, with a growing number of applications emerging for 3D world understanding and interpretation. Modern trends in extended reality (XR), metaverse, digital twins, the automotive industry, and AR/VR clearly indicate that efficient machine learning, computer vision, and data processing solutions have a high demand in the 3D domain.

It-Jim’s 3D Computer Vision Toolkit: Sensors and Techniques

At It-Jim, we have a team of experts with strong backgrounds in signal processing and physics, providing us with a deep understanding of 3D data and its peculiarities and limitations. We are equipped to work with a broad range of sensors:
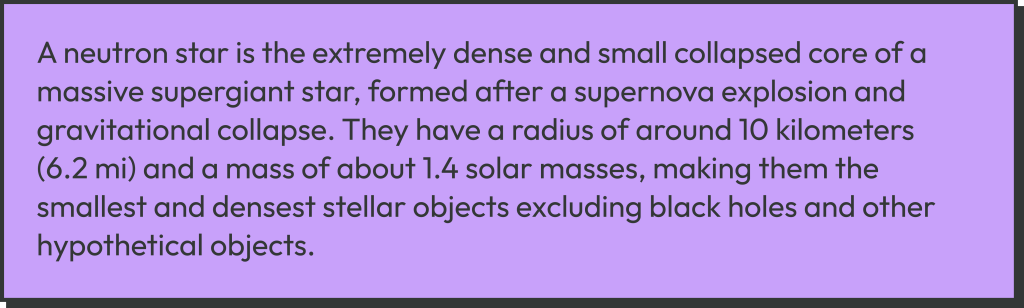
  • stereo cameras: iPhone cameras, depth API; industrial stereo cameras;
  • True Depth cameras: high-resolution IR sensor specifically used on iOS
  • LiDARs: from mobile LiDAR on iPhone to expensive industrial instruments
  • multi-camera setups.

Our expertise in 3D computer vision enables us to analyze various data from multi-sensor sources:

  • image stereo pairs and depth maps
  • multiple view mono RGB data
  • 3D point clouds
  • 3D meshes.

By leveraging these different sources of data, we are able to provide our clients with accurate and comprehensive insights tailored to their specific needs. Moreover, our team can not only find the best solution for efficient 3D data processing but also help with a proper hardware selection and setup to ensure the maximum gain for your business.

How Can Your Business Benefit from AI Solutions for 3D Data Processing?

Looking to take your business to the next level? AI solutions for 3D data processing can help you do just that. Here are some typical business cases where 3D computer vision can make all the difference:

  1. Digital twins: 3D computer vision can create highly detailed digital twins of real-world objects and environments, which can be used for predictive maintenance, equipment testing, and improving operational efficiency.
  2.  

  3. Virtual and augmented reality: By combining 3D computer vision with AR/VR technologies, you can create immersive and interactive experiences for your customers. For example, a furniture retailer could use AR to allow customers to see how different pieces of furniture would look in their homes. You can also use 3D computer vision in education to create immersive training experiences for students and professionals in various fields, such as medicine, engineering, and architecture.
  4.  

  5. Medical imaging: With 3D computer vision, you can create highly detailed 3D models of organs, tissues, and other structures. This can help doctors and researchers to understand diseases better and develop new treatments, and it can also guide surgical procedures and improve patient outcomes.
  6.  

  7. Virtual try-on: 3D computer vision allows for highly realistic virtual try-on experiences, helping customers to make more informed purchasing decisions. By scanning the customer’s body and clothing, you can generate a 3D model that shows how the clothing will fit and look on the customer, allowing them to make more informed purchasing decisions.
  8.  

  9. Autonomous driving: With 3D computer vision, autonomous vehicles can “see” and interpret their surroundings in 3D, allowing them to navigate safely and make decisions in real time.
  10.  

  11. 3D scanning and modeling: 3D computer vision can scan real-world objects and create highly detailed 3D models for use in film, television, video games, and other forms of entertainment.
  12.  

  13. Robotics and automation: 3D scene understanding and localization can help robots navigate and operate in complex environments with greater accuracy and efficiency, which can be used in manufacturing, logistics, and other industries.
  14.  

  15. Real estate and architecture: 3D computer vision can create more accurate and detailed 3D models and reconstructions of buildings and other structures, providing immersive virtual tours, floor and room plans, and better visualization for building designs.
  16.  

  17. 3D avatars and virtual assistants: human representation in 3D space can improve customer experience by providing personalized and interactive support. By leveraging 3D computer vision and combining several modalities, you can achieve a high level of immersion via the proper application of AI technologies. 
  18.  

  19. Visual positioning systems (VPS): by using 3D computer vision techniques, VPS can provide accurate and reliable user positioning and navigation in large spaces such as shopping malls, airports, museums, stadiums, parks, and more. All of this can be achieved without GPS, using only a camera of your phone!

If any of these business cases resonate with you, let us know! Our team is ready to develop a solution of any complexity to help your business succeed.

Technologies and Frameworks for 3D Computer Vision

Our team is highly skilled in utilizing various technologies and frameworks to address the unique needs of each project. In this section, we’ll give you a glimpse into the instruments we use to provide the most accurate and efficient 3D computer vision solutions for our clients:

  • Traditional 3D CV: Open3D, OpenCV, OpenSFM, CGAL, COLMAP, OpenMVG, OpenMVS, MVE, MVS texturing, various SLAM solutions
  • Deep learning 3D: NeRFStudio, PyTorch3D, Stable DreamFusion
  • 3D software: Unity, Blender, MeshLab
  • 3D rendering (programmatic): OpenGL, Three.JS, Open3D, Matplotlib
  • Mobile: ARCore, ARKit, SceneKit, RealityKit, RoomPlan API

What are the Typical 3D Computer Vision Tasks?

From creating digital twins and virtual try-on experiences to enabling autonomous driving and precise robotic navigation, 3D computer vision has already revolutionized many industries. But how exactly do AI-powered 3D data processing solutions achieve these remarkable feats? Here are some of the typical tasks that our team can perform to extract valuable insights and enhance the visual quality of your 3D data:

  • 3D reconstruction (SfM)
  • Simultaneous localization and mapping (SLAM)
  • 3D meshing
  • 3D mesh texturing 
  • Texture atlases packing and compression
  • Point cloud processing (densification, alignment, segmentation)
  • 3D object detection and tracking
  • 3D object segmentation
  • Sensor fusion 
  • Visual localization (VPS)
  • 3D mesh simplification

Our team stays up-to-date on the newest advancements and uses top-of-the-line sensors and data analysis techniques to deliver the best possible solutions. Don’t hesitate to get in touch with us to see how we can help you reach your 3D computer vision goals!