Computer Vision in a Web Browser: Practical Examples

This blog post covers some important aspects of deploying and running classical computer vision algorithms as well as convolutional neural networks in a web front-end. Please make sure you have read the first part of the blog post. This will definitely help you to follow all technical aspects much easier.

Emscripten for Computer Vision

How can you pass an image or a video frame from JS to C++ and back? We’ll give a minimal example. Suppose you have an image in an <img> tag. First, you have to copy it to RGBA pixels (only RGBA format is supported, not RGB !) via a <canvas> tag:

const img = document.getElementById('myImg');
const canvas = document.getElementById('myCanvas');
const ctx = canvas.getContext('2d');
const w = img.width; const h = img.height;
canvas.width = w; canvas.height = h;
ctx.drawImage(img, 0, 0);
const data = ctx.getImageData(0, 0, w, h).data; // Uint8ClampedArray
const bSize = data.byteLength; // == 4*w*h

Next, you have to send the Uint8ClampedArray object data to C++. However, C++ cannot access JS objects directly (at least, not efficiently). They are not part of the C++ memory, which itself is only a part of the JS memory. Some copying is unavoidable. Let’s copy data to the C++ heap:

const dataPtr = Module._malloc(nBytes); // C++ malloc
const dataHeap = new Uint8ClampedArray(Module.HEAP8.buffer, dataPtr, nBytes);  
dataHeap.set(data);  // Copy data -> dataHeap

Here dataHeap is a view object for the C++ data.

Now we can finally call the C++ code to do something to the image. We pass dataPtr, a pointer to data on the C++ heap. No result is returned here, but the image can be modified in-place:

Module._process(dataPtr, nBytes, w, h);

Finally, let’s show the result on the canvas and free the C++ buffer:

ctx.putImageData(new ImageData(dataHeap, w, h), 0, 0);
Module._free(dataPtr);

It’s very important that C++ has no garbage collections, so if you use malloc(), you must free() afterwards, otherwise there is a memory leak! Memory leaks are extremely evil. You might not notice them in a minimal demo, but they will kill a real project.

Emscripten and OpenCV

Traditional CV algorithms in C++ typically use OpenCV. Can we build it with emscripten and use it in our custom C++ projects? Yes, but with a few caveats. 

First, the emscripten build of OpenCV uses a custom build script build_js.py. Unfortunately, it’s made for an ancient emscripten version (2.0.10) and doesn’t work with modern ones. You have two choices. You either use version 2.0.10 and miss the features and optimizations of modern emscripten versions; or hack the build script to make it modern-version compatible, which is not easy. 

Second, this build script builds Asm.JS by default; you will have to specify the –build_wasm option for a WASM build, this is important.

Third, we are not sure this build is optimal. In particular, it is probably single-thread. You can dig into this stuff if you want, but it is not going to be easy.

Once the build process is finished, you will have a build directory with a lot of useful stuff, like lib and include directories, and also .cmake files. Ignore bin/opencv.js; we are not going to use that. You use OpenCV in your C++ code just like you would on a desktop platform. In particular, cmake is able to find OpenCV with find_package(), provided that you specify the option -DOpenCV_DIR=<path>, where <path> is the full path to the OpenCV emscripten build directory (the one with .cmake files). You can pass RGBA images to C++ as explained above and convert them to a cv::Mat inside your C++ code. 

But what can you do with opencv.js? First, it cannot be used in any way from your custom C++ code, thus it is pretty useless from where we stand. Second, the file opencv.js is the project of the same name (OpenCV.js), which exports a number of OpenCV functions and classes to be used directly from JS (probably via embind or something similar). As it happens, the emscripten C++ build of OpenCV (the lib directory), the thing that we want, is merely a byproduct of OpenCV.js build process from the point of view of the OpenCV team. The official OpenCV documentation does not even mention C++ emscripten usage, it presents OpenCV.js only. Calling opencv functions from JS is not very interesting from our point of view, plus OpenCV.js is inconvenient and poorly documented compared to OpenCV C++ or Python API. It’s much more interesting to build CV C++ algorithms in emscripten. Such C++ algorithms, if written well, are cross-platforms, and can be developed on desktop and later ported to mobile, front-end or embedded.

Is it possible to have both? Can we create a custom C++ code, which also exports some OpenCV stuff like cv::Mat to JS? Probably yes, with some effort, but for beginners it is much simpler to call OpenCV stuff from C++ only, and pass images from JS to C++ and back as explained in the previous chapter.

How slow is OpenCV emscripten, compared to desktop OpenCV on the same computer? It depends on the OpenCV function, but here is an example. We run Lucas-Kanade sparse optical flow cv::calcOpticalFlowPyrLK() for 400 points, and the same parameters, on the same laptop both on desktop and web browser. Our results:

    Native C++ (desktop)           WASM, Chrome   WASM, Firefox
~ 1 ms ~ 24 ms  ~ 90 ms

24-90 times, not a small difference! That is what we meant before about “custom algorithms being slow”!

Disclaimer: This applies to the default opencv WASM build with emscripten 2.0.10. It is probably single-thread. A better optimization is likely possible if you really dig into the problem, but it’s far from trivial. As a result, the web browser on your modern computer is slow ‘Like Raspberry Pi 1’ as far as CV algorithms are concerned, thus only the most lightweight ones can be successfully deployed in a web browser.

Deep Learning in a Web Browser

Nowadays, CV is mostly about neural networks, at least if you get your information from blogs and youtube channels. Can you deploy neural nets in a web browser? And how efficient is it? Short answers are: “yes”, and “very inefficient”. 

All serious neural nets use GPU (or sometimes TPU). Can a web browser use GPU? Yes, but only in the form of WebGL (web OpenGL) and not CUDA. You probably have never heard of neural networks using OpenGL on desktop, only CUDA, right? Do you wonder why? The answer is obvious: OpenGL is made for 3D rendering, not numerical calculations, and is very inefficient for neural networks compared to CUDA (on the same GPU). You’ll see some examples below. Likewise, CPU inference (in WASM) is slower than the machine-native CPU code.

Which DL frameworks are available for the web browser? We know two: TensorFlow.JS (Google) and ONNX Runtime Web (Microsoft). Both frameworks support webgl (default) and CPU inference.

TensorFlow.JS is “TensorFlow for the web”, with a JS API similar (but not identical !) to python TF+keras. It has its model format (BIN+JSON), different from TF and Keras models. It is a relatively heavyweight library with lots of utilities. Apparently, you can even train networks in a browser.  Needless to say, when we first looked at TensorFlow.JS, we were somewhat surprised. We expected a minimalistic TFlite (like on mobile platforms) but instead found something heavyweight and completely original. TFlite API also exists for the web, but if we are not mistaken, it requires full TF.js anyway. Supposedly TF and Keras models can be converted to TF.js format, but it does not always work in practice; plus we had to edit the JSON file by hand to make anything work. 

The good thing about TF.js is that it has a lot of auxiliary stuff. For example, you can create tensors from HTML <img> and <canvas> elements (automatically converting RGBA to RGB !). You also have a numpy-like tensor algebra which you can use for operations like normalization, image resize, or data type conversion. The problematic thing is that in TF.js (when using WebGL), you have to release all tensors by hand (tf.dispose()) or with the special wrapper tf.tidy(), otherwise you’ll get a catastrophic GPU RAM leak!

The other framework ONNX Runtime Web is pretty much the opposite. It is small, compact, minimalistic, and only supports ONNX format. It is good for deploying PyTorch networks (and nowadays, almost all modern neural nets are in PyTorch), as most PyTorch networks can be converted to ONNX, but not every ONNX can be further converted to TF. ONNX Runtime Web does not have tensor algebra, so you will have to implement all auxiliary operations (normalization, type conversion, RGBA->RGB) yourself (in pixel-wise JS loops) or use some other libraries.

The worst thing about ONNX Runtime Web is that it does not work. Or, rather, the original version 1.8.0 does (and the older ONNX.js), but all subsequent versions do not. The bugs are somewhere in WebGL shaders, since WASM inference works correctly. For some networks, the result is OK (e.g., torchvision ResNet 50), but for others (ResNet 18), it is completely crazy! What is the big difference between ResNet 50 and 18? Unfortunately, we didn’t have time to investigate deeper.

The most amazing thing is that several ONNX Runtime Web versions were released after 1.8.0, and they are all broken. Did nobody notice it?

For both frameworks, there is a common WebGL issue. It takes a long time to compile WebGL shaders. Thus, the very first “warm up” inference can take a few seconds. The following ones are fast, but only if the input tensor size does not change. If the network has a dynamic-sized input and the input size changes, the shaders will be recompiled. This issue is unavoidable, but a clever web developer can mask the webgl warmup with web page loading or something like that.

Finally, the speed. While we did not perform any formal test, here is what we got very roughly on the laptop with GeForce 1660 GPU (Note: unlike CPU and CUDA, WebGL inference times fluctuate wildly, even after the warmup), all on ResNet 50 from either torchvision or Keras. 

  PC
Browser (FireFox)
CUDA CPU WebGL WASM
Keras 90 ms
PyTorch 5.5 ms 60-70 ms
ONNX runtime 15 ms 50-350  ms 1000 ms
TFJS 260 ms

*Timing per one inference.

From what we see, WebGL (GPU) inference in a browser is about 15 times slower than native CPU, and about 50 times slower than CUDA. Speaking of the native CPU, ONNX runtime is way faster than PyTorch or Keras; we did not previously know that. These numbers mean that only relatively lightweight neural networks can be successfully executed in a browser unless you want inference time of many seconds.

Besides, there is a question of neural network size (the total size of their parameters in e.g. PTH or ONNX file). Modern neural networks are typically hundreds of megabytes or even gigabytes in size. The largest size practical for the front-end is perhaps about 20 Mb if you don’t want your webpage to load forever. Such super-small models are not easy to find. Please don’t expect to deploy a model from some 2022 state-of-the art paper in a web browser!

Other Technologies in the Web Browser

We’ll mention very briefly a few other web technologies which can be relevant to CV.

WebGL is available for 3D graphics, and it’s one of the “fast” technologies. Few people, however, would want to use WebGL directly. There are several convenient 3D graphics libraries that use WebGL, the most popular is Three.JS. Even Unity engine is available for the web (as an official Unity platform), based on WASM + WebGL.

WebXR is available for VR and AR (the previous specification WebVR has been deprecated and removed). But you cannot try it on your PC. WebXR requires an actual VR device, like Oculus Quest 2. On smartphones, it can do VR by showing two images on the screen, which can be viewed in 3D if you have a VR headset for your phone. Finally, it can do AR on your phone (no additional headsets required), but only if you have ARKit/ARCore, and still not all phones in existence have those. Maybe in a year or two, it will become widely available.

To Web or Not To Web?

Finally, we are ready to give the final answer to the question, “Should you put the CV algorithms on the front end?”. The answer may be different. If your CV algorithm is really lightweight, you can run it in a web browser. Otherwise, be ready for playing with your favorite neural net or heavy custom pipeline. It is much more efficient (10-50) times to run stuff on a native platform (Intel, ARM) compared to the browser. Thus, you need to always consider writing mobile applications or at least client-server web ones to control the distribution of the computational resources for heavyweight CV algorithms.

Can things get better in the future? Will the “native” and “web” worlds somehow converge?

On one hand, there are big challenges. Flashy demos for some new “fast” technologies can look very cool, but, as explained above, if we want original CV stuff, we need to write custom algorithms, which are in the “slow” category. And it is likely that WASM will always be slower than the native CPU. Neural network inference in the web browser is currently very slow compared to the native platform, but this can be easily fixed by creating new web technologies (think e.g. native-CPU ONNX runtime built into all browsers). On the other hand, browser platform is very important for rather popular Metaverse and the extended reality (XR) concepts, thus there is a strong motivation for improvement.

The world of the web tends to develop slowly (adoption of new web specifications take years), but it is likely that web browser will become a mature platform in the long term (10-20 years). We are cautiously optimistic about it.

Computer Vision in a Web Browser: Basics

Are you interested in Computer Vision (CV)? Probably yes, if you are reading this. If you read CV tutorials, you might have noticed that most of them are in Python. This applies to both traditional CV (without neural networks) and, even more, to deep learning (neural networks). Occasionally, CV tutorials use C++ instead of Python, but any other programming languages are very rare. The fact is, Python is known as THE language for research and development, math, CV, ML, DL, education, and a quick prototyping.

But what if we want to deploy our CV algorithm somewhere, i.e., to use it in real life? Then very often we will find python impossible or very difficult to use. C++ is better: it is available almost everywhere. Android and iOS platforms have their own languages: Kotlin/Java and Swift/Objective C, respectively, while Web Browsers have JavaScript (JS). But all three platforms (Android, iOS and Web) can integrate C++ code as well.

This article will introduce Computer Vision in a web browser for dummies. Note: we are talking specifically of web browsers (front end), not web servers (back end)! First, we want to run a C++ code in a browser, in particular a C++ code that uses the OpenCV library, the most popular tool in the computer vision community. Second, we want to run some neural networks in a web browser.

Disclaimer: Our background is in CV and ML, not web development. We might still be missing some technical details on the web side of things. And we deliberately skip many topics which belong to the “pure front end” and not CV, such as JS modules, bundlers, frameworks, DOM model, etc. However, minimal knowledge of JS and front-end development will definitely help you understand this article better.

CV in Front-End or Back End?

Before we start, there is an important question. Should we run CV algorithms in the front end (browser) or the back end (server)? The back end can give you much higher computational power. But you’ll pay for it, and if a million users use your website, the cost adds up quickly. If you want to take the back-end approach, there are other things to consider.  

The first is latency (delay). It often takes time for the data to travel through the internet, often up to half a second or even more. There are both physical reasons for the latency, like the finite speed of light (especially relevant for satellite connections), and other reasons, like the large number of switches and routers which retranslate your signal (never instantly). This is usually not a problem when you want to process a single image. Video is another matter. The latency doubles if the signal has to go two ways (from browser to server and back). Add to this the latency of the algorithms themselves (on the server), and you can get a pretty noticeable delay (e.g., of the order of a second), which will make your beautiful web application not so beautiful anymore.

The second problem is video streaming. Many people think it’s trivial, but it’s not. Web browsers are not made for streaming. Especially not for real-time streaming. 

But wait, what about YouTube or Netflix? It is not the same at all. They are not real-time (in fact, with quite a lot of buffering) and go one way from server to browser. Basically, the only “good” streaming option for the browser is WebRTC, but it’s made for browser-to-browser P2P connections and is extremely painful to implement on the server side. It also thinks in terms of “streams” and is not very friendly to any CV algorithms processing video frame-wise. Other options like WebSockets are much more server-friendly and programmer-friendly. Still, they use very inefficient video codecs like MJPEG (since they cannot access the built-in video codecs of the browser). And finally, two-directional video streaming can be simply problematic on slow networks due to the network load.

CV in the front end has its downsides. As we’ll see below, a web browser is simply not a powerful enough platform for heavyweight algorithms. It is especially true for neural networks. Typical modern neural networks are both too large (hundreds of megabytes) and too slow to be deployed in a browser.

To summarize this chapter:

  • For heavyweight algorithms, there is no choice: back end.
  • For processing a single image (e.g., applying effects to a photo), back end is OK.
  • For real-time video processing, it’s very hard to create a working solution with a back end, use the front end if possible.
  • Desktop or mobile apps utilize your hardware much more efficiently than the web browser, giving you 10-100 times more power (see examples in the following chapters). 

Web Browser as a Virtual Platform

While you probably did not think about it, a web browser is a platform, much like Android, iOS or Raspberry Pi. But it runs on your PC or phone, so it is a virtual device on your host system, which can be compared to an Android emulator or perhaps some PlayStation or Nintendo emulator. Web Browser would NEVER run a third-party machine code of your host machine architecture (Intel or ARM), except in browser plugins, which seem to be dying out nowadays. Instead, it has a virtual engine, or actually, more like two virtual engines (for modern browsers): JS engine and WASM engine.

JS engine runs JS code natively, without a compiling step (actually, there is a JIT compiling and many optimizations under the hood). The other engine is WASM (for WebAssembly), a machine code type. C++ and other languages can be compiled into WASM and executed in a web browser. However, WASM is not the machine language of your host. Thus, the same C++ code runs many times slower in a web browser than the same C++ code built for the host and always will in the future. By the way, if you ever hear of something called “Asm.JS,” just ignore it; it is deprecated since WASM was introduced.

As a virtual platform, the Web Browser has a lot of artificial limitations, motivated mainly by web security. Compared to other platforms (desktop, mobile, Raspberry Pi, etc.) it is probably the most painful platform to develop for.

  • You cannot access your host file system. Files can be accessed only via file chooser dialogs.
  • Many things, including the camera, require HTTPS. HTTPS is only possible if you have a certificate. 
  • Cannot autoplay videos with sound.
  • Mobile browsers have no console, and a localhost server is typically not available; thus, developing and testing for mobile browsers is much harder compared to desktop ones.
  • Cannot access different remote servers freely due to CORS issues.

Browsing Fast and Slow

One can say that a web browser turns your latest expensive PC or phone into a Raspberry Pi 1. However, it’s only half true. Some things are pretty fast in a browser. These are the things implemented as a part of the browser code itself, written in C++ and well-optimized. In contrast, any custom code of yours, whether in JS or WASM, will run pretty slowly.

Fast (or at least reasonably fast) operations, built-in into the browser:

  • Image operations using <img> and <canvas> tags, including JPEG and PNG codecs.
  • Video and audio operations using <video>, <audio> tags, including a number of codecs.
  • 3D graphics with WebGL.
  • Audio/Video streaming with WebRTC.
  • Presumably (but I didn’t test myself) WebXR.

Slow: Any custom algorithms written by you, or part of third-party JS or C++ libraries:

  • Any custom code in JS.
  • Any custom code in WASM (usually compiled from C++).
  • It includes OpenCV operations.
  • Neural Network inference.
  • Any JS library, installed by NPM or otherwise.
  • Any cross-platform C/C++ libraries compiled to WASM, like ffmpeg.js.

The fast operations are regularly advertised and showcased in beautiful demos. However. In real life, if you want to create something original, fast operations are often not enough. At some point, you will have to write your own custom algorithms in either JS or C++, and they will be very slow.

The fast operations tend to be extremely restrictive, often surprisingly so. Take for example the <video> tag. It is probably something like the combination of VideoCapture and VideoWriter of OpenCV, right? Nope! In fact, the <video> tag is almost useless for CV applications for the following reasons:

  • It cannot break the video into individual frames (no “next frame” callback).
  • Seeking a given position is supposed to exist but does not seem to work on Chrome.
  • It is strictly real-time and cannot wait while you process a frame (you cannot process a video file slowly). 
  • It cannot encode a sequence of frames into a video stream.

Basically, the <video> tag is good at only one thing: showing a video in your browser. Not for CV. WebRTC, by the way, has similar limitations and can hardly be connected to any front-end CV. What to do then if you want to process a video? None of the options are perfect, but still:

  • You can try to use the <video> tag anyway, but you might lose frames and have an irregular FPS with possible non-deterministic outputs. 
  • A library ffmpeg.js can be used, but it’s a part of the “slow world”, heavyweight and complicated.
  • New WebCodecs API as an option, however  it’s still not widely supported (nor is it easy).

How to Compile C++ to WASM Using Emscripten

WASM is one of the official LLVM (aka clang) toolchains. Does it mean that you can compile LLVM-supported languages, such as C and C++, into WASM? In theory, yes. In practice, some additional code is needed for a user-friendly porting of C++ code into a web browser. Such functionality is provided by emscripten, which is basically LLVM wasm toolchain with a good port of the C++ standard library, plus some extras, including some web-only functions and macros usable from C/C++ via emscripten.h. OpenGL C++ API is also available (implemented via WebGL).

To compile a C++ code with emscripten, use em++ instead of g++, or, for a real project, use wrappers like emcmake, emconfigure, emmake. For example, to build a cmake project:

mkdir build
cd build
emcmake cmake ..
emmake make

In theory, you can port (almost) any C++ code to a web browser using emscripten. In practice, there are many technical details. Instead of an executable, emscripten generates a pair of JS+WASM files (e.g., hello.js, hello.wasm). From the point of view of cmake or make, they are ‘executable’, not ‘library’. That word applies to static C++  *.a libraries that can also be built by emscripten. However, our ‘executable’ might not even have the main() function, and it can contain other functions callable from JS, so from the point of view of JS, the JS+WASM pair works library-like, as a JS script with functions. Emscripten builds a JS script by default; if you want to build a JS module, use “-s EXPORT_ES6=1 -s MODULARIZE=1” flags. It’s not very convenient to access your browser window from WASM (with a few exceptions, like WebGL). So most often, WASM code contains some algorithms called from a GUI written in JS. We assume such architecture in the following. Here is a minimal emscripten C++ example. Let’s call it mymul.cpp:

#include <iostream>
#include <emscripten.h>
extern "C" { 
       EMSCRIPTEN_KEEPALIVE double mymul(double x, double y){ 
            double z = x * y; 
            std::cout<<"C++:"<<x<<"*"<<y<<"="<<z<<std::endl;
            return z; 
       } 
} 

It’s a pretty standard C++ code, but a couple of things need explaining. First, the EMSCRIPTEN_KEEPALIVE macro ensures that function mymul() is not removed during linking, and thus it can be used from JS. Second, extern “C” ensures that the function mymul() is called _mymul, without C++ name mangling. By the way, where does cout print to? It’s the browser console. Let’s compile this code:

em++ -o mymul.js mymul.cpp

We get two output files: mymul.js and mymul.wasm. Now you can import mymul.js via the <script> tag in your webpage and use the function  Module._mymul(), or simply _mymul(), in your JS code, for example, _mymul(7.1, 3.0). 

It is an example of calling a C++ function directly from JS. This is the simplest, and most reliable way, but the argument types are very limited: a primitive or a C++ pointer (treated by JS as a number). There are other options. Emscripten functions cwrap()/ ccall() give some support for JS arrays and strings, and embind (a cousin of nbind and pybind) is a powerful framework that wraps various C++ types, including classes, into JS. Such higher-level options can seem attractive, but if you do not understand their mechanics fully, you can easily get a C++ memory leak (which is very bad) or unnecessary copying of a large array (which is slightly bad).

There are some more technical details you should know about emscripten:

  • C++ heap: The default C++ heap is very small. You will likely have to increase it, or alternatively to allow automatic growth.
  • C++ exceptions: Disabled by default for the sake of performance. You can allow C++ exceptions explicitly via either JS exceptions (slow) or WASM native exceptions (new, experimental).
  • Files and console: Remember that the browser cannot access your host filesystem. Standard streams like cout and cerr use browser console.
  • C++ threads: Originally, WASM was strictly single-thread. Nowadays, you can use multiple threads via WebWorkers, but have to enable such options explicitly.
  • Emscripten runtime loading: C++ functions are not available immediately on webpage load, you’ll have to wait until the Emscripten runtime initializes. JS modules can do this in a more controlled way.

In the follow-up article, we are going to dive deeper into practical aspects of running classical computer vision algorithms as well as convolutional neural networks in a web front-end.

Computer Vision in the Food Domain

Surprising but true: according to market research, customers prefer apples with a maximum diameter of 75 to 80 mm 🍏 Now you know 🙂 People would obviously struggle to accurately evaluate fruits’ size with their naked eyes. In contrast, computer vision (CV) systems can measure the precise diameter of an apple in the blink of an eye, literally.

CV systems can collect and process a variety of parameters, including size, weight, shape, texture, color, and much more. So how exactly are these systems used in the food domain today? Let’s find out.

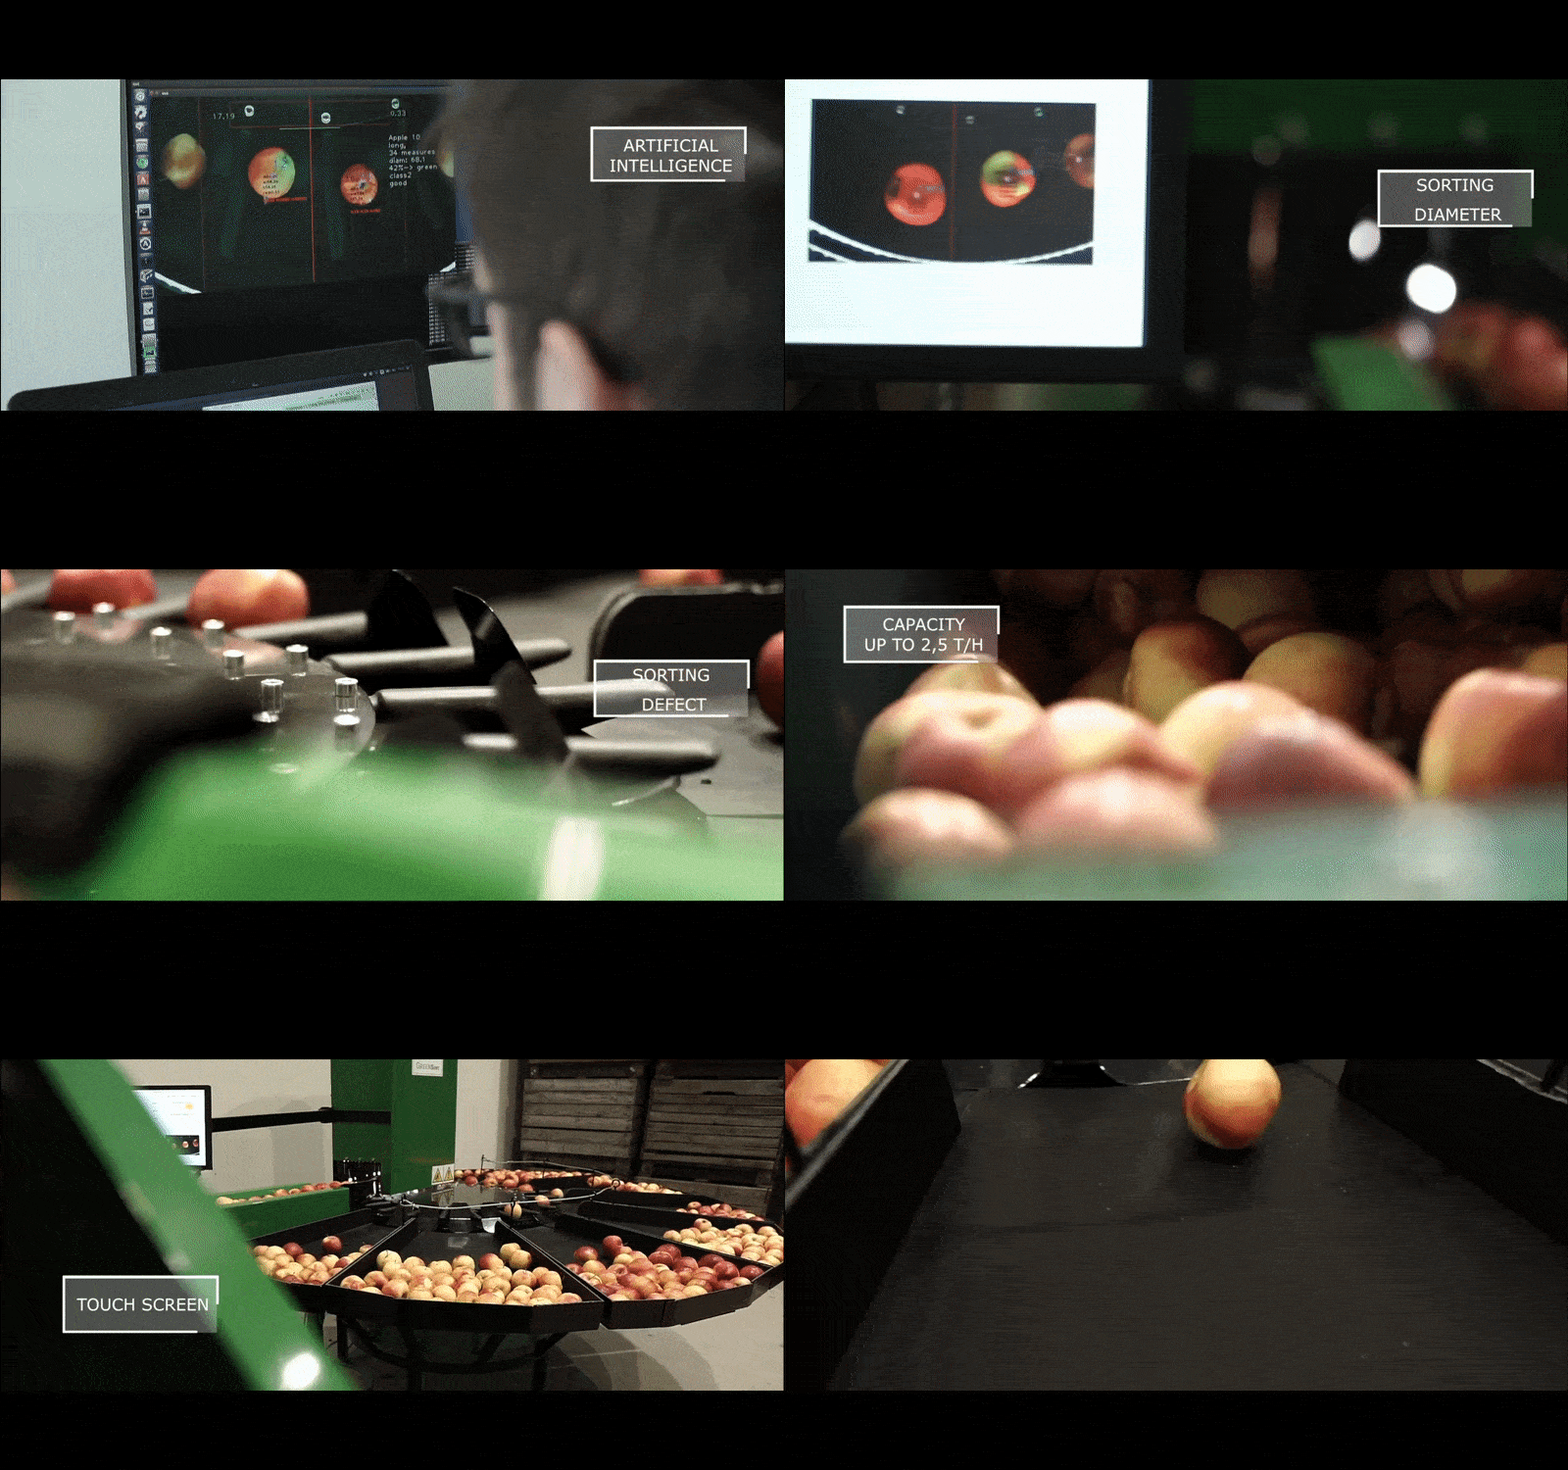
AI-based apple sorting machine – demo source

Where and How Vision Can Help: Use-Cases and Advantages

When it comes to the food and beverage segment, it is more common to hear the term “machine vision” (MV) than computer vision. What is the difference?

Though the essential components of vision-based systems are generally the same (digital cameras and image processing software), CV and MV are different terms for overlapping technologies. MV systems traditionally work in manufacturing and practical applications for quality control, inspection, and guidance. At the same time, CV systems are self-contained and do not require the use of a larger machine system, as they go way beyond image processing. In CV terms, an image doesn’t even have to be a photo or a video; it could be an ‘image’ from a thermal or infrared sensor, motion detector, or other sources. 

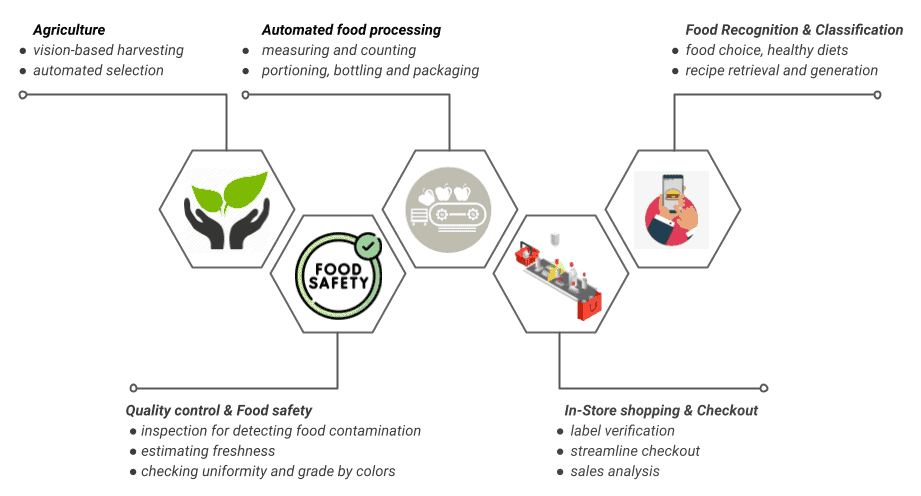
The current trends and benefits of using vision systems for the food can be summarized as follows:

As you can see, there is a lot to do. While it may appear that most active development is reserved for industry, smart food technology is becoming increasingly accessible to end users. Let’s focus now on the most popular such examples.

How to Cook This Dish or A few Words about Cross-Modal Recipe Retrieval

The recommendation of recipes along with food might be the next “Shazam” for food, but, unfortunately, it still seems technically challenging. The problem of recipe retrieval comes from two aspects. First, current food recognition technology can only scale up to a few hundreds of categories, making it impractical to recognize tens of thousands of food categories. Second, even within a single food category, recipe variants may differ in ingredient composition. Finding the best-match recipe thus requires ingredient knowledge, which is a fine-grained recognition problem.

A good run-time example is the Vivino app, the label scanner, which can bring up all the information you need about the wine with a simple photo of a bottle. If you’re trying to make a snap decision in a bottle shop or supermarket, you can find out if the bottle you’re holding is a good deal or if it has the type of smoothness or dryness you’re looking for in a wine. Another plus is that it enables price comparison.

Vivino app – source

Creating New Recipes Based on Consumers’ Trends and Preferences

Today, consumers are increasingly looking for a variety of tasty options for healthy eating. To meet these expectations, entire menus must be reinvented, making it challenging to create new recipes constantly. Fortunately, this problem is now solvable.

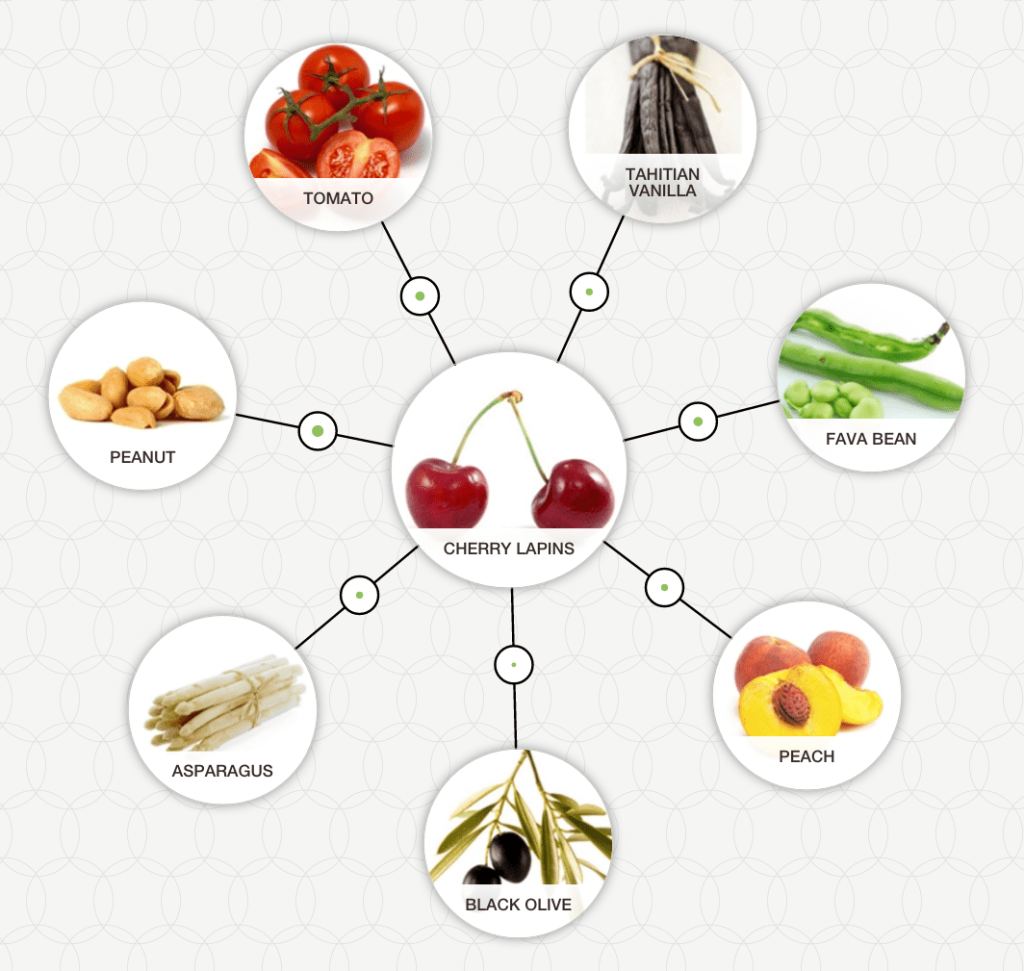
The Foodpairing application enables analyzing and determining the compatibility of various food ingredients or discovering your flavor and creating new recipes. It has emerged as a result of multi-disciplinary knowledge from flavor science, food science experts, AI/ML domain, and consumer research. Even if you are too far from the art of cooking, try to play with a variety of interesting and tasty combinations for fun 😉

Image source

Food Tracking

Food image recognition apps may help improve your food ration by utilizing AI to tell you exactly the nutritional value of what is on your plate. Simply take a picture of your meal, and a food recognition platform will tell you exactly what it contains, including the main ingredient, side dishes, and even sauces.

Such programs can estimate portion sizes, nutrition, and calories, which is ideal for those who care about their health and keep their bodies in good shape. For example:

Real-time detection mode (left) and nutrition analysis from the local gallery (right)
on the FoodTracker app –
source

To Sum Up

As it is in many other industries, AI is making huge waves in the food and beverage field. More and more companies recognize the potential of vision-based systems to improve efficiency and profitability, reduce losses, and protect against supply chain disruptions. This has resulted in the increased adoption of smart technologies in food production. And while it is having a significant impact in the industry, we are still in the early stages of its application as the end-users. Due to the costs associated with their implementation, such technologies are currently used primarily by large manufacturers. However, it is unavoidable that AI will one day become ubiquitous throughout the industry and more accessible to everyone.

Computer Vision for Beginners

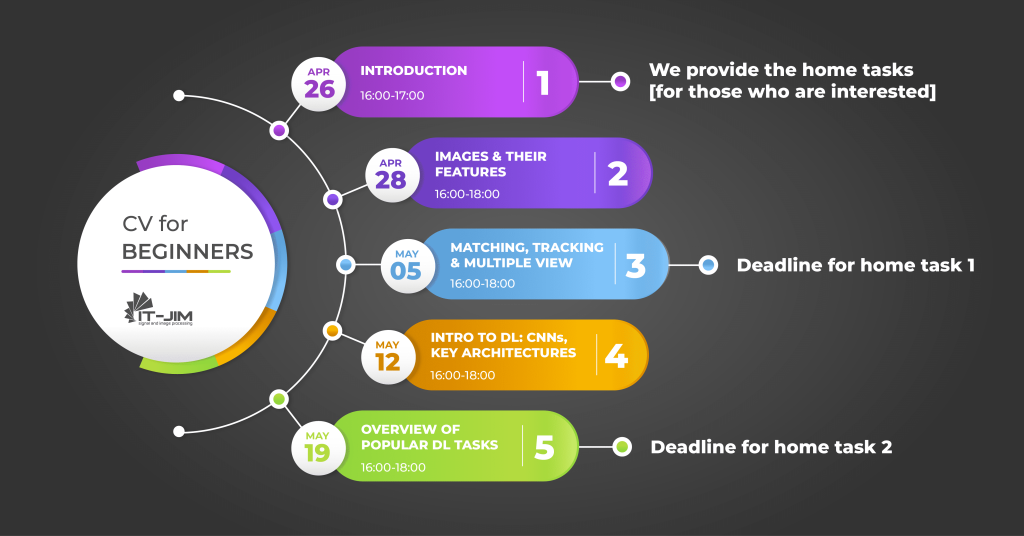
We introduce a FREE 4-week Computer Vision Course. Based on our previous practices and taught by our leading engineers, it will give you a sound knowledge base both in classical computer vision algorithms and deep learning approaches.

Lecturers: Pavlo Vyplavin, CTO, and Yuriy Chirka, Head of ML.

Registration lasts until April 22, 2022: https://bit.ly/3O8hpnu 

Who would benefit from this course? 

Students who have had their studies cut short, teachers, programmers, or anyone interested in computer vision, machine learning, and deep learning but have not yet given it a try. 

When, where and how?

The course will begin on April 26, 2022 (Tuesday) with an introductory lecture. Technical lectures will be held every Thursday at 16:00 and will last 1.5-2 hours each. The last lecture will take place on May 19, 2022.

Computer Vision for Beginners

After settling at new places and putting everything on the working track, we understood something was missing: we hadn’t done any educational activities for a long time…

Computer Vision for beginners

While a new edition of our trainee program is paused, we decided to offer everyone a free 4-week course on computer vision. Based on our previous practices and taught by our leading engineers, it will give you a sound knowledge base both in classical computer vision algorithms and deep learning approaches.

Who would benefit from this course? 

Students who have had their studies cut short, teachers, programmers, or anyone interested in computer vision, machine learning, and deep learning but have not yet given it a try. 

What, when, where, and how?

The course will start on April 26, 2022, with a 1-hour opening lecture followed by four 2-hour technical lectures on Thursdays until May 19, 2022. All the events will start at 4 PM UTC+3.

After registration and no later than April 24, you will receive a link to join the event. The course will be in Ukrainian and Russian.

This time, there won’t be any selection process; the course is open to everyone. We will assign a couple of home tasks during the course and invite those of our participants who provide us with promising solutions for an interview for a trainee position.

Support people in need

While the course is entirely free, we kindly ask you to support Ukrainians who have suffered from war or fearless volunteers helping civilians all across our country. We will later provide more information and gladly double your donations.

Apply before April 22

Please fill in the form below before April 22, 2022. There, we ask about your technical background to tailor the course to most listeners. 

It-Jim Receives Platinum Award from Kharkiv IT Cluster 🏆


Our team has been recognized by Platinum Award from Kharkiv IT Cluster for successful contribution to Kharkiv IT Ecosystem development 🏆

The award ceremony took place on December 20, 2021, as part of the Kharkiv IT Cluster’s general meeting for members and partners. The event was dedicated to the presentation of the Kharkiv IT community’s achievements in 2021, and it brought together leaders and partners from approximately 100 IT companies.

The award depends on how the company joins the cluster’s activities in different directions. Participants and partners received awards from Kharkiv IT Cluster in the following nominations:

🔷 Participation in charitable initiatives within the IT4Life project,
🔷 Activity in educational projects,
🔷 Awards for personal contribution to the improvement of the region.

We are proud to be a part of the local IT community and are encouraged to continue the trend of working on new projects that improve our world 💪


Computer Vision Trainee Program

The program is a perfect match for:
🎓 engineering students
💻 software developers who want to switch to the CV / ML / DL domain

It lasts up to 2 months and gives you a chance to work on a real CV project under the personal guidance of an @It-Jim expert.

At the end of the program, successful candidates will have the opportunity to continue working at the company 🤝

🔥 Apply with the form by December 27, 2021

A C++ Mini-Tutorial on MediaPipe

What MediaPipe Really Is: a C++ Mini-Tutorial


As we already explained, MediaPipe is a C++ pipeline library. It is very poorly documented, basically, the only documentation is the comments and docstrings in the MP source code. There are also examples, but they are not very readable. There is only one trivial “hello world” example, the rest is deep learning, which is counterproductive for learning basic MP concepts.  Moreover, these examples are artificially obscured by things like GLog and GFlags. So we had to learn MP the hard way while dealing with the Bazel issues. This kind of low-level MediaPipe work is exactly what later enabled us to build production-grade computer vision pipelines for demanding domains like motion analysis and performance tracking in professional sports.

As a result, we wrote the following tutorial: https://github.com/agrechnev/first_steps_mediapipe. It gives a gentle introduction to the basic MediaPipe C++ API (no deep learning or solutions). Below we give a very brief summary of this tutorial, see the actual code for more details.

The core MP concepts (unlike the C++ API) are pretty well explained in the official MP docs. The basic terminology:

  • Packet: An immutable data packet of an arbitrary type (with a timestamp). MP also has standard types for image and audio.
  • Graph: The pipeline, represented as a graph.
  • Node: A node of the graph, which processes data.
  • Stream: Graph edge, a stream of packets with monotonously increasing timestamps.
  • Calculator: A registered class for creating nodes.

First example

How does it work in practice? Let’s look at our first example 1.1. It deals with packets of doubles (using more complicated types, like images would be very wrong for first examples). Let’s define a very simple graph, as a Protobuf text string:

string protoG = R"(
    input_stream: "in"
    output_stream: "out"
    node {
        calculator: "PassThroughCalculator"
        input_stream: "in"
        output_stream: "out1"
    }
    node {
        calculator: "PassThroughCalculator"
        input_stream: "out1"
        output_stream: "out"
    }
    )";

It has two nodes of PassThroughCalculator. What does it do? Basically nothing, it forwards all input data packets to the output. The graph has input stream in, output stream out, and there is one more stream out1 in the middle. The graph looks like this (visualized by the MP visualizer):

Next, we parse the config and create our graph.

mediapipe::CalculatorGraphConfig config =
  mediapipe::ParseTextProtoOrDie<mediapipe::CalculatorGraphConfig>(protoG);
mediapipe::CalculatorGraph graph;
MP_RETURN_IF_ERROR(graph.Initialize(config));

Next, we should add an observer to process output packets of a graph asynchronously (synchronous processing is also possible if needed). Then we start running the graph:

auto cb = [](const mediapipe::Packet &packet)->mediapipe::Status{
  cout << packet.Timestamp() << ": RECEIVED " << packet.Get<double>() << endl;
  return mediapipe::OkStatus();
}
MP_RETURN_IF_ERROR(graph.ObserveOutputStream("out", cb));
MP_RETURN_IF_ERROR(graph.StartRun({}));

At this point, the graph starts running. It is now waiting for the input packets. But wait, we did not supply any! This is what we do next. The packet is sort of like an immutable shared_ptr<any>, plus a timestamp. It can hold data of any type. The timestamps in a stream must increase monotonously. Of course, they don’t have to be absolute timestamps since the epoch. Let’s send a few double packets, then “close the stream” to tell MP that no more packets are coming.

for (int i=0; i<13; ++i) {
  mediapipe::Timestamp ts(i);
  mediapipe::Packet packet = mediapipe::MakePacket<double>(i*0.1).At(ts);
  MP_RETURN_IF_ERROR(graph.AddPacketToInputStream("in", packet));
}
graph.CloseInputStream("in");

Adding the timestamp is crucial, MP will not work otherwise! Now let us wait for MP to process all packets and finish.

MP_RETURN_IF_ERROR(graph.WaitUntilDone());
return mediapipe::OkStatus();

That’s it, we are done!

Writing a custom calculator

Let us now write a custom calculator (example 1.2). Our calculator will multiply a double number by 2, aka “double the double”. A custom calculator must be defined in the mediapipe namespace and registered with the REGISTER_CALCULATOR() macro. After that MediaPipe finds the calculator by name (as specified in the Protobuf graph description), there is no need to import any header for the calculator class. 

Every calculator must implement the static method GetContract() to describe inputs and outputs (streams in MP can have numbers, string tags, or both); and implement the method Process() which process each incoming packet (or, in, general, a synchronized bunch of packets with the same timestamp). Methods Open() and Close() are typically also overridden. The code for “double the double” calculator is:

namespace mediapipe{
class GoblinCalculator12 : public CalculatorBase {
public:
static Status GetContract(CalculatorContract *cc) {
  using namespace std;
  cc->Inputs().Index(0).Set<double>; 	// 1 double input
  cc->Outputs().Index(0).Set<double>;	// 1 double output
  return OkStatus();                   	// Never forget to say "OK" !
}

Status Process(CalculatorContext *cc) override {
  using namespace std;
  Packet pIn = cc->Inputs().Index(0).Value();	// Receive the input packet
  double x = pIn.Get<double>();     	// Extract the double number
  double y = x * 2;                        	// Process the number
  Packet pOut = MakePacket<double>(y).At(cc->InputTimestamp()); // Create packet
  cc->Outputs().Index(0).AddPacket(pOut);  // Send it to the output stream
  return OkStatus();             	// Never forget to say "OK" !
}
REGISTER_CALCULATOR(GoblinCalculator12); 	// Register this calculator
}

Example 1.3 contains further examples of custom calculators.

Can you configure a calculator? MP gives a few ways to do that:

  1. Options: Parameter specified in the Protobuf graph definition, see example 1.4.
  2. Side packets: Input and output data packets that are sent only once (and not for each timestamp). Example 1.5.
  3. Extra stream: This can contain options for each timestamp. For example, stream 0 for video frames, and stream 1 for crop boxes of some sort. Example 2.3.

Let’s process images

Now let’s process images (and a stream of images is actually a video). Once you’re comfortable with image and video streams at this level, extending the pipeline to full-body keypoint detection and temporal pose tracking becomes a natural next step.

MP has a special type for images, ImageFrame. It can be converted back and forth to cv::Mat. Example 2.1 is a trivial example with PassThroughCalculator, but with video data. The graph is simple:

string protoG = R"(
    	input_stream: "in",
    	output_stream: "out",
    	node {
        	calculator: "PassThroughCalculator",
        	input_stream: "in",
        	output_stream: "out",
    	}
    	)";

Our Observer callback now converts the packet to cv::Mat and displays the image on the screen.

auto cb = [](const Packet &packet)->Status{
    	cout << packet.Timestamp() << ": RECEIVED VIDEO PACKET !" << endl;
    	// Get data from packet (you should be used to this by now)
    	const ImageFrame & outputFrame = packet.Get<ImageFrame>();
    	// Represent ImageFrame data as cv::Mat (MatView is a thin wrapper, no copying)
    	cv::Mat ofMat = formats::MatView(&outputFrame);
    	// Convert RGB->BGR
    	cv::Mat frameOut;
    	cvtColor(ofMat, frameOut, cv::COLOR_RGB2BGR);
    	// Display frame on screen and quit on ESC
    	// Returning non-OK status aborts graph execution
    	// I'll make a nicer quit in later examples
    	cv::imshow("frameOut", frameOut);
    	if (27 == cv::waitKey(1))
        	// I was not sure which Abseil error to use here ...
        	return absl::CancelledError("It's time to QUIT !");
    	else
        	return OkStatus();
	};

Note that we return an error code for a smooth quit from the application if the ESC key is pressed. If the Observer callback returns an error, the whole MP graph stops.

Now we take frames from the camera, convert them to ImageFrame, and send them to MP in an endless loop, which we break out of on a failed MP_RETURN_IF_ERROR() check:

for (int i=0; ; ++i){
    	// Read next frame from camera
    	cap.read(frameIn);
    	if (frameIn.empty())
        	return absl::NotFoundError("CANNOT OPEN CAMERA !");
    	// Convert BGR to RGB
    	cv::cvtColor(frameIn, frameInRGB, cv::COLOR_BGR2RGB);
    	// Create an empty RGB ImageFrame with the same size as our image
    	ImageFrame *inputFrame =  new ImageFrame(
        	ImageFormat::SRGB, frameInRGB.cols, frameInRGB.rows, ImageFrame::kDefaultAlignmentBoundary
    	);
    	// Copy data from cv::Mat to Imageframe, using
    	// MatView: a cv::Mat representation of ImageFrame
    	frameInRGB.copyTo(formats::MatView(inputFrame));
    	// Create and send a video packet
    	uint64 ts = i;
    	// Adopt() creates a new packet from a raw pointer, and takes this pointer under MP management
    	MP_RETURN_IF_ERROR(graph.AddPacketToInputStream("in",
        	Adopt(inputFrame).At(Timestamp(ts))
    	));
	}

Our further video examples:

  • 2.2: Video pipeline with ImageCroppingCalculator and ScaleImageCalculator
  • 2.3: Video pipeline with ImageCroppingCalculator (dynamic crop)
  • 2.4: Video pipeline with FeatureDetectorCalculator and custom image processing. Here we write a custom calculator for processing images.

ImageCroppingCalculator, ScaleImageCalculator and FeatureDetectorCalculator are three standard image-processing calculators of MediaPipe. There are many more.

How to make MediaPipe real-time?

By default, MP is NOT real-time. It processes all packets deterministically, in the order of increasing timestamps, without loosing any packets. Any MP stream automatically has a buffer of unlimited size. This is fine if we want to process a video file offline.

As we all know, it is NOT acceptable for real-time pipelines. These real-time constraints become especially critical in applications where pose dynamics are used not just for visualization, but for quantitative analysis – for example, detecting subtle motor impairments or asymmetries over time. If we set up a real-time source of packets, and the pipeline is not fast enough to process them, the buffers will fill more and more, while increasing the lag, until they fill all RAM and your application crashes (Example 3.1). 

Is it possible to create a real-time pipeline in MP? Yes. There are several ways. The simplest (and used in Google deep learning examples) is to put a FlowLimiterCalculator at the beginning of the pipeline. This calculator has a second input stream, which should be plugged into the output stream of the pipeline. It then compares the timestamps of two streams. If they are too different, it means that the buffers start to fill up, and, above a certain threshold (which can be adjusted), FlowLimiterCalculator starts to drop packets. A typical pipeline from the Google face detection example is (output video is actually sent to the “FINISHED” input of FlowLimiter, but the visualizer does not show such connections):

The right panel shows the subgraph FaceDetectionFrontCpu, which is a typical TFLite inference pipeline.

Our example 3.2 demonstrates the use of FlowLimiter.

What’s next?

MediaPipe has the following modules, each with a number of standard calculators:

  • audio
  • core
  • image
  • tensor
  • tensorflow
  • tflite
  • util
  • video

In our tutorial we focused on the basic MP concepts, there are lots of things we did not cover:

  • We barely touched the standard calculators
  • Using GPU
  • Audio processing
  • Deep learning with TFLite or TensorFlow
  • Solutions
  • Input policies
  • Languages and OSes other than C++/Desktop

And we repeat our final verdict: MediaPipe would be very nice, if not for Bazel. Bazel (and all related issues) makes you think twice before deciding to use MediaPipe in your C++ project.


If you’re more into watching than reading – we have a YouTube lecture on MediaPipe. Enjoy!